J-Tech Digital JTECH-WEX200V3 Wireless HDMI Extender User Manual
Model: JTECH-WEX200V3
Introduction
The J-Tech Digital JTECH-WEX200V3 is a powerful wireless HDMI extender designed to transmit high-definition audio and video signals up to 200 feet (61 meters) without the need for cables. This system supports Full HD 1080p resolution and features dual antennas for stable transmission, an HDMI loop output on the transmitter, and IR passthrough for remote control of source devices.
Key features include:
Wireless extension of HDMI A/V signals up to 200 ft (61m) through obstructions.
Support for connecting one transmitter to two receivers simultaneously.
Ability to operate up to 4 independent sets in the same environment without interference by customizing SSID and 5GHz operating frequency.
Variable 5GHz frequency selection to avoid WiFi interference.
Low latency (0.1-0.2 seconds) suitable for video playback.
Full HD support: 60/50Hz @1080P, 60/50Hz@1080I, 60/50Hz @720P, 60/50Hz@576P, 50Hz@576I, 60Hz@480P, 60Hz@480I.
Important Safety Information
Do not expose this unit to water, moisture, or excessive humidity.
Ensure proper ventilation to prevent overheating.
Use only the provided power adapters.
Do not attempt to disassemble or repair the unit. Refer all servicing to qualified personnel.
Keep the device away from strong electromagnetic fields.
Package Contents
Please verify that all items are included in your package:
1x JTECH-WEX200V3 Transmitter Unit
1x JTECH-WEX200V3 Receiver Unit
2x DC 12V/1A Power Adapters
1x IR Blaster Cable
1x IR Receiver Cable
1x User Manual
Image: Contents of the J-Tech Digital Wireless HDMI Extender package, including the transmitter, receiver, power adapters, IR cables, and user manual.
Product Overview
Transmitter Unit (TX)
The transmitter unit connects to your HDMI source device. It features:
DC 12V Input: For power adapter connection.
IR Out: Connects to the IR Blaster cable to control the source device.
HDMI Input: Connects to the HDMI source (e.g., Blu-ray player, cable box).
HDMI Loop Out: Allows for a local display connection to monitor the source.
Reset Button: Short press to show Channel ID, press and hold for 3 seconds to change Channel ID.
Power/Status/HDMI LEDs: Indicators for power, connection status, and HDMI signal.
Receiver Unit (RX)
The receiver unit connects to your HDMI display device. It features:
DC 12V Input: For power adapter connection.
IR In: Connects to the IR Receiver cable to receive signals from your remote control.
HDMI Output: Connects to your HDMI display (e.g., TV, projector).
Reset Button: For system reset.
Power/Status/HDMI LEDs: Indicators for power, connection status, and HDMI signal.
Image: Detailed diagram showing the interfaces and ports on both the transmitter and receiver units of the J-Tech Digital Wireless HDMI Extender.
Image: Close-up view of the J-Tech Digital Wireless HDMI Extender Transmitter unit, highlighting its ports and indicators.
Image: Close-up view of the J-Tech Digital Wireless HDMI Extender Receiver unit, highlighting its ports and indicators.
Setup Instructions
1. One-to-One Connection
Connect your HDMI source device (e.g., Blu-ray player, set-top box) to the HDMI Input port on the Transmitter (TX) unit using an HDMI cable.
Connect your HDMI display device (e.g., TV, projector) to the HDMI Output port on the Receiver (RX) unit using an HDMI cable.
For IR control, connect the IR Blaster cable to the IR Out port on the TX unit and position the IR emitter near the IR sensor of your source device. Connect the IR Receiver cable to the IR In port on the RX unit and place the IR receiver in a location where your remote control can easily send signals to it.
Connect the provided 12V DC power adapters to both the TX and RX units and plug them into power outlets.
Ensure both units power on and the HDMI and Status LEDs indicate a stable connection.
Image: Diagram illustrating a one-to-one connection setup for the J-Tech Digital Wireless HDMI Extender, showing source, transmitter, receiver, and display connections.
2. One-to-Two Connection
The JTECH-WEX200V3 supports connecting one transmitter to two receiver units simultaneously, allowing you to display the same content on two separate HD displays.
Follow steps 1-4 for the first receiver unit as described in the "One-to-One Connection" section.
Obtain a second JTECH-WEX200V3 receiver unit.
Connect the second receiver unit to your second HDMI display.
Power on the second receiver unit. The transmitter will automatically detect and connect to both receivers.
Image: Diagram showing how one J-Tech Digital Wireless HDMI Extender transmitter can connect to two receiver units, enabling simultaneous display on two screens.
3. Multiple Pairs in the Same Environment
Up to 4 independent pairs of JTECH-WEX200V3 can operate in the same environment without interference. This is achieved by customizing the SSID and 5GHz operating frequency for each set.
Each transmitter and its paired receiver form an independent set.
Access the web interface of each JTECH-WEX200V3 set (refer to the Operating Instructions section for details).
Within the web interface, change the SSID and select a unique 5GHz operating frequency for each pair to prevent cross-interference.
Ensure sufficient physical separation between multiple sets to optimize performance.
Image: Floor plan diagram illustrating how up to four independent J-Tech Digital Wireless HDMI Extender pairs can be set up in different rooms within the same environment.
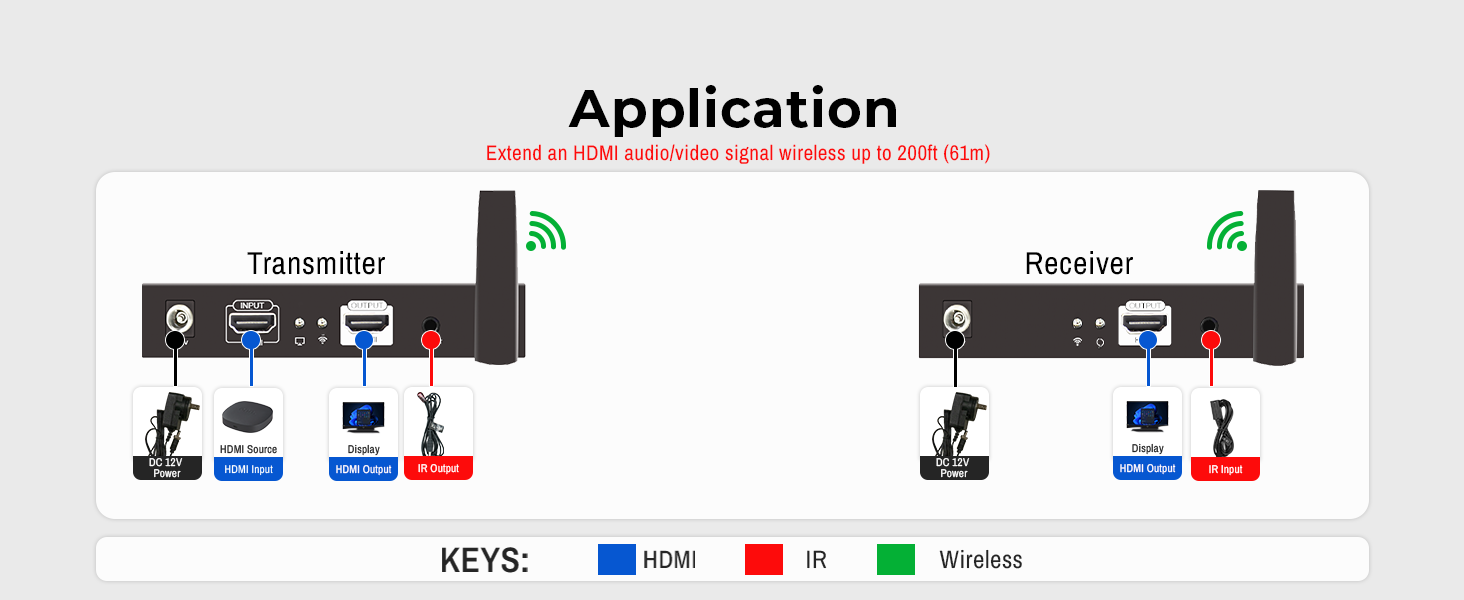
Image: Simplified diagram showing the application of the J-Tech Digital Wireless HDMI Extender, with a transmitter connected to a source and a receiver connected to a display, indicating wireless signal transmission.
Operating Instructions
Changing Channel ID / 5GHz Frequency
The JTECH-WEX200V3 allows users to select the operating channel to avoid interference from other 5GHz wireless devices. This is particularly useful in high-traffic wireless areas or when using multiple extender sets.
Via Reset Button: On the Transmitter unit, a short press of the 'Reset' button will display the current Channel ID. Press and hold the 'Reset' button for 3 seconds to change the Channel ID. The units will automatically re-sync.
Via Web Interface: For more advanced customization, including SSID and operating channels, access the JTECH-WEX200V3's web interface. The specific IP address and login details can typically be found in the full user manual (PDF) or by connecting the transmitter to a computer via Ethernet and checking network settings.
IR Passthrough Operation
The IR passthrough feature allows you to control your HDMI source device from the location of your display.
Ensure the IR Blaster cable is connected to the TX unit's 'IR Out' port and its emitter is positioned directly over the IR sensor of your source device.
Ensure the IR Receiver cable is connected to the RX unit's 'IR In' port and is placed in a clear line of sight from your remote control.
Point your source device's remote control at the IR Receiver connected to the RX unit. The signal will be transmitted wirelessly to the TX unit and then relayed to your source device via the IR Blaster.
Maintenance
Cleaning: Use a soft, dry cloth to clean the exterior of the units. Do not use liquid or aerosol cleaners.
Storage: If storing the device for an extended period, disconnect it from power and store in a cool, dry place.
Ventilation: Ensure the units have adequate airflow around them to prevent overheating. Do not block ventilation openings.
Troubleshooting
No Picture/Signal:
Check all HDMI cable connections between source, transmitter, receiver, and display.
Ensure both transmitter and receiver units are powered on and their power/status LEDs are illuminated.
Verify that the input on your display is set to the correct HDMI port.
Try power cycling both the transmitter and receiver units.
Ensure the distance between the TX and RX units is within the specified range (200 ft) and there are no major obstructions.
Audio/Video Sync Issues or Pixelation:
This product has a low latency of 0.1-0.2 seconds, which is generally good for video playback but may not be ideal for real-time shooting or PC gaming.
Try changing the 5GHz operating channel of the extender set to avoid interference from other wireless devices. Refer to the "Changing Channel ID" section.
Reduce the distance between the transmitter and receiver, or remove any significant obstructions.
Ensure your source and display devices are outputting/receiving supported resolutions (up to 1080p).
IR Remote Control Not Working:
Verify that the IR Blaster cable is securely connected to the TX unit's 'IR Out' port and the IR emitter is directly aligned with the IR sensor of your source device.
Ensure the IR Receiver cable is securely connected to the RX unit's 'IR In' port and is placed in a clear line of sight from your remote control.
Check the batteries in your remote control.
Some universal remotes or specific device remotes may have compatibility issues.
Specifications
Feature
Detail
Model Number
JTECH-WEX200V3
Product Dimensions
5.3 x 3.2 x 6.9 inches
Item Weight
2.33 pounds
Wireless Communication Standard
802.11ac
Connector Type
HDMI
Color
1x2 1080P Kit
Max Transmission Distance
200 feet (61 meters)
Supported Resolution
Up to 1080p (60/50Hz)
Latency
0.1-0.2 seconds
Manufacturer
J-Tech Digital
Country of Origin
China
Image: Diagram showing the physical dimensions of the J-Tech Digital Wireless HDMI Extender units.
Warranty and Support
Manufacturer Warranty
This J-Tech Digital product includes a 1 Year Manufacturer Warranty from J-Tech Digital, covering defects in materials and workmanship under normal use.
Technical Support
J-Tech Digital provides free lifetime technical support for this product. Our knowledgeable team is available to assist you with any questions or issues you may encounter.
Support Hours: Monday through Friday, 9 AM – 6 PM CST.
For contact information, please refer to the seller page on Amazon or the official J-Tech Digital website.
Image: Illustration of J-Tech Digital customer support, indicating availability for assistance.