
1. Product Overview
This manual provides instructions for the installation, operation, and maintenance of the Make Auto Parts Manufacturing Passenger Right Side Headlight Assembly, model MI2503110. This headlight assembly is a direct fit replacement designed for specific Mitsubishi Mirage Coupe models.
Key features include:
- Composite clear lens design.
- Designed for the passenger (right) side of the vehicle.
- Utilizes a halogen light source.
- Includes bulb(s) for immediate installation.
2. Specifications
| Specification | Detail |
|---|---|
| Brand | Make Auto Parts Manufacturing |
| Model Number | MI2503110 |
| Manufacturer Part Number | 0787806977643 |
| Type | Composite Headlight Assembly |
| Quantity Sold | Individually |
| Product Fit | Direct Fit OE Replacement |
| Replaces OE Number | MR296308 |
| Color/Finish | Clear Lens |
| Light Source | Halogen |
| Assembly | With bulb(s) |
| Location | Passenger Right Side |
| Vehicle Service Type | Car |
| UPC | 787806977643 |
Fitment Details:
- Make: Mitsubishi
- Model: Mirage Coupe
- Years: 1997, 1998, 1999, 2000, 2001
3. Installation (Setup)
Important: Professional installation is recommended for optimal performance and safety. Disconnect the vehicle's battery before beginning any electrical work.
Required Tools (May Vary):
- Socket wrench set
- Screwdrivers (Phillips and flathead)
- Trim removal tools (if applicable)
Installation Steps:
- Prepare the Vehicle: Park the vehicle on a level surface, engage the parking brake, and turn off the engine. Disconnect the negative terminal of the vehicle's battery.
- Access the Headlight: Depending on your vehicle model, you may need to remove the front bumper, grille, or fender liner to access the headlight assembly mounting bolts. Refer to your vehicle's service manual for specific instructions.
- Remove Old Headlight: Disconnect the electrical connectors from the existing headlight bulbs. Unscrew or unclip any mounting bolts or clips securing the old headlight assembly. Carefully remove the old assembly from the vehicle.
- Install New Headlight: Position the new Make Auto Parts Manufacturing headlight assembly into the opening. Ensure all mounting tabs and alignment pins are correctly seated. Secure the assembly with the previously removed bolts or clips.
- Connect Electrical: Reconnect the electrical connectors to the new headlight bulbs. Ensure connections are secure.
- Test and Adjust: Reconnect the vehicle's battery. Turn on the headlights to verify proper function (low beam, high beam, turn signal if integrated). Adjust the headlight aim according to local regulations and vehicle specifications.
- Reassemble: Reinstall any removed bumper, grille, or fender liner components.

Image 1: Front view of the headlight assembly, showcasing the clear composite lens and overall shape.

Image 2: Angled front view of the headlight assembly, providing a better perspective of the lens texture and reflector design.

Image 3: Side view of the headlight assembly, illustrating the mounting brackets and overall profile.
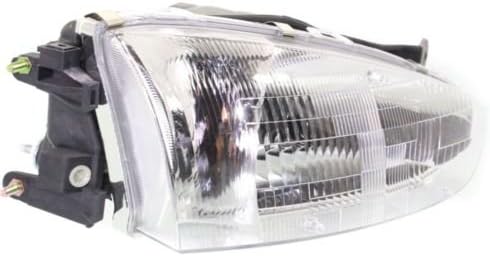
Image 4: Another side view of the headlight assembly, showing additional structural details.

Image 5: Rear view of the headlight assembly, detailing the bulb housing and points for electrical connections.

Image 6: Top-angled view of the headlight assembly, illustrating the upper edge and additional mounting features.
4. Operating
The headlight assembly operates in conjunction with your vehicle's existing electrical system. Once installed, the headlights will function normally when activated via your vehicle's headlight switch.
- Low Beam: Provides illumination for general driving conditions, designed to avoid dazzling oncoming traffic.
- High Beam: Offers maximum illumination for driving in dark areas without oncoming traffic.
- Turn Signal (if integrated): Activates when the turn signal lever is engaged, indicating a turn or lane change.
Always ensure your headlights are clean and properly aimed for safe driving.
5. Maintenance
Regular maintenance helps ensure the longevity and optimal performance of your headlight assembly.
- Cleaning: Periodically clean the exterior of the headlight lens with a soft cloth and mild automotive-safe cleaner. Avoid abrasive materials or harsh chemicals that could scratch or damage the lens.
- Bulb Replacement: If a bulb fails, replace it with a bulb of the correct type and wattage as specified by your vehicle manufacturer. Refer to your vehicle's service manual for specific bulb replacement procedures. Ensure the vehicle's battery is disconnected before replacing bulbs.
- Inspection: Regularly inspect the headlight assembly for any signs of damage, cracks, or condensation inside the lens. Address any issues promptly to prevent further damage or reduced visibility.
6. Troubleshooting
If you encounter issues with your headlight assembly, consider the following troubleshooting steps:
- Headlight Not Working:
- Check the bulb: A burnt-out bulb is a common cause. Replace if necessary.
- Check the fuse: Locate the vehicle's fuse box and inspect the headlight fuse. Replace if blown.
- Check electrical connections: Ensure all connectors to the headlight assembly and bulbs are secure and free of corrosion.
- Dim Headlight:
- Inspect the bulb: A failing bulb can appear dim before completely burning out.
- Check for voltage drop: This may indicate a wiring issue or a problem with the vehicle's charging system. Professional diagnosis may be required.
- Clean the lens: A dirty or hazy lens can significantly reduce light output.
- Condensation Inside Lens:
- Minor condensation that dissipates quickly is often normal due to temperature changes.
- Persistent or excessive condensation may indicate a seal issue. Inspect the housing for cracks or gaps. If severe, replacement may be necessary.
If these steps do not resolve the issue, consult a qualified automotive technician.
7. Warranty and Support
For information regarding warranty coverage, terms, and conditions for this Make Auto Parts Manufacturing product, please refer to the documentation provided with your purchase or contact the manufacturer directly.
For technical support or further assistance, please reach out to Make Auto Parts Manufacturing customer service.