
Vintage Electronics AD-3800
User Manual: Complete Belt Kit for Aiwa AD-3800
Model: AD-3800 | Brand: Vintage Electronics
Introduction
This manual provides detailed instructions for the installation and maintenance of the Complete Belt Kit for the Aiwa AD-3800 cassette deck. This kit includes both essential belts required for optimal operation of your vintage audio equipment. These belts are manufactured to meet original equipment manufacturer (OEM) specifications, ensuring compatibility and reliable performance.
Product Overview
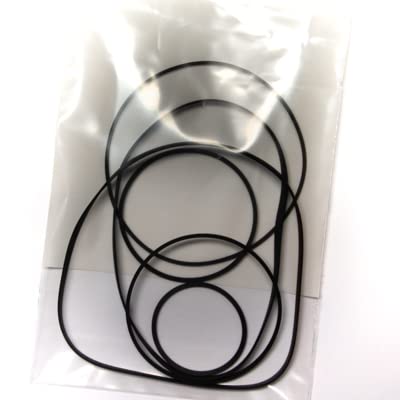
Figure 1: The Complete Belt Kit for Aiwa AD-3800, showing the two replacement belts sealed in clear plastic packaging. The belts are black and appear to be of different sizes, designed to fit specific mechanisms within the cassette deck.
The Vintage Electronics Complete Belt Kit for the Aiwa AD-3800 is designed to replace worn or broken drive belts in your cassette deck. Proper belt function is crucial for accurate tape speed, rewind, fast forward, and overall playback quality. This kit includes two belts, specifically engineered for the AD-3800 model.
Setup and Installation
Disclaimer: Installation of these belts requires opening the Aiwa AD-3800 cassette deck. This process should only be attempted by individuals comfortable with electronics repair. Incorrect installation can damage your equipment. If you are unsure, please consult a qualified technician.
Required Tools:
- Small Phillips head screwdriver
- Flathead screwdriver (optional, for prying)
- Tweezers or small pliers (for handling belts)
- Isopropyl alcohol and cotton swabs (for cleaning pulleys)
Installation Steps:
- Power Off and Disconnect: Ensure the Aiwa AD-3800 is completely powered off and unplugged from the mains electricity supply before beginning any work.
- Access the Mechanism: Carefully remove the outer casing of the cassette deck. This typically involves unscrewing screws on the back and bottom panels. Refer to your Aiwa AD-3800 service manual if available for specific disassembly instructions.
- Locate Old Belts: Identify the existing drive belts. There are usually two main belts: one for the capstan/flywheel mechanism and another for the counter/reel drive. Note their routing paths.
- Remove Old Belts: Gently remove the old, worn, or broken belts. They may be stretched, brittle, or have disintegrated.
- Clean Pulleys: Using isopropyl alcohol and cotton swabs, thoroughly clean all pulleys and surfaces where the new belts will make contact. Remove any residue from the old belts to ensure proper grip and prevent slippage.
- Install New Belts: Carefully route the new belts onto their respective pulleys, following the path of the original belts. Ensure they are not twisted or pinched. The larger belt typically goes to the main capstan flywheel, and the smaller one to the counter or reel drive.
- Verify Belt Tension: Once installed, gently rotate the flywheels and reels manually to ensure the belts are seated correctly and have appropriate tension. They should be snug but not overly tight.
- Test Functionality: Before reassembling the casing, temporarily plug in and power on the deck (with extreme caution, avoiding contact with live circuits). Test basic functions like Play, Fast Forward, and Rewind to confirm the belts are working correctly.
- Reassemble: Once satisfied with the functionality, carefully reassemble the cassette deck's casing.
Operating Considerations
After successful installation, your Aiwa AD-3800 should operate with restored tape transport functions. Observe the following:
- Tape Speed: Play a known good cassette tape and verify that the playback speed is consistent and correct.
- Winding Functions: Test Fast Forward and Rewind to ensure they engage smoothly and wind tapes efficiently.
- Wow and Flutter: Listen for any noticeable fluctuations in pitch (wow and flutter), which should be minimized with new, properly installed belts.
Maintenance
The belts themselves are designed for long-term durability. However, to maximize their lifespan and the performance of your Aiwa AD-3800:
- Keep Clean: Periodically clean the tape path, including the capstan, pinch roller, and tape heads, to prevent dirt and debris from accumulating and potentially affecting belt performance.
- Environmental Conditions: Store and operate the cassette deck in a clean, dry environment, away from extreme temperatures or direct sunlight, which can degrade rubber over time.
- Avoid Excessive Stress: Do not force tape mechanisms or leave the deck in play/fast forward/rewind modes for extended periods when not in use, as this can put unnecessary strain on the belts.
Troubleshooting
| Problem | Possible Cause | Solution |
|---|---|---|
| Tape speed is inconsistent or too slow. | Belts not properly seated or pulleys are dirty. | Re-check belt routing. Clean pulleys thoroughly with isopropyl alcohol. |
| Fast Forward/Rewind not working or weak. | Belt slippage or incorrect belt installed. | Ensure the correct belt is on the reel drive. Clean pulleys. |
| New belts seem too loose or too tight. | Incorrect belt size or manufacturing defect. | Verify you received the correct kit for AD-3800. Contact Vintage Electronics support if issues persist. |
| Deck makes grinding or unusual noises. | Belt rubbing against other components or mechanical issue. | Inspect belt path for obstructions. This may indicate a deeper mechanical issue beyond the belts. |
Specifications
- Product Type: Complete Belt Kit (2 belts)
- Compatibility: Aiwa AD-3800 Cassette Deck
- Material: High-quality rubber, manufactured to OEM specifications
- Condition: Brand new stock
- UPC: 790913744343
Warranty and Support
This Complete Belt Kit comes with a Lifetime Warranty from Vintage Electronics. This warranty covers defects in materials and workmanship for the lifetime of the product under normal use.
For technical support, warranty claims, or any questions regarding the installation or performance of your belt kit, please contact Vintage Electronics directly. With 45 years of experience, their technical support team is available to assist you.
Contact Information: Please refer to your purchase documentation or the Vintage Electronics website for the most current contact details.
Ask a question about this manual
Ask about setup, troubleshooting, compatibility, parts, safety, or missing instructions. Manuals+ will review the question and use this page’s manual context to help answer it.