Introduction
This manual provides detailed instructions for the installation, operation, and maintenance of your hansgrohe Talis S Kitchen Tap 160. Please read these instructions carefully before installation and use to ensure safe and optimal performance. Keep this manual for future reference.
Safety Information
- Ensure all local plumbing and building codes are followed during installation.
- Installation should be performed by a qualified professional if you are unsure about any steps.
- Always turn off the main water supply before beginning any installation, repair, or maintenance work.
- Protect the product from frost.
- Operating pressure: minimum 1 bar / maximum 10 bar. Recommended operating pressure: 1.6 - 5 bar.
Package Contents
Verify that all components are present and undamaged before proceeding with installation.
- hansgrohe Talis S Kitchen Tap 160 Assembly
- Instruction Manual
- MagFit Magnetic Shower Support
- Quick Connect Shower Hose
- Sprayer
- Mounting Hardware
Setup and Installation
The hansgrohe Talis S Kitchen Tap 160 is designed for single-hole deck mount installation.
Step 1: Prepare the Installation Area
Ensure the mounting surface on the sink or countertop is clean, dry, and clear of any obstructions. Turn off the main water supply to the kitchen.
Step 2: Mount the Faucet
Insert the faucet body into the designated mounting hole. From underneath the sink, secure the faucet using the provided mounting hardware (washer, gasket, and nut). Tighten firmly but do not overtighten.
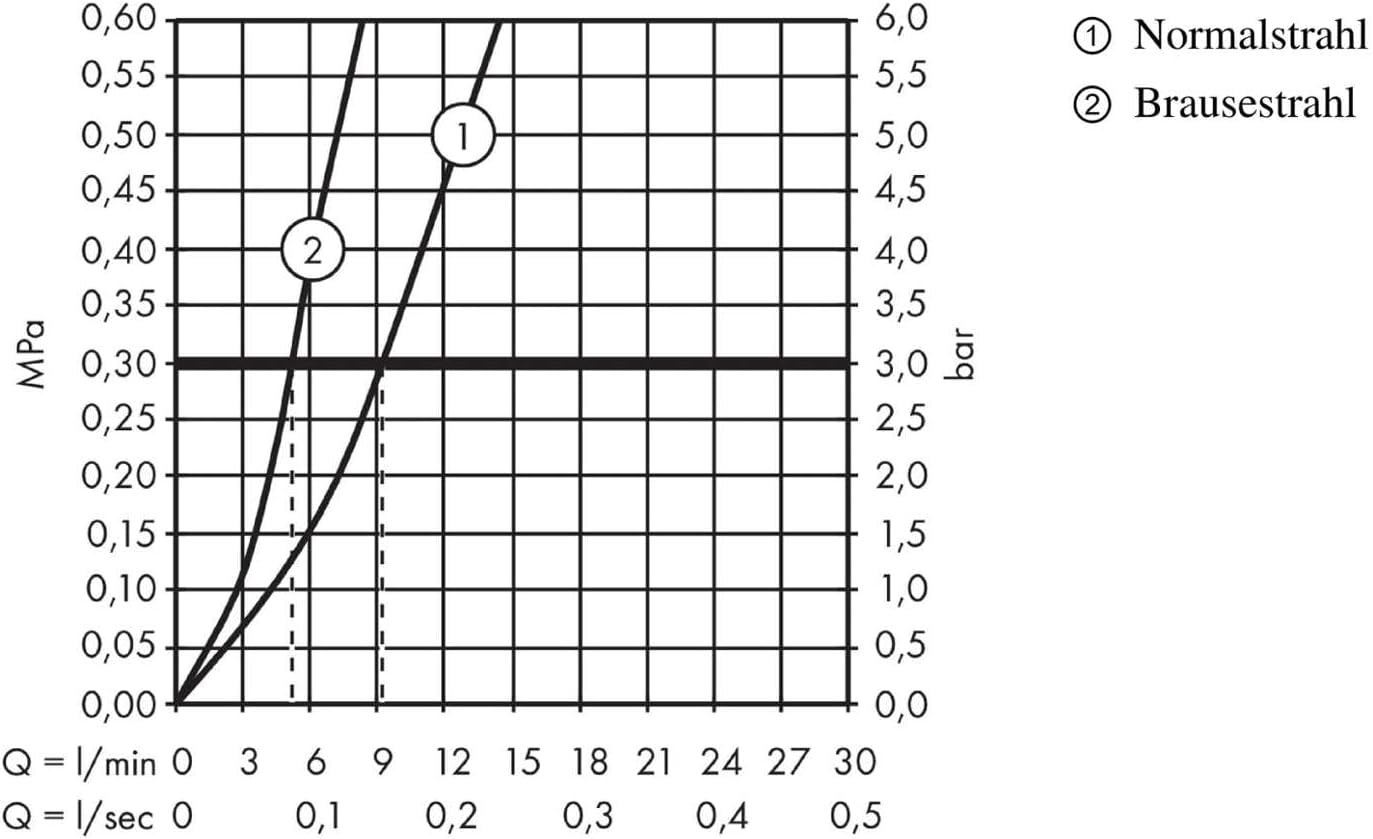
Image: Detailed technical drawing illustrating the dimensions and connection points for the faucet, including G 3/8" hose connections and a maximum deck thickness of 70mm.
Step 3: Connect Water Supply Lines
Connect the hot and cold water supply lines to the faucet's G 3/8" hose connections. Ensure all connections are hand-tightened, then use a wrench for a final quarter-turn. Avoid overtightening to prevent damage. Note the hot water connection is typically on the left and cold on the right.
Step 4: Install Pull-Out Spray and Hose
Connect the quick-connect shower hose to the faucet's outlet. Ensure it clicks securely into place. Install the MagFit magnetic shower support mechanism to ensure the pull-out spray retracts smoothly and holds firmly in the spout.

Image: The hansgrohe Talis S Kitchen Tap 160 in stainless steel, demonstrating the pull-out spray feature.
Step 5: Test for Leaks
Slowly turn on the main water supply. Check all connections for any signs of leaks. If leaks are detected, turn off the water supply and re-tighten the connections. Operate the faucet to ensure proper water flow and temperature control.
Operating Instructions
Water Flow and Temperature Control
The single lever handle controls both water flow and temperature:
- Flow Control: Lift the handle upwards to increase water flow. Push it downwards to decrease or stop the flow.
- Temperature Control: Move the handle to the left for hot water and to the right for cold water.
Pull-Out Spray Function
The faucet features a 50 cm pull-out spray for enhanced flexibility:
- Extend Spray: Gently pull the spray head from the spout to extend the hose.
- Spray Type Selection: Press the spray diverter button on the spray head to switch between the laminar spray (standard flow) and the spray jet (shower function).
- Lockable Shower Spray: The shower spray can be locked in position. It will return to the laminar spray upon pressing the diverter again or turning off the water.
- Retraction: The MagFit magnetic support ensures the spray head retracts smoothly and securely into the spout when released.
Swivel Range Adjustment
The spout's swivel range can be adjusted to either 110° or 150°, providing optimal flexibility for various sink configurations and tasks.
Maintenance and Care
Cleaning
To maintain the finish and functionality of your hansgrohe faucet, clean it regularly:
- Use only soft cloths and mild cleaning agents specifically designed for kitchen fixtures.
- Avoid abrasive cleaners, scouring pads, or solvents, as these can damage the surface finish.
- Rinse thoroughly with clean water after cleaning and dry with a soft cloth to prevent water spots.
Quick Clean Technology
The faucet features Quick Clean technology for easy lime scale removal. Simply rub the silicone nozzles on the spray head with your finger to dislodge mineral deposits and maintain optimal spray performance.
Troubleshooting
| Problem | Possible Cause | Solution |
|---|---|---|
| Low Water Flow | Clogged aerator or supply lines | Remove and clean the aerator; check supply line filters for debris. |
| Leaks from Connections | Loose connections or improperly seated washers | Turn off water, tighten connections, and ensure washers are correctly seated. |
| Spray Head Not Retracting Smoothly | Obstruction in hose path or issue with MagFit | Check the hose for kinks or obstructions under the sink; ensure the MagFit mechanism is clear. |
| Inconsistent Water Temperature | Water heater settings or unbalanced hot/cold supply | Check your water heater settings; ensure hot and cold water supply pressures are balanced. |
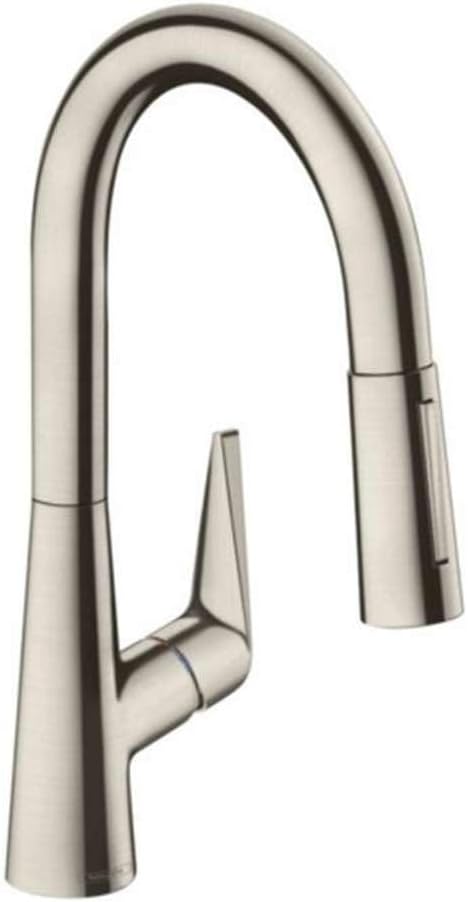
Image: Performance chart indicating water flow rates (Q) in liters per minute and liters per second against pressure (MPa/bar) for normal (1) and spray jet (2) modes.
Specifications
| Feature | Detail |
|---|---|
| Model Number | 72815800 |
| Brand | hansgrohe |
| Finish Type | Stainless Steel |
| Mounting Type | Deck Mount, Single Hole |
| Handle Type | Lever |
| Swivel Range | 110° / 150° |
| Pull-Out Spray Length | 50 cm |
| Operating Pressure | Min. 1 bar / Max. 10 bar |
| Connection Type | G 3/8" hose connections |
| Spout Height | 135 Millimeters |
| Spout Reach | 20 Centimeters |
| Item Weight | 2.79 Kilograms |
Warranty and Support
For detailed warranty information, technical support, or to purchase replacement parts, please refer to the official hansgrohe website or contact their customer service department. Keep your purchase receipt as proof of purchase for warranty claims.
Online Resources: www.hansgrohe.com


