Gemini Sound Dual Handheld Frequencies 3+4
Gemini UHF Wireless Microphone System User Manual
Model: Dual Handheld Frequencies 3+4
Introduction
Thank you for choosing the Gemini UHF Wireless Microphone System. This professional bundle provides reliable and clear audio for various applications, including live performances, presentations, and karaoke. Designed for ease of use and exceptional performance, this system ensures your voice is heard clearly and confidently.
This manual provides detailed instructions for setting up, operating, and maintaining your wireless microphone system. Please read it thoroughly before use to ensure optimal performance and longevity of your device.
Safety Information
- Do not expose the unit to rain or moisture.
- Do not remove the cover or back. No user-serviceable parts inside.
- Refer servicing to qualified service personnel only.
- Ensure proper ventilation and do not block ventilation openings.
- Do not place near heat sources such as radiators, heat registers, stoves, or other apparatus (including amplifiers) that produce heat.
- Use only attachments/accessories specified by the manufacturer.
- Unplug this apparatus during lightning storms or when unused for long periods of time.
- Dispose of batteries properly according to local regulations.
Package Contents
Verify that all items are present in your package:
- UHF-02 Dual Channel Receiver
- 2 x Handheld Microphones (Frequencies 3+4)
- Power Adapter
- Audio Cable
- User Manual (this document)
Product Overview
System Components
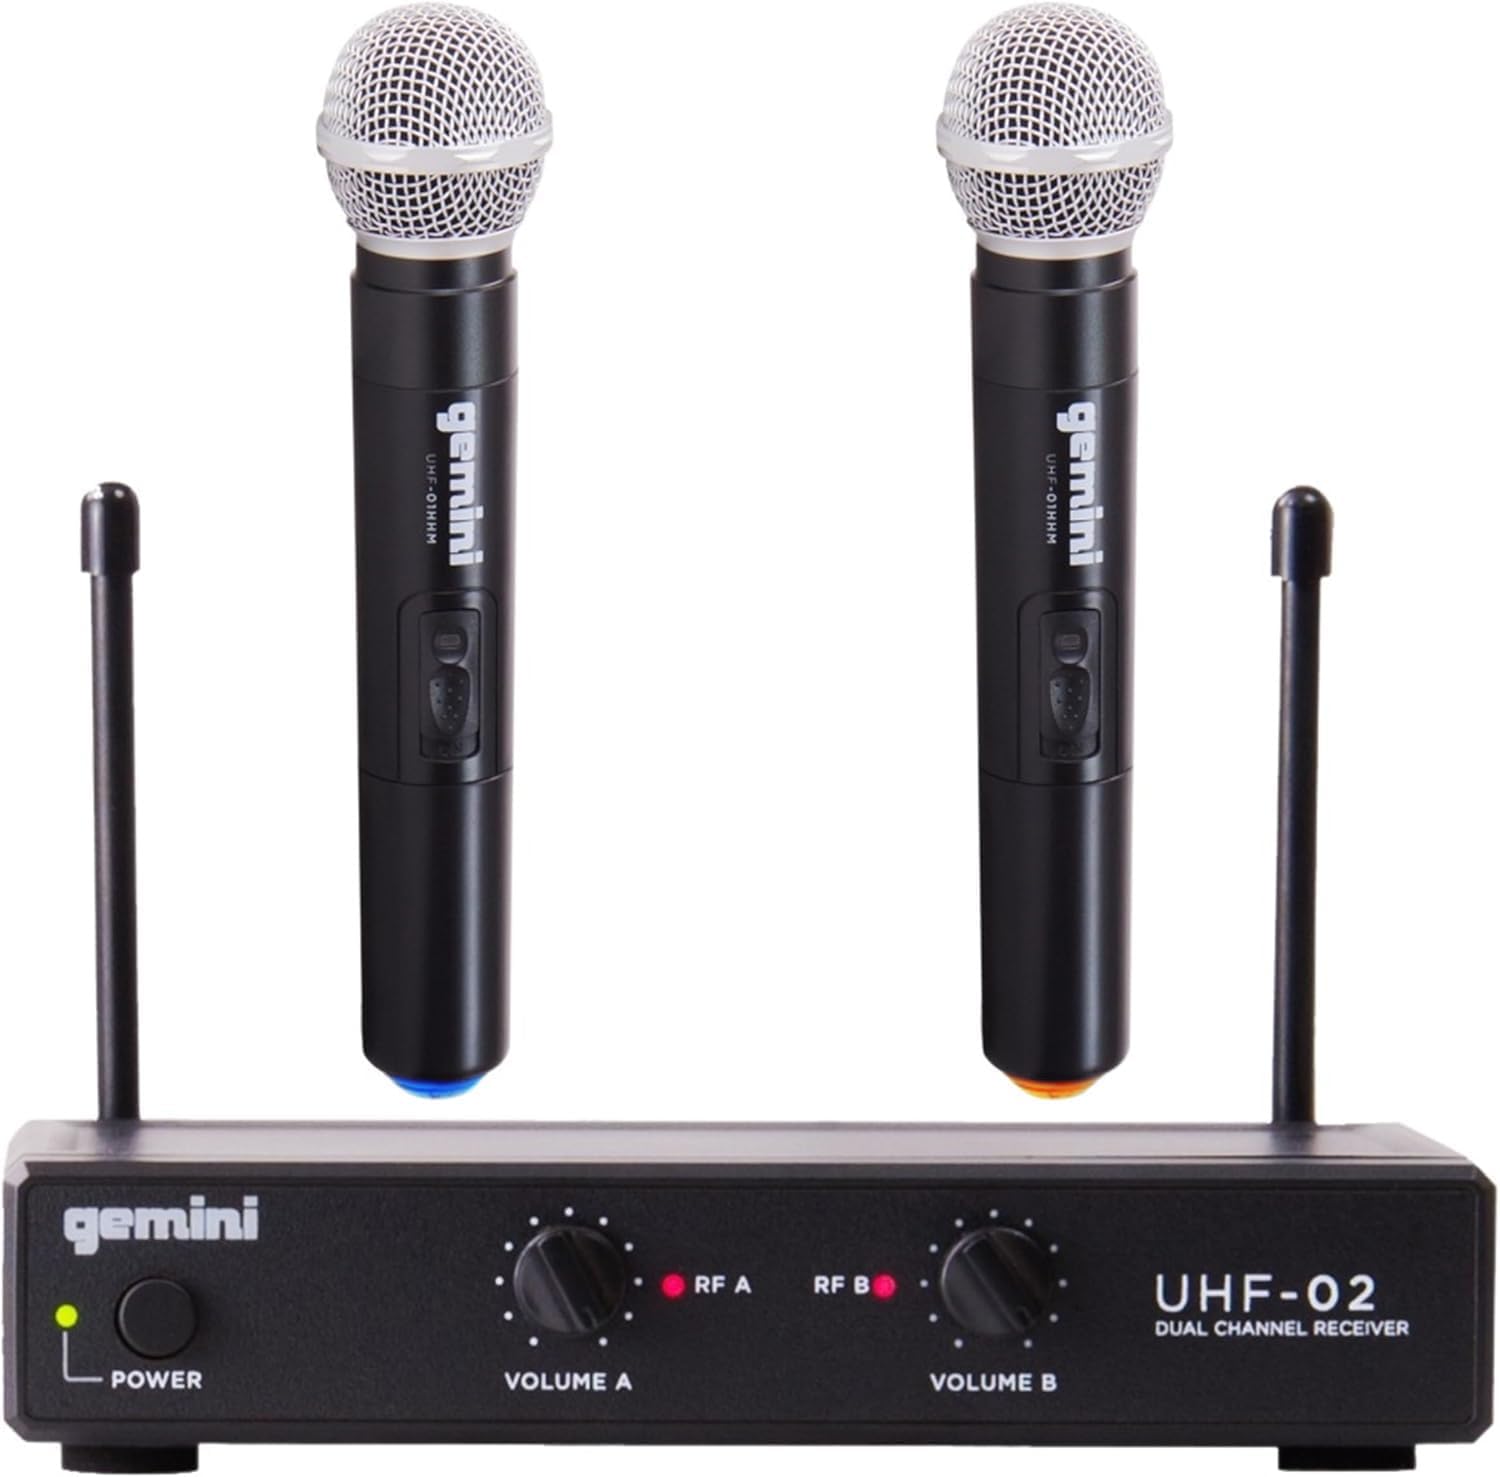
Figure 1: The complete Gemini UHF Wireless Microphone System, including the dual-channel receiver and two handheld microphones.
UHF-02 Dual Channel Receiver
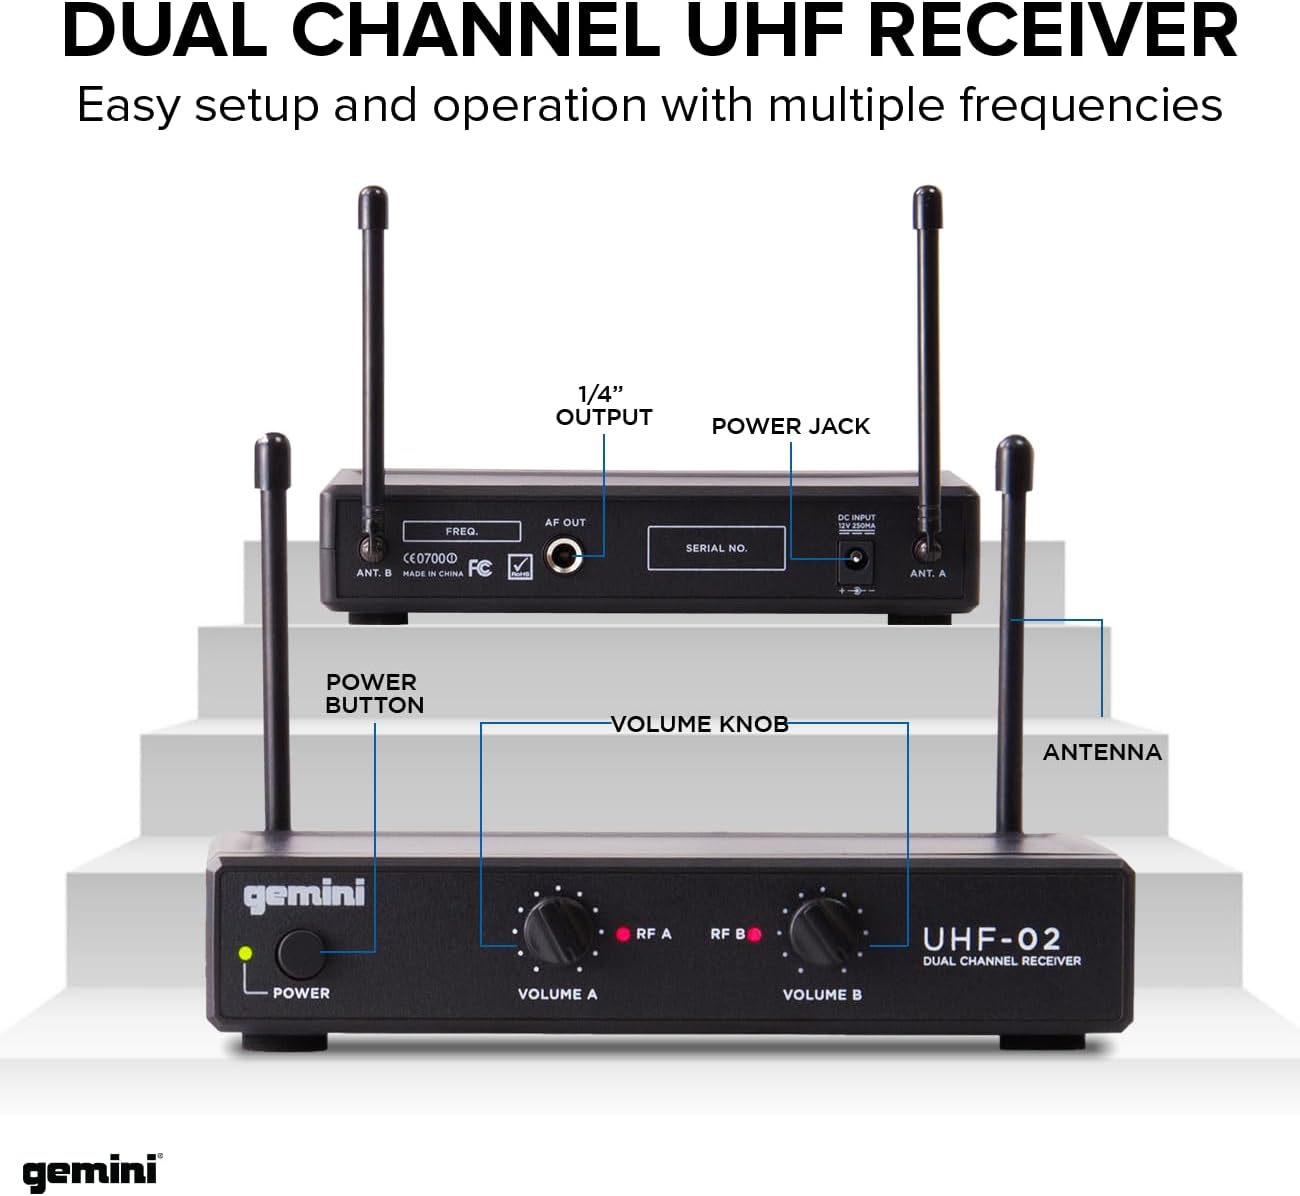
Figure 2: Detailed view of the UHF-02 receiver, highlighting the Power button, Volume Knobs (Volume A, Volume B), RF A/B LED indicators, Antennas, 1/4" Output, Power Jack, and Serial No. on the rear panel.
- Power Button: Turns the receiver on or off.
- Volume Knobs (Volume A, Volume B): Adjusts the output volume for each respective microphone channel.
- RF A/B LED Indicators: Illuminates when a strong radio frequency signal is received from the corresponding microphone.
- Antennas: Receives wireless signals from the microphones. Ensure they are extended for optimal reception.
- 1/4" Output: Connects the receiver to an amplifier, mixer, or PA system.
- Power Jack: Connects the included power adapter to power the receiver.
Handheld Microphones
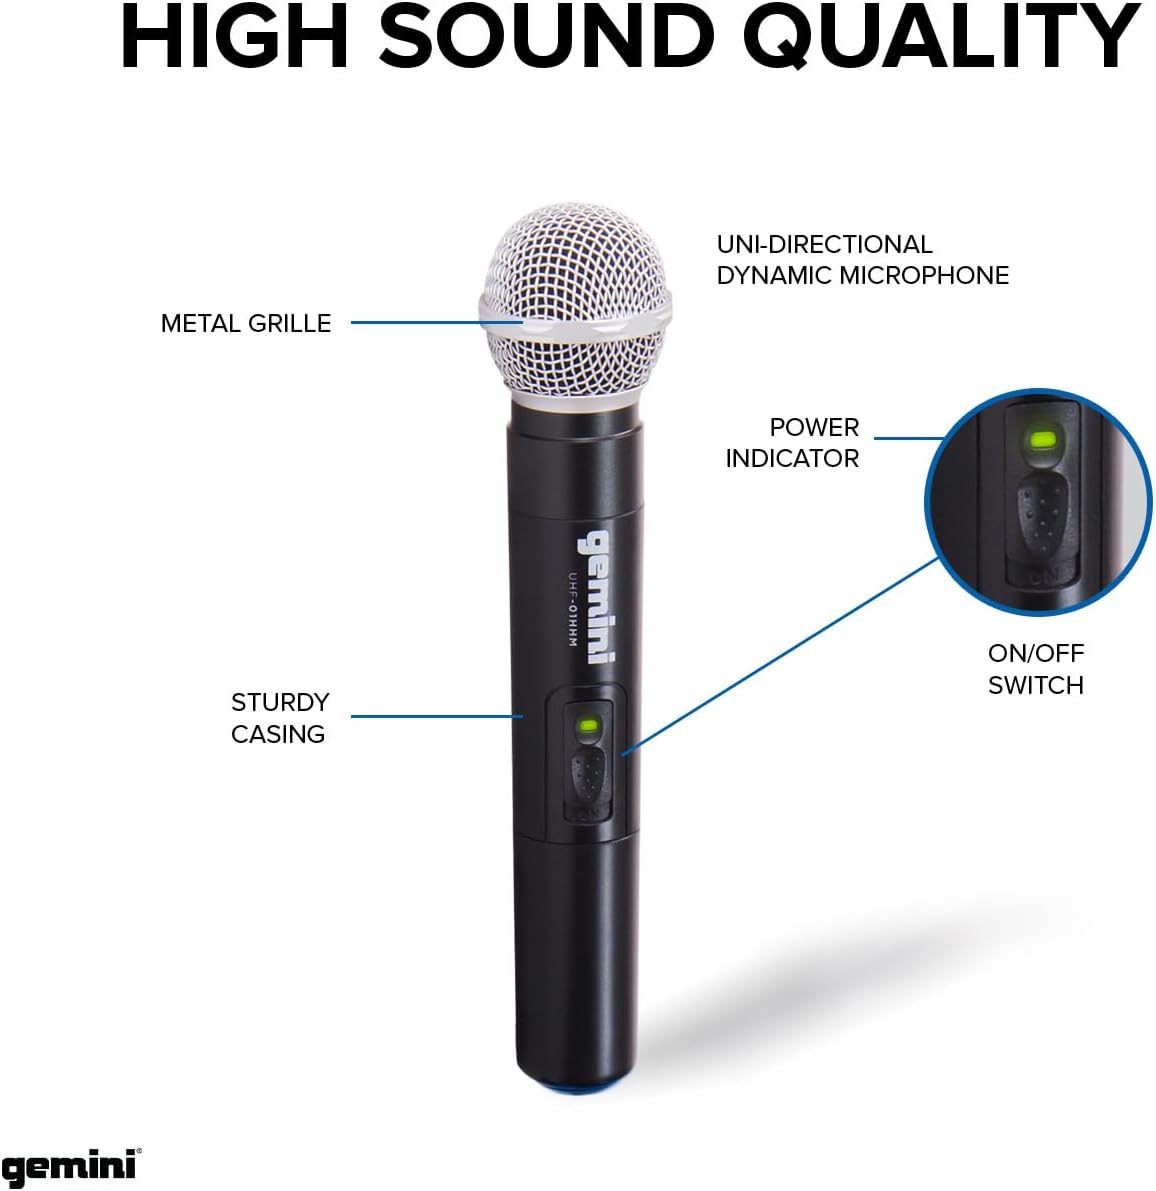
Figure 3: Close-up of a Gemini handheld microphone, indicating the Uni-directional Dynamic Microphone (under the metal grille), Power Indicator LED, and On/Off Switch. The microphone features a sturdy casing.
- Metal Grille: Protects the microphone capsule.
- Uni-directional Dynamic Microphone: Captures sound primarily from the front, reducing background noise.
- Power Indicator: LED light indicating the microphone's power status.
- On/Off Switch: Toggles the microphone power.
- Battery Compartment: Located at the bottom of the microphone (twist to open). Requires 2x AA batteries (not included).
Setup
- Unpack the System: Carefully remove all components from the packaging.
- Position the Receiver: Place the UHF-02 receiver on a stable surface, away from other electronic devices that might cause interference. Extend both antennas vertically for optimal signal reception.
- Connect Power to Receiver: Insert the included power adapter into the DC INPUT jack on the rear of the receiver, then plug the adapter into a standard AC power outlet.
- Connect Receiver to Audio System: Connect the 1/4" OUTPUT jack on the rear of the receiver to an input on your mixer, amplifier, or PA system using a 1/4" audio cable (not included).
- Install Batteries in Microphones: Unscrew the bottom cap of each handheld microphone to reveal the battery compartment. Insert two fresh AA batteries into each microphone, ensuring correct polarity (+/-). Replace the cap securely.
- Power On:
- Press the POWER button on the receiver. The power indicator LED will illuminate.
- Slide the ON/OFF switch on each microphone to the "ON" position. The microphone's power indicator LED will light up.
- Automatic Pairing: The microphones and receiver are designed to pair automatically. Once the microphones are powered on and within range, the RF A and RF B LED indicators on the receiver should illuminate, confirming a strong connection.
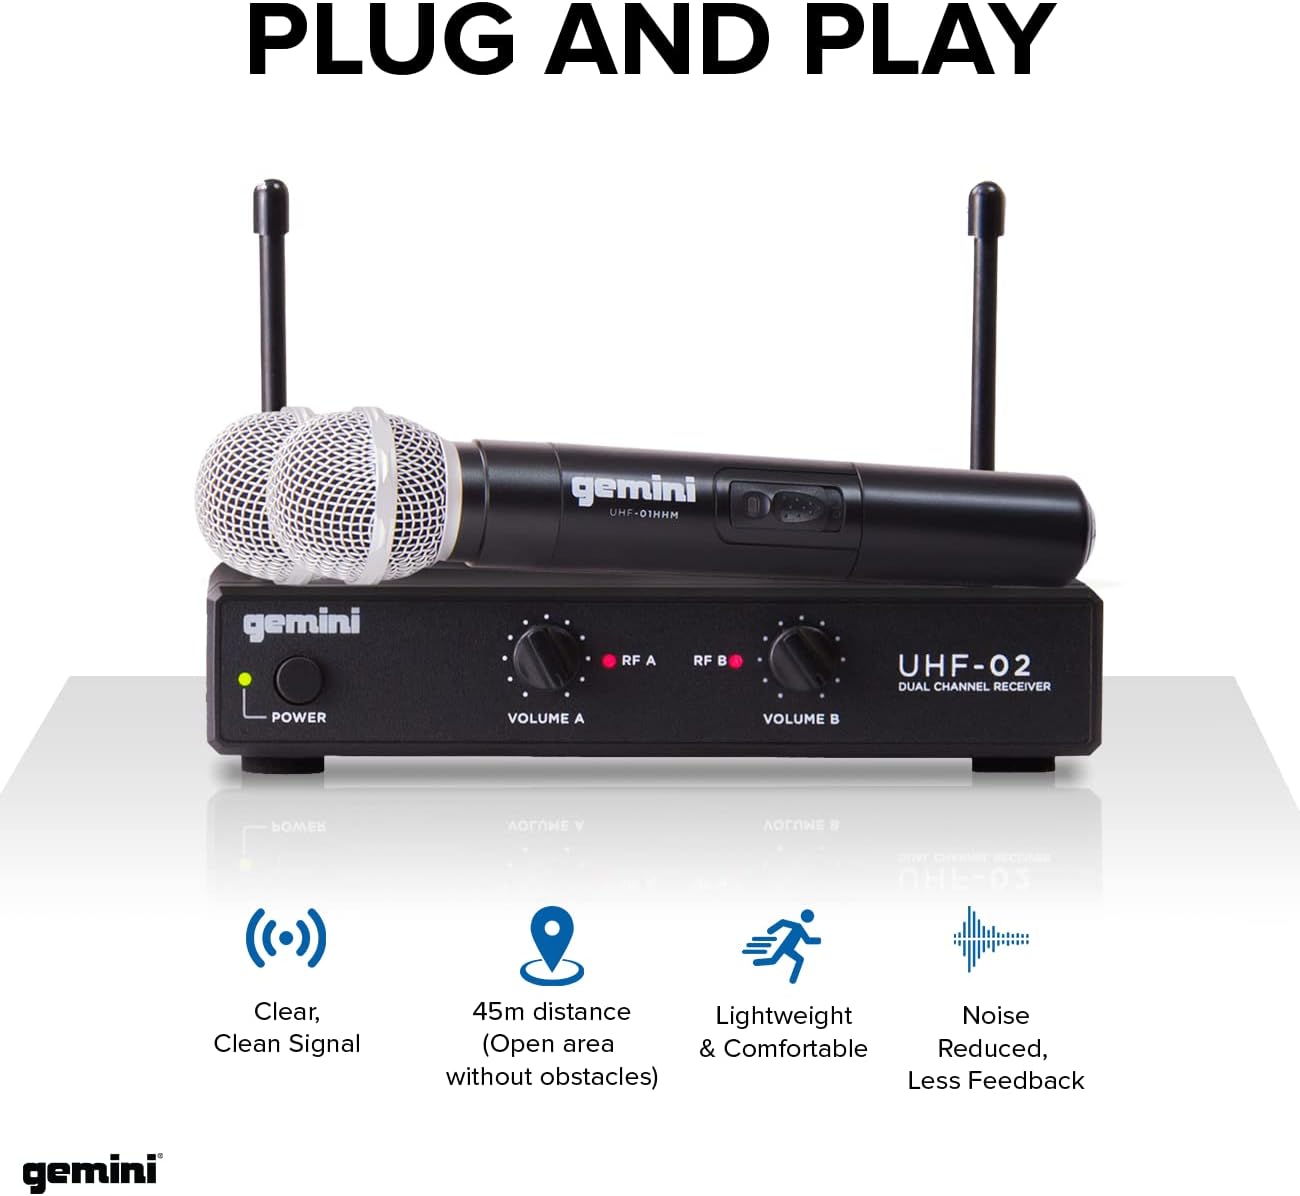
Figure 4: The system is designed for plug-and-play operation, offering clear, clean signal, a dynamic operating range of up to 45 meters (150 ft) in open areas, lightweight and comfortable microphones, and reduced noise/feedback.
Operating Instructions
- Volume Adjustment: Use the VOLUME A and VOLUME B knobs on the receiver to adjust the output level for each microphone independently. Start with the volume low and gradually increase it to avoid sudden loud sounds.
- Microphone Usage: Hold the microphone approximately 2-6 inches from your mouth for optimal sound pickup. Avoid covering the grille with your hand, as this can affect sound quality and signal.
- Operating Range: The system offers a dynamic range of up to 150 feet (45 meters) in open areas. Maintain line of sight between the microphones and the receiver for best performance. Walls, large objects, and other wireless devices can reduce the effective range.
- Frequency Stability: The system operates within the 533.7+537.2MHz frequency range, designed to minimize interference.

Figure 5: The Gemini UHF Wireless Microphone System provides up to 150 feet of wireless freedom, allowing users to move freely during performances or presentations.
Versatile Applications

Figure 6: The Gemini UHF Wireless Microphone System is suitable for a wide range of applications, including live music performances, wedding ceremonies, professional presentations, and karaoke sessions.
Maintenance
- Cleaning: Use a soft, dry cloth to clean the receiver and microphones. Do not use abrasive cleaners or solvents.
- Battery Replacement: Replace microphone batteries when the power indicator LED starts to dim or if audio quality degrades. Always use fresh, high-quality AA batteries. Remove batteries if the microphones will not be used for an extended period to prevent leakage.
- Storage: Store the system in a cool, dry place when not in use. Protect it from extreme temperatures and humidity.
- Antennas: Handle the receiver antennas with care to prevent bending or breaking.
Troubleshooting
| Problem | Possible Cause | Solution |
|---|---|---|
| No sound from microphones. |
|
|
| Poor sound quality / Interference. |
|
|
| RF LED indicators not lighting up. |
|
|
Specifications
| Feature | Detail |
|---|---|
| Brand | Gemini Sound |
| Model Name | Gemini UHF Wireless Microphones and Receivers |
| Item Model Number | Dual Handheld Frequencies 3+4 |
| Microphone Form Factor | Microphone System |
| Number of Channels | 2 |
| Connectivity Technology | UHF |
| Frequency Range | 533.7+537.2MHz (Operating), 517.6 MHz (Response) |
| Dynamic Range | 150 ft (approx. 45 meters) |
| Signal-to-Noise Ratio | 70 dB |
| Polar Pattern | Unidirectional |
| Power Source | Battery Powered (Microphones), AC Adapter (Receiver) |
| Material | Crystal (Microphone) |
| Color | Black |
| Item Weight | 7.4 ounces (approx. 209 grams) |
| Product Dimensions (L x W x H) | 6.69 x 1.34 x 4.41 inches |
| Recommended Uses | Public Speaking, Health Instructors, Teaching |
Warranty and Support
Gemini Sound products are designed for reliability and performance. For specific warranty details and terms, please refer to the warranty card included with your product or visit the official Gemini Sound website. Keep your purchase receipt as proof of purchase for warranty claims.
For technical support, troubleshooting assistance, or service inquiries, please contact Gemini Sound customer support:
- Website: www.geminisound.com
- Customer Service: Refer to the website for contact information (phone numbers, email support).
Please have your product model number (Dual Handheld Frequencies 3+4) and serial number ready when contacting support.
Ask a question about this manual
Ask about setup, troubleshooting, compatibility, parts, safety, or missing instructions. Manuals+ will review the question and use this page’s manual context to help answer it.