Galaxy Audio PA6BT
Galaxy Audio PA6BT Powered Hot Spot Monitor Speaker with Bluetooth User Manual
Model: PA6BT
1. Introduction
This manual provides comprehensive instructions for the setup, operation, and maintenance of your Galaxy Audio PA6BT Powered Hot Spot Monitor Speaker with Bluetooth. Please read this manual thoroughly before using the device to ensure proper functionality and to prevent damage.
The Galaxy Audio PA6BT is a 6-inch, 170-watt, 2-way powered monitor speaker designed for various audio applications, featuring integrated Bluetooth connectivity for wireless audio streaming.

Figure 1: Angled front view of the Galaxy Audio PA6BT monitor, highlighting its compact design and the integrated control panel.
2. Important Safety Instructions
- Read these instructions.
- Keep these instructions.
- Heed all warnings.
- Follow all instructions.
- Do not use this apparatus near water.
- Clean only with a dry cloth.
- Do not block any ventilation openings. Install in accordance with the manufacturer's instructions.
- Do not install near any heat sources such as radiators, heat registers, stoves, or other apparatus (including amplifiers) that produce heat.
- Do not defeat the safety purpose of the polarized or grounding-type plug. A polarized plug has two blades with one wider than the other. A grounding-type plug has two blades and a third grounding prong. The wide blade or the third prong are provided for your safety. If the provided plug does not fit into your outlet, consult an electrician for replacement of the obsolete outlet.
- Protect the power cord from being walked on or pinched, particularly at plugs, convenience receptacles, and the point where they exit from the apparatus.
- Only use attachments/accessories specified by the manufacturer.
- Use only with the cart, stand, tripod, bracket, or table specified by the manufacturer, or sold with the apparatus. When a cart is used, use caution when moving the cart/apparatus combination to avoid injury from tip-over.
- Unplug this apparatus during lightning storms or when unused for long periods of time.
- Refer all servicing to qualified service personnel. Servicing is required when the apparatus has been damaged in any way, such as power-supply cord or plug is damaged, liquid has been spilled or objects have fallen into the apparatus, the apparatus has been exposed to rain or moisture, does not operate normally, or has been dropped.
- WARNING: To reduce the risk of fire or electric shock, do not expose this apparatus to rain or moisture. Do not open the unit; there are no user-serviceable parts inside.
3. Key Features
- Power Output: 170 Watts for robust sound delivery.
- Frequency Response: 80Hz - 18kHz for a wide audio spectrum.
- Two-Way Speaker System: Features a 6.5" Neodymium High Power Woofer and a 1.5" High Efficiency Tweeter.
- Dual Channels: Two independent input channels with individual volume controls.
- Versatile Inputs: Channel 1 offers XLR and 1/4" inputs. Channel 2 offers XLR, 1/4", and an additional 1/8" line input.
- Bluetooth Connectivity: Integrated Bluetooth technology with its own volume control for wireless audio streaming.
- XLR Pass-Through: Allows independent control of microphones without affecting the signal sent to a main PA system.
- -20dB Pad Switch: On each XLR input to accommodate high-level signals without distortion.
- 3-Band EQ: Adjustable Low, Mid, and High frequency controls for sound shaping.
- Compressor/Limiter: Built-in 18dB circuit with Compressor and Clip LEDs to smooth transient peaks and protect speakers.
- Mounting Options: Designed for mounting on most mic stands, includes an MSA-1 stand adaptor.
4. Package Contents
Please check the package contents upon unboxing to ensure all items are present:
- Galaxy Audio PA6BT Powered Hot Spot Monitor Speaker
- MSA-1 Stand Adaptor
- IEC Power Cable
- User Manual (this document)
5. Controls and Connections
5.1 Front Panel Controls

Figure 2: Front view of the Galaxy Audio PA6BT monitor, showing the speaker grille, tweeter, and control panel with knobs and LEDs.
- PWR LED: Illuminates when the unit is powered on.
- LOW, MID, HI Knobs: 3-band equalizer controls to adjust bass, midrange, and treble frequencies.
- CLIP LED: Indicates when the input signal is too high, potentially causing distortion. Reduce input volume if this LED illuminates frequently.
- COMP LED: Indicates when the built-in compressor/limiter circuit is active, smoothing out transient peaks.
- CHAN 1 Knob: Volume control for Channel 1 input.
- CHAN 2 Knob: Volume control for Channel 2 input.
- BT VOL Knob: Volume control for the Bluetooth audio input.
5.2 Rear Panel Connections
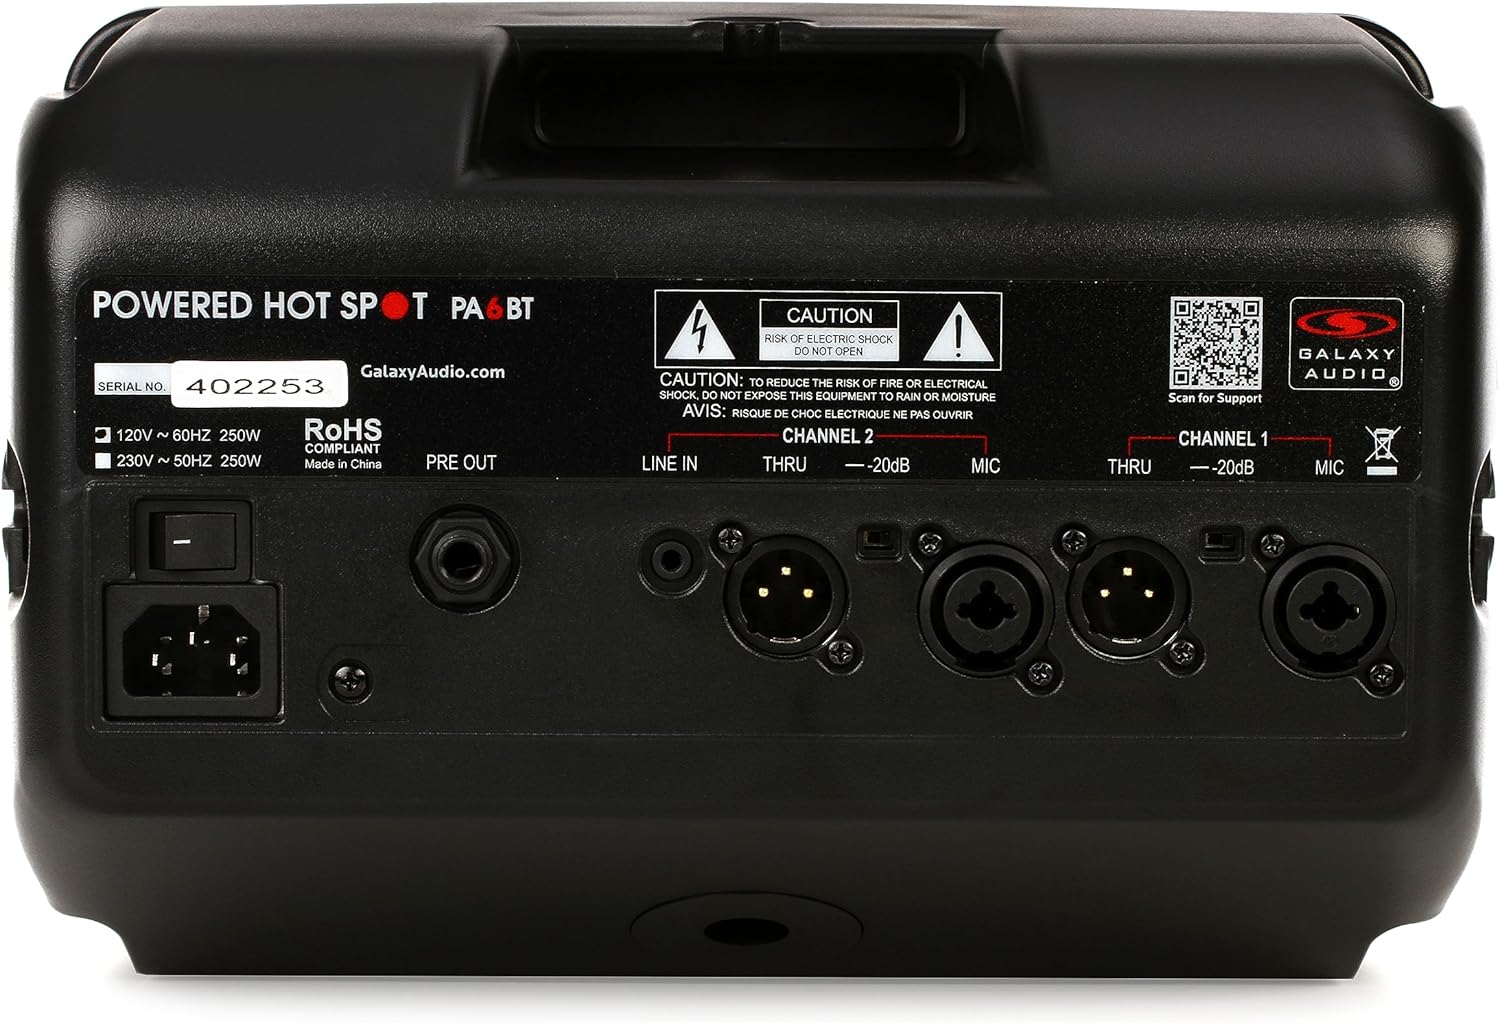
Figure 3: Rear view of the Galaxy Audio PA6BT monitor, displaying the power input, serial number, and various audio input/output connections for Channel 1 and Channel 2.
- Power Switch: Turns the unit on or off.
- IEC Power Inlet: Connects the included IEC power cable to an AC power source.
- PRE OUT: Line-level output for sending the mixed signal to another powered speaker or a main PA system.
- Channel 2 Inputs:
- LINE IN (1/8"): Stereo or mono input for connecting devices like MP3 players, smartphones, or laptops.
- THRU (XLR): XLR pass-through for Channel 2, allowing the input signal to be sent to another device without processing.
- -20dB Pad (Switch): Reduces the input sensitivity by 20dB for high-level signals.
- MIC (XLR/1/4" Combo): Combo jack for connecting microphones (XLR) or line-level instruments (1/4").
- Channel 1 Inputs:
- THRU (XLR): XLR pass-through for Channel 1.
- -20dB Pad (Switch): Reduces the input sensitivity by 20dB for high-level signals.
- MIC (XLR/1/4" Combo): Combo jack for connecting microphones (XLR) or line-level instruments (1/4").
6. Setup Guide
- Unpack the Unit: Carefully remove the PA6BT from its packaging and inspect for any signs of damage.
- Placement:
- For personal monitoring, mount the PA6BT onto a standard microphone stand using the included MSA-1 stand adaptor. Ensure the stand is stable.
- Alternatively, place the unit on a stable, flat surface such as a table or stage floor.
- Initial Control Settings: Before connecting power, ensure all volume knobs (CHAN 1, CHAN 2, BT VOL) are turned completely counter-clockwise (minimum). Set the LOW, MID, and HI EQ knobs to their center (flat) positions.
- Power Connection: Connect the supplied IEC power cable to the IEC inlet on the rear panel of the PA6BT, then plug the other end into a suitable AC power outlet.
- Power On: Flip the Power Switch on the rear panel to the "ON" position. The PWR LED on the front panel should illuminate.
7. Operating Instructions
7.1 Connecting Audio Sources
- Microphones/Instruments (XLR/1/4" Combo Jacks):
- Connect your microphone or instrument to either the Channel 1 or Channel 2 MIC input.
- If using a high-output source, engage the -20dB Pad switch for that channel to prevent input clipping.
- Slowly increase the corresponding CHAN 1 or CHAN 2 volume knob until the desired level is reached. Monitor the CLIP LED; if it flashes frequently, reduce the input volume or engage the -20dB pad.
- Line-Level Devices (1/8" LINE IN - Channel 2 only):
- Connect your smartphone, tablet, or other line-level audio device to the 1/8" LINE IN jack on Channel 2.
- Adjust the BT VOL knob to control the volume of this input.
7.2 Bluetooth Pairing and Operation
- Ensure the PA6BT is powered on.
- Activate Bluetooth on your audio device (e.g., smartphone, tablet).
- Search for available Bluetooth devices. The PA6BT should appear as "Galaxy Audio PA6BT".
- Select "Galaxy Audio PA6BT" to pair. A confirmation tone may sound from the speaker.
- Once paired, play audio from your device. Adjust the BT VOL knob on the PA6BT to control the playback volume.
7.3 Using the Equalizer (EQ)
The LOW, MID, and HI knobs allow you to tailor the sound to your preference or acoustic environment:
- LOW: Adjusts the bass frequencies. Turn clockwise to boost bass, counter-clockwise to cut.
- MID: Adjusts the midrange frequencies. Turn clockwise to boost mids, counter-clockwise to cut. This is often used to enhance vocal clarity.
- HI: Adjusts the treble frequencies. Turn clockwise to boost highs, counter-clockwise to cut.
7.4 Compressor/Limiter
The PA6BT features a built-in 18dB compressor/limiter. This circuit automatically reduces the dynamic range of the audio signal, preventing sudden loud peaks from distorting the sound and protecting the speakers from damage. The COMP LED illuminates when the compressor/limiter is active.
7.5 XLR Pass-Through (THRU)
The XLR THRU outputs on both channels allow you to send the unprocessed input signal from that channel to another device, such as a main mixing console or another powered speaker. This is useful for creating a separate monitor mix without affecting the main house sound.
8. Maintenance
- Cleaning: Use a soft, dry cloth to clean the exterior of the unit. Do not use liquid cleaners or solvents, as they may damage the finish or internal components.
- Storage: When not in use for extended periods, store the PA6BT in a cool, dry place, away from direct sunlight and extreme temperatures.
- Ventilation: Ensure that the ventilation openings are not blocked to prevent overheating.
- Servicing: Refer all servicing to qualified service personnel. Do not attempt to open the unit or perform repairs yourself.
9. Troubleshooting
| Problem | Possible Cause | Solution |
|---|---|---|
| No power (PWR LED off) | Power cable not connected; Power switch off; Power outlet faulty. | Ensure power cable is securely connected. Turn power switch ON. Test power outlet with another device. |
| No sound output | Volume knobs too low; Input source not connected or muted; Incorrect input selected; Faulty cable. | Increase CHAN 1, CHAN 2, or BT VOL. Check input source connection and volume. Ensure correct input is used. Test with a different cable. |
| Distorted sound / CLIP LED flashing | Input signal too high; EQ settings extreme. | Reduce the volume of the input source. Engage the -20dB Pad switch for the affected channel. Adjust EQ knobs to a more neutral position. |
| Bluetooth not pairing | PA6BT not in pairing mode; Device too far; Interference; Previously paired with another device. | Ensure PA6BT is powered on. Move device closer. Turn off other Bluetooth devices. Forget PA6BT from your device's Bluetooth list and try pairing again. |
| Feedback (howling sound) | Microphone too close to speaker; Microphone gain too high; Speaker pointed directly at microphone. | Reposition the microphone and speaker. Reduce microphone gain. Adjust EQ settings (especially MID/HI). |
10. Specifications

Figure 4: Diagram showing the dimensions of the Galaxy Audio PA6BT monitor: 12 inches deep, 7 inches wide, and 12 inches high.
| Feature | Detail |
|---|---|
| Model | PA6BT |
| Power Output | 170 Watts |
| Frequency Response | 80Hz - 18kHz |
| Speaker Type | 2-Way: 6.5" Neodymium Woofer, 1.5" Tweeter |
| Inputs | Channel 1: XLR/1/4" Combo; Channel 2: XLR/1/4" Combo, 1/8" Line In |
| Outputs | PRE OUT (Line Level), XLR THRU (Channel 1 & 2) |
| Wireless Connectivity | Bluetooth |
| Equalization | 3-Band (Low, Mid, High) |
| Dynamic Processing | Built-in 18dB Compressor/Limiter |
| Dimensions (H x W x D) | 12" x 7" x 12" (approximate) |
| Item Weight | 8.21 Pounds |
| Included Components | MSA-1 stand adaptor, IEC power cable |
| Power Source | Corded Electric |
| Color | Black |
11. Warranty and Support
11.1 Limited Warranty
The Galaxy Audio PA6BT is covered by a limited warranty. For specific terms, conditions, and duration of the warranty, please refer to the warranty card included with your product or visit the official Galaxy Audio website. Keep your proof of purchase for warranty claims.
11.2 Customer Support
For technical assistance, troubleshooting beyond this manual, or service inquiries, please contact Galaxy Audio customer support. You can find contact information and additional resources on the official Galaxy Audio website:
Ask a question about this manual
Ask about setup, troubleshooting, compatibility, parts, safety, or missing instructions. Manuals+ will review the question and use this page’s manual context to help answer it.