1. Important Safety Instructions
Always read and understand all safety warnings, instructions, illustrations, and specifications provided with this power tool. Failure to follow all instructions listed below may result in electric shock, fire, and/or serious injury.
- Work Area Safety: Keep your work area clean and well-lit. Cluttered or dark areas invite accidents. Do not operate power tools in explosive atmospheres, such as in the presence of flammable liquids, gases, or dust.
- Electrical Safety: Power tool plugs must match the outlet. Never modify the plug in any way. Avoid body contact with earthed or grounded surfaces such as pipes, radiators, ranges, and refrigerators.
- Personal Safety: Always wear eye protection. Use hearing protection when operating the tool for extended periods. Dress properly; do not wear loose clothing or jewelry. Keep hair and clothing away from moving parts.
- Tool Use and Care: Do not force the power tool. Use the correct power tool for your application. Disconnect the plug from the power source before making any adjustments, changing accessories, or storing power tools.
- Service: Have your power tool serviced by a qualified repair person using only identical replacement parts. This will ensure that the safety of the power tool is maintained.
2. Product Overview
The Dexter Power Z1 C-HW-2662SREP is an 800W SDS-Plus rotary hammer drill designed for drilling in concrete, masonry, wood, and metal, as well as light chiseling applications. It features an SDS-Plus chuck system for quick bit changes and a powerful motor for demanding tasks.
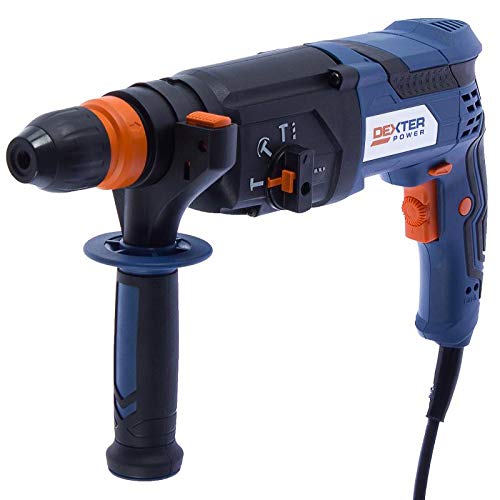
Image 1: Dexter Power Z1 C-HW-2662SREP 800W SDS-Plus Rotary Hammer Drill. This image shows the main body of the rotary hammer drill, including the handle, motor housing, and SDS-Plus chuck. The mode selector switch is visible on the side.
Components:
- SDS-Plus Chuck: For quick and secure insertion of SDS-Plus drill bits and chisels.
- Mode Selector Switch: Allows selection between drilling, hammer drilling, and chiseling functions.
- Auxiliary Handle: Provides additional grip and control during operation.
- Depth Stop: For precise drilling depth control.
- Trigger Switch: Activates the tool.
- Lock-on Button: For continuous operation.
3. Setup
3.1 Unpacking
Carefully remove the tool and all accessories from the packaging. Inspect for any damage that may have occurred during transit. Do not use the tool if it appears damaged.
3.2 Attaching the Auxiliary Handle
- Loosen the auxiliary handle by rotating it counter-clockwise.
- Slide the handle over the chuck and onto the barrel of the tool.
- Adjust the handle to a comfortable and secure position.
- Tighten the handle by rotating it clockwise until it is firmly secured.
3.3 Inserting SDS-Plus Bits
- Clean the shank of the SDS-Plus bit.
- Insert the bit into the chuck until it clicks into place. Pull on the bit to ensure it is securely locked. The SDS-Plus system allows for slight axial movement of the bit, which is normal.
- To remove the bit, pull back the chuck sleeve and pull the bit out.
3.4 Connecting to Power
Ensure the power switch is in the OFF position before plugging the tool into a suitable power outlet. The tool requires a standard electrical supply as specified in the 'Specifications' section.
4. Operating Instructions
4.1 Mode Selection
Rotate the mode selector switch to choose the desired function:
- Drilling Mode (Rotation Only): For drilling in wood, metal, or plastics.
- Hammer Drilling Mode (Rotation with Hammering): For drilling in concrete, brick, and masonry.
- Chiseling Mode (Hammering Only): For light chiseling, chipping, or demolition work.
4.2 Starting and Stopping the Tool
- To Start: Press the trigger switch.
- For Continuous Operation: Press the trigger switch and then press the lock-on button.
- To Stop (from continuous operation): Press the trigger switch again.
4.3 Drilling Techniques
- Mark the drilling point accurately.
- Hold the tool firmly with both hands using the main and auxiliary handles.
- Apply steady, even pressure. Do not force the tool.
- For deep holes, periodically withdraw the bit to clear debris.
4.4 Chiseling Techniques
- Ensure the chisel is correctly inserted and locked.
- Hold the tool firmly and guide the chisel along the desired line.
- Allow the tool's hammering action to do the work; avoid excessive pressure.
5. Maintenance
Regular maintenance ensures optimal performance and extends the life of your tool. Always disconnect the tool from the power supply before performing any maintenance.
5.1 Cleaning
- Keep the ventilation openings clean to prevent overheating.
- Wipe the tool housing with a soft, damp cloth. Do not use harsh chemicals or abrasive cleaners.
- Clean the SDS-Plus chuck regularly to ensure smooth bit insertion and removal.
5.2 Lubrication
The internal components of this tool are factory-lubricated and generally do not require user lubrication. If you notice unusual noise or reduced performance, consult a qualified service technician.
5.3 Storage
Store the tool in a dry, secure place, out of reach of children. Protect it from direct sunlight and extreme temperatures.
6. Troubleshooting
If you encounter problems with your tool, refer to the following common issues and solutions:
| Problem | Possible Cause | Solution |
|---|---|---|
| Tool does not start | No power supply; Faulty power cord/plug; Trigger switch fault | Check power outlet and connections; Inspect power cord for damage; Contact service center |
| Reduced drilling/hammering performance | Worn drill bit/chisel; Incorrect mode selected; Overheating | Replace bit/chisel; Select correct mode; Allow tool to cool down |
| Excessive vibration/noise | Loose bit; Internal component wear | Ensure bit is properly seated; Contact service center |
| Tool overheats | Blocked ventilation; Prolonged heavy use | Clean ventilation slots; Allow tool to cool; Reduce load |
If the problem persists after attempting these solutions, contact a qualified service technician.
7. Specifications
| Feature | Specification |
|---|---|
| Model | Z1 C-HW-2662SREP |
| Brand | Dexter Power |
| Power Input | 800 W |
| Power Source | Electric (corded) |
| Chuck Type | SDS-Plus |
| Functions | Drilling, Hammer Drilling, Chiseling |
8. Warranty and Support
This product comes with a manufacturer's warranty. Please refer to the warranty card included with your purchase for specific terms and conditions, including warranty period and coverage details. For technical support, spare parts, or service inquiries, please contact your retailer or the Dexter Power customer service department.
Keep your purchase receipt as proof of purchase for warranty claims.