1. Introduction
Thank you for choosing the Frigidaire FFID2426TD 24-inch Built-in Dishwasher. This manual provides essential information for the safe and efficient operation, maintenance, and care of your new appliance. Please read all instructions carefully before using the dishwasher to ensure optimal performance and longevity.
2. Safety Information
Important Safety Instructions:
- Read all instructions before using the appliance.
- This appliance is intended for normal household use only.
- Do not operate the dishwasher if it is damaged or malfunctioning. Contact qualified service personnel.
- Keep children away from the dishwasher, especially when the door is open.
- Use only detergents and rinse aids recommended for automatic dishwashers.
- Do not store or use flammable materials near the dishwasher.
- Proposition 65 Warning: This product can expose you to chemicals which are known to the State of California to cause cancer and birth defects or other reproductive harm. For more information go to www.P65Warnings.ca.gov.
3. Setup and Installation
The Frigidaire FFID2426TD is a built-in dishwasher. Proper installation is crucial for its performance and safety. It is highly recommended that installation be performed by a qualified technician to ensure compliance with local codes and manufacturer guidelines.
Key Installation Considerations:
- Ensure adequate water supply and drainage connections.
- Verify electrical requirements (120 Volts) are met.
- Securely fasten the dishwasher to prevent tipping.
- Confirm proper leveling for optimal operation.
4. Operating Instructions
Your Frigidaire dishwasher is designed for ease of use. Follow these steps for effective dishwashing.
4.1. Control Panel Overview

Image: The control panel features buttons for various wash cycles and options, including Heavy Wash, Normal Wash, Rinse Only, and options like Sanitize Wash and Delay Start.
The control panel is located on the top edge of the dishwasher door. It provides access to all wash cycles, options, and the Start/Cancel button.
4.2. Loading the Dishwasher
Proper loading ensures optimal cleaning performance. Scrape off large food particles before loading.

Image: The upper rack is designed to hold glasses, cups, and smaller bowls, ensuring thorough cleaning.
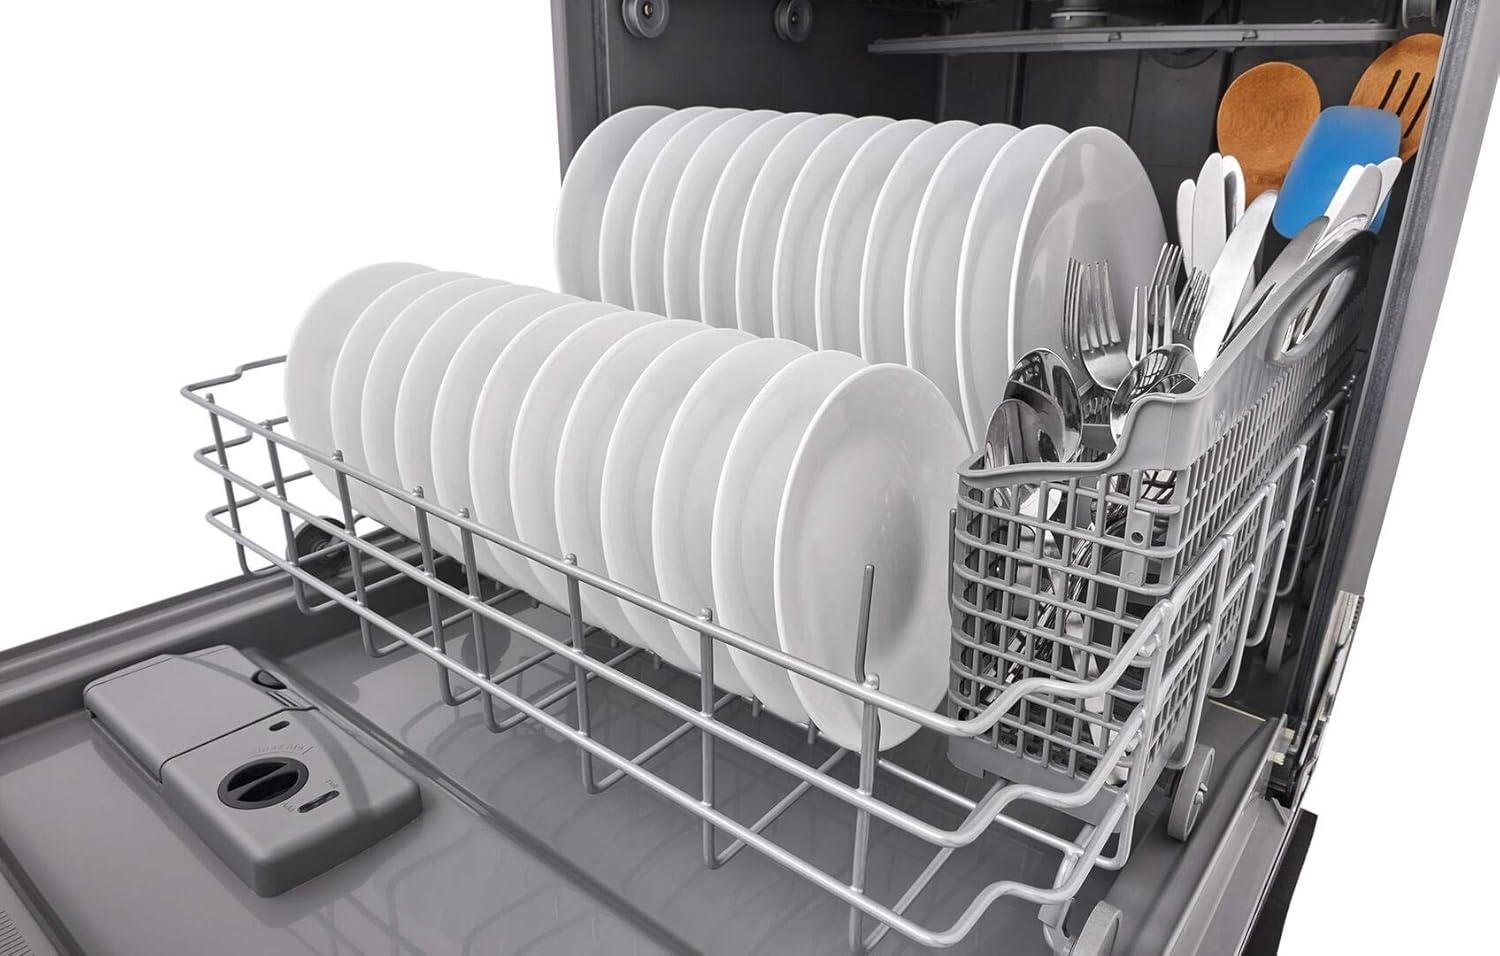
Image: The lower rack accommodates dinner plates and larger items, with a dedicated basket for silverware.
- Upper Rack: Ideal for glasses, cups, and small bowls. Ensure items are placed face down for best water coverage.
- Lower Rack: Best for dinner plates, serving dishes, and pots/pans. Position items to avoid blocking the spray arm.
- Silverware Basket: Place forks and spoons with handles up, and knives with handles down for safety. The basket can be removed if more space is needed for larger items.
4.3. Adding Detergent and Rinse Aid
Locate the detergent dispenser on the inside of the dishwasher door. Add the recommended amount of dishwasher detergent to the main wash compartment. If using rinse aid, fill the rinse aid dispenser to the indicated level. Rinse aid helps prevent water spots and improves drying performance.
4.4. Selecting a Wash Cycle and Options
Choose a wash cycle based on the soil level of your dishes:
- Heavy Wash: For heavily soiled dishes and pots.
- Normal Wash: For regularly soiled dishes.
- 1 Hr Wash: For lightly soiled dishes that need a quick wash.
- Energy Saver: An efficient cycle for normal soil levels.
- Rinse Only: To rinse dishes that will be washed later.
Select additional options as needed:
- Sanitize High: Increases water temperature for sanitization.
- Heat Dry: Uses a heating element to improve drying.
- Delay 4 Hr: Delays the start of the cycle by 4 hours.
4.5. Starting the Dishwasher
After loading dishes, adding detergent, and selecting your desired cycle and options, firmly close the dishwasher door. Press the Start/Cancel button to begin the cycle. The dishwasher will typically indicate its status (Washing, Clean, Sanitized) on the control panel.
5. Maintenance and Care
Regular maintenance helps keep your dishwasher performing at its best.
5.1. Cleaning the Exterior
Wipe the black stainless steel exterior with a soft, damp cloth and mild detergent. For stubborn spots, use a stainless steel cleaner. Avoid abrasive cleaners or scouring pads.
5.2. Cleaning the Interior
Periodically clean the interior of the dishwasher. Remove the filter at the bottom of the tub and rinse it under running water to remove any trapped food particles. You can also run a dishwasher cleaning cycle with a specialized dishwasher cleaner.

Image: This view shows the lower spray arm, which ensures water coverage, and the filter area at the bottom of the tub.
6. Troubleshooting
If your dishwasher is not operating correctly, consult the following common issues before contacting service.
- Dishes not clean: Ensure proper loading, use adequate detergent, and check that the spray arms are not blocked.
- Dishes not drying: Select the Heat Dry option and ensure the rinse aid dispenser is full.
- Dishwasher not starting: Check if the door is fully closed and latched. Ensure the power supply is connected.
- Unusual noises: Check for foreign objects in the pump area or spray arms.
For persistent issues, refer to the full troubleshooting guide in your product documentation or contact Frigidaire customer support.
7. Specifications
| Feature | Specification |
|---|---|
| Brand | Frigidaire |
| Model Name | FFID2426TD |
| Installation Type | Built-In |
| Product Dimensions (D x W x H) | 24"D x 25"W x 34.25"H |
| Capacity | 14 Place Settings |
| Color | Black Stainless Steel |
| Controls Type | Midline |
| Material | Steel (Exterior), Plastic (Inner Material) |
| Noise Level | 54 Decibels |
| Voltage | 120 Volts |
| Energy Consumption | 256 Kilowatt Hours |
| Cycle Options | Heavy, Normal, Rinse, Top Rack |
| Special Feature | Delay Start |
| Included Components | Dishwasher |
8. Warranty and Support
For warranty information and customer support, please refer to the documentation included with your purchase or visit the official Frigidaire website. Keep your proof of purchase for any warranty claims.


