1. Introduction
This manual provides detailed instructions for the safe and effective use of the GOLDEN BLUE GM1312 Digital Thermometer. This device is designed for precise temperature measurement using various thermocouple types, including J, K, T, E, N, R, and S. Please read this manual thoroughly before operating the device to ensure proper function and longevity.
2. Safety Information
WARNING: Failure to follow these safety instructions may result in injury or damage to the device.
- Do not expose the device to extreme temperatures, humidity, or direct sunlight.
- Ensure the battery compartment is securely closed before use.
- Do not attempt to disassemble or modify the thermometer. Refer all servicing to qualified personnel.
- Use only the specified battery type (3x 1.5V AAA).
- Keep the device away from strong electromagnetic fields.
- The included K-type thermocouples have a measuring range of -50°C to 300°C. For higher temperatures, use appropriate thermocouples.
3. Package Contents
Verify that all items listed below are present in your package:
- 1 x GOLDEN BLUE GM1312 Digital Thermometer
- 2 x K-type Thermocouples (-50°C to 300°C)
- 1 x User Manual (this document)
Note: AAA batteries are not included and must be purchased separately.
4. Product Overview
The GM1312 Digital Thermometer features a clear LCD display and intuitive button layout for ease of use. It supports a wide range of thermocouple types for diverse applications.

Figure 1: Front view of the GM1312 Digital Thermometer, showing the LCD display and control buttons.
4.1 Key Components
- LCD Display: Shows temperature readings, units, and mode indicators.
- Power Button (Ⓘ): Turns the device on or off.
- MAX/MIN/AVG Button: Cycles through maximum, minimum, and average temperature readings.
- HOLD Button: Freezes the current temperature reading on the display.
- °C/°F Button: Toggles between Celsius and Fahrenheit temperature units.
- TYPE Button: Selects the thermocouple type (J, K, T, E, N, R, S).
- T1/T2 Button: Switches between input channels T1 and T2 for dual-channel models.
- T1-T2 Button: Displays the temperature difference between T1 and T2.
- Thermocouple Input Ports: Located at the top of the device for connecting thermocouples.
- Battery Compartment: Located on the back for AAA battery installation.

Figure 2: The GM1312 thermometer displaying temperature with a K-type thermocouple connected to input T1.

Figure 3: Side view illustrating the dual thermocouple input ports at the top of the device.
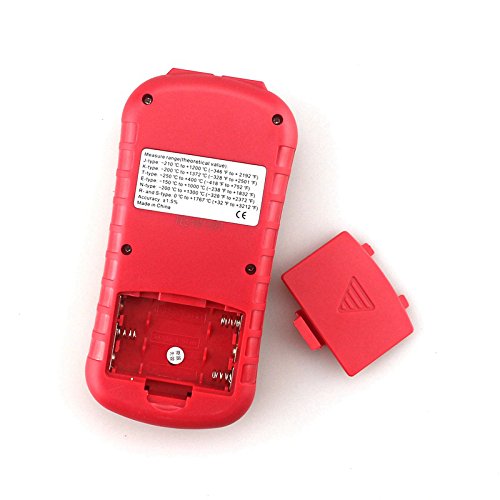
Figure 4: Rear view of the thermometer with the battery cover removed, showing the battery slots.

Figure 5: The two K-type thermocouples included with the GM1312 thermometer.
5. Setup
5.1 Battery Installation
- Locate the battery compartment cover on the back of the device (refer to Figure 4).
- Slide the cover downwards to open.
- Insert three (3) 1.5V AAA batteries, ensuring correct polarity (+/-).
- Replace the battery compartment cover and slide it upwards until it clicks into place.
5.2 Connecting Thermocouples
- Identify the thermocouple input ports at the top of the thermometer (refer to Figure 3).
- Connect the desired thermocouple (e.g., K-type) into either the T1 or T2 input port. Ensure a firm connection.
- For dual-channel measurements, connect a second thermocouple to the remaining port.
6. Operating Instructions
6.1 Power On/Off
- Press the Ⓘ (Power) button to turn the thermometer on.
- Press and hold the Ⓘ (Power) button for approximately 2 seconds to turn the thermometer off.
6.2 Selecting Temperature Units (°C/°F)
- With the device powered on, press the °C/°F button to toggle between Celsius and Fahrenheit units. The selected unit will be displayed on the LCD.
6.3 Selecting Thermocouple Type
- Press the TYPE button to cycle through the available thermocouple types (J, K, T, E, N, R, S). Ensure the selected type matches the connected thermocouple for accurate readings.
6.4 Single and Dual Channel Measurement
- If only one thermocouple is connected, the display will show the reading for that channel (T1 or T2).
- If two thermocouples are connected, press the T1/T2 button to switch between displaying the temperature for T1 or T2.
- Press the T1-T2 button to display the temperature difference between the two channels.
6.5 Data Hold Function
- Press the HOLD button to freeze the current temperature reading on the display. The "HOLD" indicator will appear.
- Press the HOLD button again to release the function and resume live readings.
6.6 MAX/MIN/AVG Readings
- Press the MAX/MIN/AVG button repeatedly to cycle through the maximum, minimum, and average temperature readings recorded since the device was powered on or the function was reset.
- To reset the MAX/MIN/AVG data, turn the device off and then on again.
7. Maintenance
7.1 Cleaning
- Wipe the device with a soft, damp cloth. Do not use abrasive cleaners or solvents.
- As per product care instructions, do not soak the device in water or any liquid.
7.2 Battery Replacement
- When the battery indicator appears on the display, replace the batteries as described in Section 5.1.
- Remove batteries if the device will not be used for an extended period to prevent leakage.
7.3 Storage
- Store the thermometer in a cool, dry place, away from direct sunlight and extreme temperatures.
- The recommended storage temperature is 20% to 90% relative humidity.
8. Troubleshooting
| Problem | Possible Cause | Solution |
|---|---|---|
| Device does not power on. | Dead or incorrectly installed batteries. | Check battery polarity or replace with new AAA batteries. |
| Inaccurate temperature readings. | Incorrect thermocouple type selected; faulty thermocouple; thermocouple not properly connected. | Ensure the correct thermocouple type is selected using the TYPE button. Check thermocouple connection. Replace thermocouple if damaged. |
| "OL" or "---" displayed. | Temperature out of range; open circuit in thermocouple; thermocouple not connected. | Ensure the measured temperature is within the thermocouple's range. Check thermocouple connection. Replace if faulty. |
9. Specifications
| Parameter | Value |
|---|---|
| Supported Thermocouple Types | J, K, T, E, N, R, S |
| Measuring Range (J-type) | -210°C to 1200°C (-346°F to 2192°F) |
| Measuring Range (K-type) | -200°C to 1372°C (-328°F to 2501°F) |
| Measuring Range (T-type) | -250°C to 400°C (-418°F to 752°F) |
| Measuring Range (E-type) | -150°C to 1000°C (-238°F to 1832°F) |
| Measuring Range (N-type) | -200°C to 1300°C (-328°F to 2372°F) |
| Measuring Range (R & S-type) | 0°C to 1767°C (32°F to 3212°F) |
| Resolution | 0.1°C/°F (<1000°); 1.0°C/°F (≥1000°) |
| Accuracy | 0.1% + 0.6°C |
| Operating Temperature | 0°C to 40°C (32°F to 104°F) |
| Storage Temperature | -10°C to 50°C (14°F to 122°F) |
| Storage Humidity | 20% to 90% RH |
| Power Supply | 3 x 1.5V AAA Battery |
| Weight | 159.0g (without batteries) |
| Included K-type Thermocouple Range | -50°C to 300°C |
| Included K-type Thermocouple Accuracy | 1.5% |
| Display Type | Digital |
| Special Feature | High Accuracy |
Note: The measuring range of the included K-type thermocouples is limited to -50°C to 300°C. For measurements outside this range, compatible thermocouples with the required range must be used.
10. Warranty and Support
The GOLDEN BLUE GM1312 Digital Thermometer is designed for reliability and performance. For warranty information, technical support, or service inquiries, please refer to the contact information provided by your retailer or visit the official GOLDEN BLUE website.
For additional resources, you may visit the GOLDEN BLUE Store on Amazon.