
1. Introduction
This manual provides detailed instructions for the installation, operation, and maintenance of your SAMDO LCD Universal Motorcycle Speedometer Gauge Odometer. This multi-functional digital instrument is designed for various motorcycles, offering speed, odometer, trip meter, gear position, RPM, fuel level, and clock displays.
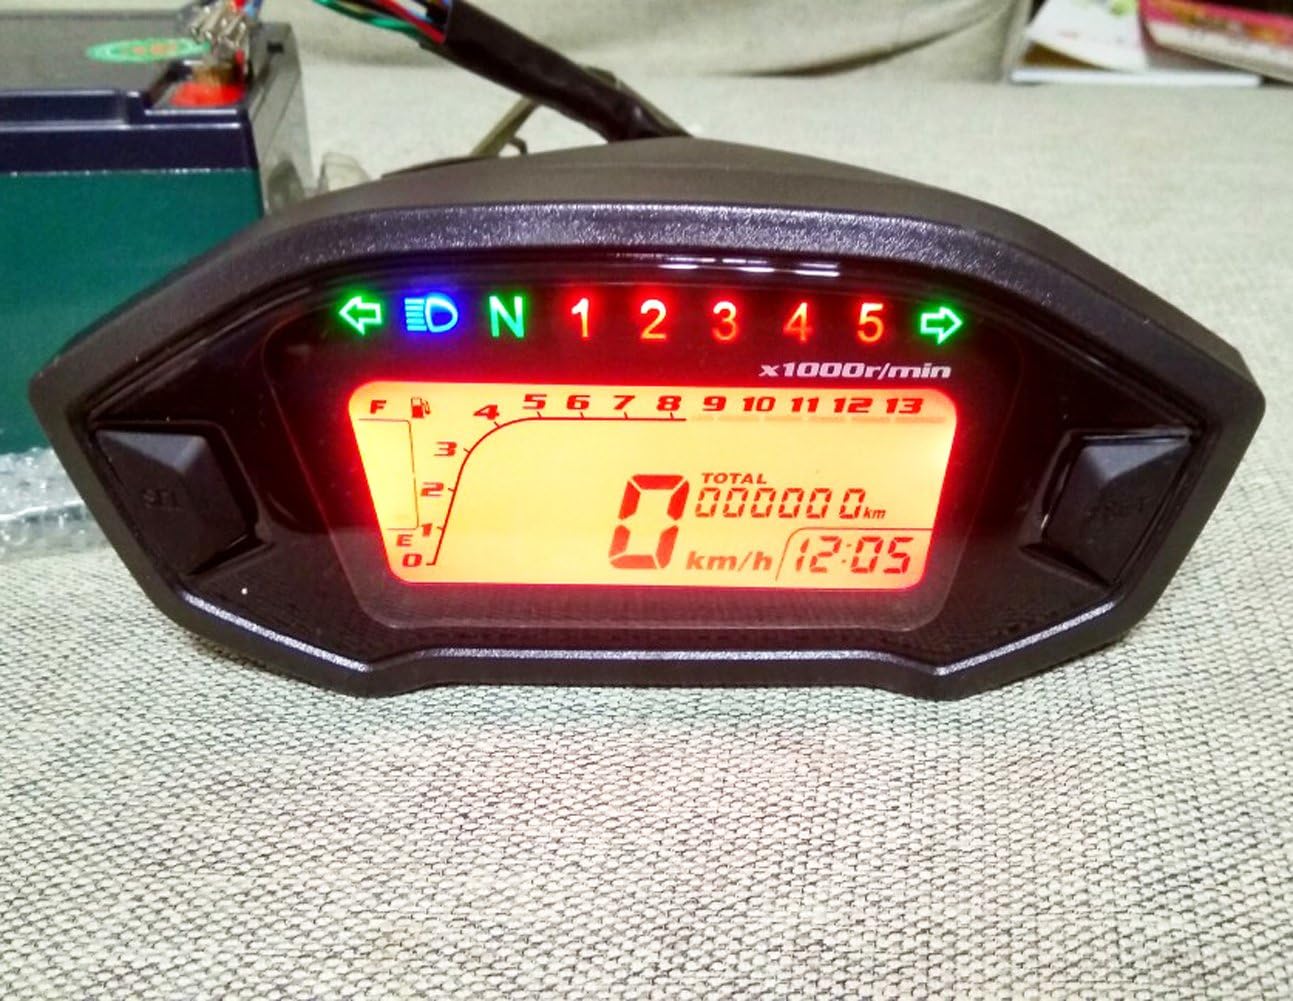
Figure 1: Front view of the SAMDO LCD Universal Motorcycle Speedometer.
2. Product Features
- Universal Compatibility: Designed for various motorcycles with tire sizes including 10", 12", 13", 17", 18", 19", 20", and 21".
- Engine Compatibility: Suitable for single-cylinder, two-cylinder, and four-cylinder carburetor motorcycles. Note: RPM function is not compatible with Electric Fuel Injection (EFI) engines.
- Multi-functional Display: Digital display for speed (0-199 km/h or mph), trip distance (0-999.9 km or miles), odometer (0-99999.9 km or miles), gear position (N, 1-5), RPM (0-10000), fuel level (LED display with low fuel warning), and clock.
- Unit Switching: Easily switch between kilometers per hour (km/h) and miles per hour (mph).
- Adjustable Settings: Features adjustable wheel perimeter and pulse settings for accurate calibration.
- Backlight Options: Offers 7 different backlight colors for personalized display.

Figure 2: The speedometer features 7 different backlight colors.
3. Package Contents
Upon unpacking, please ensure all the following items are present:
- 1x SAMDO LCD Universal Motorcycle Speedometer
- 1x Speed Sensor (length 950mm, Hall effect type)
- 2x Magnets
- 1x English Wiring Diagram
4. Installation and Setup
4.1 Physical Installation
The speedometer is designed for easy assembly. Refer to the provided wiring diagram for electrical connections. The speed sensor is a Hall effect type and comes with a 950mm cable.

Figure 3: Technical diagrams showing dimensions and rear view of the speedometer.
4.2 Wiring Instructions
Connect the RPM cable according to your motorcycle's engine type:
- For single-cylinder and two-cylinder motors: Connect the RPM cable to the trigger signal line's positive pole.
- For four-cylinder motors: Connect the RPM cable to the ignition coil input line.
Refer to the included English wiring diagram for all other connections.
4.3 Speedometer Settings
To access the background settings, power off the ignition switch. Then, press and hold both the "SEL" and "SET" buttons simultaneously while turning on the ignition. Release the buttons after 5 seconds to enter the background setting interface.

Figure 4: Speedometer setting instructions.
There are 6 interfaces for configuration:
- Interface 1: Tire Circumference Setting
- Display shows "1" and "TOTAL display C-1333" (example).
- Short press "SET" to adjust the current number.
- Long press "SET" for 3 seconds to save and enter the next interface.
- Circumference setting range: 500-2600mm.
- Interface 2: Magnet Number Setting
- Display shows "2" and "TOTAL display C--04" (example).
- Short press "SET" to adjust the number.
- Long press "SET" for 3 seconds to save and enter the next interface.
- Magnet number setting range: 1-12.
- Interface 3: Rotation Per Minute (RPM) Setting
- Display shows "3" and "TOTAL display C---2" (example, 2 means 2-cylinder).
- Short press "SET" to shift between 2/4 cylinder.
- Long press "SET" for 3 seconds to enter the next interface.
- Interface 4: 2-wire/3-wire Fuel Setting
- Display shows "4" and "TOTAL display E---3" (example, 3 means 3-wire fuel instrument).
- Short press "SET" to shift between 2-wire and 3-wire fuel instrument.
- Long press "SET" for 3 seconds to save and enter the next interface.
- Refer to the table below for resistance values for fuel level indication:
Grid 2 Wires (Ohms) 3 Wires (Ohms) 0 Grid (Empty) Above 96 Ω Above 566 Ω 1 Grid 94-95 566-531 2 Grid 81-93 530-448 3 Grid 61-80 447-345 4 Grid 51-60 344-243 5 Grid 31-50 242-140 6 Grid 21-30 139-40 7 Grid (Full) Bellow 20 Ω Bellow 41 Ω - Interface 5: Switch Kph/Mph
- Display shows "5" and "km/h" or "mph" in the lower right corner.
- Short press "SET" to switch between km/h and mph.
- Long press "SET" for 3 seconds to save and exit.
- Interface 6: Mileage Clearance
- Display shows "6".
- Short press "SET" to clear mileage. This can be done up to 3 times after 200km.
- Long press "SET" to save and quit.
5. Operating Instructions
5.1 Basic Operation
Once installed and configured, the speedometer will display real-time information including speed, RPM, gear position, fuel level, odometer, trip meter, and clock.

Figure 5: Pressing the SET button to change between MPH and KMH.
5.2 Switching Units (MPH/KMH)
To switch between MPH and KMH, enter the background settings (Interface 5) as described in Section 4.3. Short press the "SET" button to toggle the unit, then long press "SET" to save and exit.
5.3 Clearing Trip Distance
The trip distance can be cleared. Refer to Interface 6 in Section 4.3 for detailed instructions on mileage clearance.
5.4 Changing Backlight Color
The speedometer offers 7 backlight colors. To change the backlight color, press the "SEL" button. Each short press will cycle through the available colors.

Figure 6: Example of different backlight colors available.
6. Maintenance
The SAMDO speedometer is designed for durability and requires minimal maintenance. Keep the display clean using a soft, damp cloth. Avoid abrasive cleaners or solvents that could damage the screen or casing. Regularly check all wiring connections for security and ensure the speed sensor and magnets are free from debris.
7. Troubleshooting
- RPM Function Not Working: Ensure your motorcycle does not have an Electric Fuel Injection (EFI) engine. This speedometer's RPM function is not compatible with EFI systems. Verify the RPM cable is correctly connected to the trigger signal line (for 1/2 cylinder) or ignition coil input (for 4 cylinder).
- Speedometer/Odometer Not Registering:
- Check the speed sensor installation. Ensure the magnets are securely in place and the sensor is positioned correctly to register them. The sensor may need to be adjusted for depth.
- Verify the tire circumference setting (Interface 1) and magnet number setting (Interface 2) are correctly configured.
- Fuel Level Display Issues (e.g., always full or flashing empty):
- Ensure the fuel wire is not grounded if your motorcycle has a fuel level sender. Grounding the fuel wire can cause the odometer to malfunction and the fuel gauge to show full.
- Check the 2-wire/3-wire fuel setting (Interface 4) matches your motorcycle's fuel instrument type.
- If your bike does not have a fuel level sender, a resistor may be needed in line with the fuel wire to simulate a full or half-full tank, preventing the display from flashing empty. Refer to the resistance table in Section 4.3 for guidance.
- Incorrect Speed Reading: Adjust the tire circumference setting (Interface 1) to fine-tune speed accuracy. Compare with a GPS-enabled device for calibration.
- Odometer Reset: To reset the odometer and trip odometer, hold down the "SET" button while turning the key from off to on, and continue holding until the gauge lights up and completes its self-check.
8. Specifications
| Feature | Specification |
|---|---|
| Working Temperature | -30°C to 85°C |
| Working Voltage | 9-16V |
| Item Height | 55 mm |
| Item Width | 95 mm |
| Item Length | 195 mm |
| Item Weight | 500 g (approx. 1.1 pounds) |
| Speed Range | 0-199 km/h or mph |
| Trip Distance Range | 0-999.9 km or miles |
| Odometer Range | 0-99999.9 km or miles |
| RPM Range | 0-10000 RPM |
| Speed Sensor Type | Hall Effect |
| Speed Sensor Length | 950 mm |
9. Support
For further assistance or inquiries regarding your SAMDO LCD Universal Motorcycle Speedometer, please refer to the contact information provided with your purchase or visit the official SAMDO support channels. When contacting support, please have your model number (132246) and a detailed description of your issue ready.