
NMD DB600D
NMD Auto Light Sensor System User Manual
Model: DB600D
Product Overview
The NMD Autolight system is designed to automatically control your vehicle's lighting system. It switches lights on as it gets dark and off when it gets light, eliminating the need for manual operation. This system is safe, easy to install, and does not interfere with the vehicle's existing electrical system. It is universally compatible with all 12V vehicles.
Key features include automatic light control based on ambient light, adjustable light sensor sensitivity, handbrake integration, and a manual ON/OFF switch on the light sensor. It supports vehicles with both negative and positive headlight systems.
Safety Precautions
- This unit is designed for vehicles with 12V DC power supply only.
- It is highly recommended to have this unit installed by a professional auto technician to ensure proper functionality and safety.
- When extending cables, always use the same type and gauge of cable to maintain electrical integrity.
- Always perform a thorough test after completing the installation to verify correct operation.
- The sensitivity of the light sensor can be adjusted to suit different environmental conditions and user preferences.
Technical Specifications
| Specification | Value |
|---|---|
| Rated Voltage | 12V ± 4V |
| Max. Rated Current | <25A |
| Operation Mode | ON-OFF |
| Operating Voltage | 12 Volts |
| Current Rating | 25 Amps |
| Contact Type | Normally Open |
| Connector Type | Cable With Screw Terminals |
| Mounting Type | Panel Mount |
| Actuator Type | Push Button |
| International Protection Rating | IP65 |
| Color | Black |
| Item Weight | 10.6 ounces |
| Model Number | DB600D |
Product Components


Installation Guide
Proper installation is crucial for the optimal performance and safety of the NMD Autolight system. It is strongly recommended that installation be performed by a qualified automotive technician.

- Remove Trim: Carefully remove the trim from around the light switch area in your vehicle.
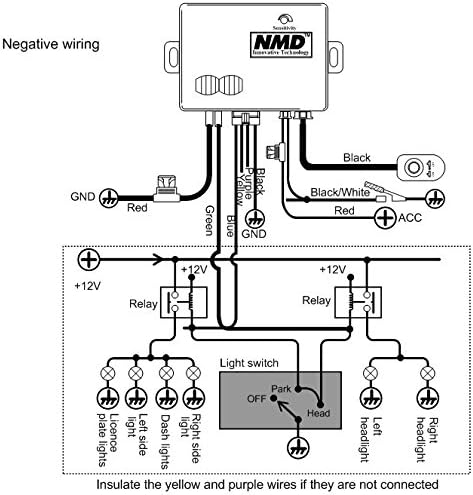
- Connect Wires: Connect all necessary wires as per the provided wiring diagram. Ensure all connections are secure.
- Install ECU: Connect the main control unit (ECU) and fasten it securely in a suitable location.
- Install Light Sensor: Fix the light sensor to the windscreen. If the handbrake wire is connected, the headlights will switch off and side lights will remain on when the handbrake is applied.
- Connect Handbrake Wire: Connect the Black/White wire to the handbrake wire.
- Function Test: After installation is complete, perform a comprehensive test to ensure all functions operate correctly. The sensitivity of the light sensor can be adjusted during this step.
- Refit Trim: Once satisfied with the installation and testing, refit all removed trim pieces.
Wiring Diagrams
Refer to the following diagrams for correct wiring connections based on your vehicle's headlight system.


Operation
The NMD Autolight system operates by sensing ambient light conditions to automatically control your vehicle's headlights and parking lights.
- Automatic ON/OFF: The system will automatically turn your vehicle's lights ON when it detects low light conditions (e.g., at dusk, in tunnels, or in garages) and turn them OFF when sufficient light is detected.
- Adjustable Sensitivity: The sensitivity of the light sensor can be adjusted to fine-tune when the lights activate or deactivate. This allows customization based on personal preference and typical driving environments.
- Manual Override: A push-button switch located on the back of the light sensor allows you to manually turn the Autolight system ON or OFF, providing full control when needed.
- Handbrake Integration: If the handbrake wire is connected during installation, the system is designed to switch off the headlights while the handbrake is engaged, keeping only the side lights on.
Maintenance
The NMD Autolight system is designed for minimal maintenance. To ensure continued optimal performance:
- Keep Sensor Clean: Periodically clean the light sensor with a soft, dry cloth to ensure it is free from dust, dirt, or obstructions that could affect its sensitivity.
- Inspect Wiring: Occasionally inspect visible wiring for any signs of wear, damage, or loose connections. Address any issues promptly.
- Professional Check-up: If you experience any unexpected behavior or issues, consult a professional auto technician for diagnosis and repair.
Troubleshooting
If you encounter issues with your NMD Autolight system, consider the following common troubleshooting steps:
- Lights Not Turning On/Off Automatically:
- Check the light sensor for obstructions or dirt.
- Verify the light sensor's sensitivity setting. Adjust if necessary.
- Ensure the manual ON/OFF switch on the light sensor is in the ON position.
- Inspect all wiring connections for looseness or corrosion.
- System Not Responding:
- Check the vehicle's 12V DC power supply to the unit.
- Ensure all fuses related to the lighting system and the Autolight unit are intact.
- Interference with Vehicle Electrical System:
- The system is designed not to interfere. If interference occurs, re-check installation wiring for any incorrect connections or shorts. Consult a professional.
For persistent issues, it is advisable to seek assistance from a certified automotive electrician or the product manufacturer.
Warranty and Support
For information regarding product warranty, returns, or technical support, please refer to the purchase documentation or contact NMD customer service directly. Ensure you have your product model number (DB600D) and purchase details available when contacting support.
Manufacturer: NMD
Model: DB600D
UPC: 606220084945, 787893783264
Ask a question about this manual
Ask about setup, troubleshooting, compatibility, parts, safety, or missing instructions. Manuals+ will review the question and use this page’s manual context to help answer it.