
1. Introduction
Thank you for purchasing the XINDA PJ-XD1736B Projector. This manual provides essential information for the safe and efficient operation of your device. Please read it thoroughly before use and retain it for future reference.
2. Important Safety Information
To prevent fire, electric shock, or injury, always observe the following safety precautions:
- Do not look directly into the projector lens when the lamp is on. The intense light can cause eye damage.
- Ensure proper ventilation. Do not block ventilation openings. Overheating can lead to malfunction or fire.
- Use only the power adapter supplied with the projector. Using an incorrect adapter may cause damage or fire.
- Keep the projector away from water or other liquids. Do not operate in damp or wet conditions.
- Place the projector on a stable, level surface to prevent it from falling.
- Unplug the projector from the power outlet during lightning storms or when unused for extended periods.
- Do not attempt to repair the projector yourself. Refer all servicing to qualified personnel.
3. Package Contents
Please check that all items are present:
- XINDA PJ-XD1736B Projector
- Power Adapter
- Remote Control
- HDMI Cable
- AV Cable
- User Manual
4. Product Overview
Familiarize yourself with the projector's components:
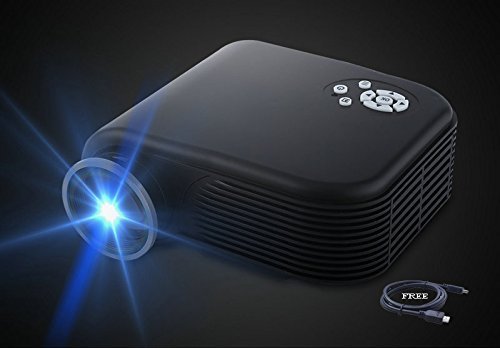
Figure 4.1: Front view of the XINDA PJ-XD1736B Projector, showing the lens and ventilation.
4.1. Front Panel
- Projection Lens: Emits the image.
- Focus Ring: Adjusts image clarity.
4.2. Rear Panel
- Power Port: Connects to the power adapter.
- HDMI Port: Connects to HDMI-enabled devices (laptops, DVD players).
- USB Port: Connects to USB storage devices for media playback.
- VGA Port: Connects to computers via VGA cable.
- AV Port: Connects to older devices using an AV cable.
- Audio Out: Connects to external speakers or headphones.
4.3. Top Panel
- Power Button: Turns the projector on/off.
- Menu Button: Accesses the on-screen display (OSD) menu.
- Navigation Buttons: Used to navigate menus and adjust settings.
- Source Button: Selects input source.
5. Setup
5.1. Placement
Place the projector on a flat, stable surface. The projection distance will determine the screen size. Ensure there is adequate space around the projector for ventilation.
5.2. Power Connection
- Connect the power adapter to the projector's power port.
- Plug the power adapter into a suitable electrical outlet.
5.3. Connecting Input Devices
The projector supports multiple input sources:
- HDMI: Connect an HDMI cable from your device (e.g., laptop, DVD player) to the projector's HDMI port.
- USB: Insert a USB flash drive into the USB port for direct media playback.
- VGA: Connect a VGA cable from your computer to the projector's VGA port.
- AV: Use the provided AV cable to connect to devices with AV output.
6. Operation
6.1. Powering On/Off
- Power On: Press the Power button on the projector or remote control. The indicator light will turn blue.
- Power Off: Press the Power button again. The indicator light will turn red.
6.2. Focus Adjustment
Rotate the focus ring on the front of the projector until the image appears clear and sharp on the screen.
6.3. Input Source Selection
Press the 'Source' button on the projector or remote control to cycle through available input sources (HDMI, USB, VGA, AV). Select the desired input.
6.4. Menu Navigation
Press the 'Menu' button to access the OSD menu. Use the navigation buttons (Up/Down/Left/Right) to browse options and 'OK' to confirm selections. Press 'Menu' again to exit.
6.5. Audio Output
The projector has a built-in speaker. For enhanced audio, connect external speakers or headphones to the 'Audio Out' port.
7. Maintenance
7.1. Cleaning the Lens
Use a soft, lint-free cloth or lens cleaning paper to gently wipe the projector lens. Do not use abrasive cleaners or excessive force.
7.2. Cleaning the Projector Body
Wipe the projector's exterior with a soft, dry cloth. For stubborn marks, a slightly damp cloth can be used, followed by a dry cloth.
7.3. Ventilation
Regularly check that the ventilation openings are clear of dust and debris to ensure proper airflow and prevent overheating.
7.4. Storage
When not in use for extended periods, store the projector in a cool, dry place, protected from dust and direct sunlight.
8. Troubleshooting
| Problem | Possible Cause | Solution |
|---|---|---|
| No image on screen | Power not connected; Incorrect input source; Cable not connected properly. | Check power connection; Select correct input source; Reconnect cables securely. |
| Image is blurry | Focus not adjusted. | Adjust the focus ring on the lens. |
| No sound | Volume too low; External audio device not connected; Source device volume low. | Increase projector volume; Check external audio connection; Increase source device volume. |
| Remote control not working | Batteries low/dead; Obstruction between remote and projector. | Replace batteries; Ensure clear line of sight to IR receiver. |
| Projector overheats | Blocked ventilation. | Ensure ventilation openings are clear and projector has adequate space. |
9. Specifications
| Feature | Detail |
|---|---|
| Brand Name | XINDA |
| Model Number | PJ-XD1736B |
| Item Weight | 2.3 pounds |
| Product Dimensions | 7.5 x 2.7 x 5.2 inches |
| Special Feature | Portable |
| Speaker Type | Built-In |
| Connectivity Technology | HDMI, USB, VGA cable |
| Display Resolution Maximum | 1920 x 1080 |
10. Warranty Information
This product comes with a manufacturer's warranty. Please refer to the warranty card included in your package or contact XINDA customer support for detailed warranty terms and conditions.
11. Customer Support
For technical assistance, troubleshooting, or product inquiries, please contact XINDA customer support. Contact details can typically be found on the product packaging or the official XINDA website.