1. Important Safety Instructions
Please read these instructions carefully before installing and operating your microwave oven. Keep this manual for future reference. Failure to follow these instructions may result in electric shock, fire, or injury.
- Grounding: This appliance must be properly grounded. Connect only to a properly installed and grounded outlet.
- Supervision: Close supervision is necessary when the appliance is used by or near children.
- No Empty Operation: Do not operate the oven when empty. This can damage the appliance.
- Metal Objects: Do not place metal containers, foil, or utensils in the microwave oven during microwave cooking, as this can cause arcing or fire.
- Flammable Materials: Do not store or use flammable materials near the oven.
- Food Safety: Do not heat sealed containers, as they may explode. Pierce foods with skins (e.g., potatoes, apples) before cooking.
- Hot Surfaces: The oven cavity, door, and accessories become hot during operation, especially when using the grill function. Use oven mitts.
- Repair: Do not attempt to repair or modify the appliance yourself. Contact qualified service personnel.
2. Product Overview
The Amica EMW 13184 E is a built-in grill microwave oven designed for convenient and efficient cooking. It features a 20-liter capacity and 800W microwave power, complemented by a grill function for versatile meal preparation. The appliance is finished in stainless steel for durability and a modern aesthetic.
Key Features:
- Capacity: 20 Liters
- Microwave Power: 800 Watts
- Grill Function: For browning and crisping.
- Control Type: Button and knob controls for easy operation.
- Installation: Designed for built-in integration into kitchen cabinetry.
Components:
- Control Panel
- Door Release Button
- Oven Window
- Turntable Ring
- Glass Turntable
- Grill Element (located inside the oven cavity)

Figure 1: Front view of the Amica EMW 13184 E Built-in Grill Microwave Oven, showing the control panel, door, and stainless steel finish.
3. Setup and Installation
This microwave oven is designed for built-in installation. Ensure that the installation space meets the specified dimensions and ventilation requirements to ensure proper operation and safety.
Cabinet Requirements:
- The cabinet opening must be precisely measured according to the diagrams provided.
- Ensure adequate ventilation space is maintained around the appliance, especially at the rear and top.
- The cabinet material must be heat-resistant.
Installation Steps:
- Prepare the cabinet opening according to the dimensions shown in Figure 2.
- Ensure the electrical outlet is accessible and properly grounded.
- Carefully slide the microwave oven into the prepared cabinet opening.
- Secure the oven to the cabinet using the provided screws through the mounting holes in the trim kit.
- Verify that the oven is level and securely fastened.
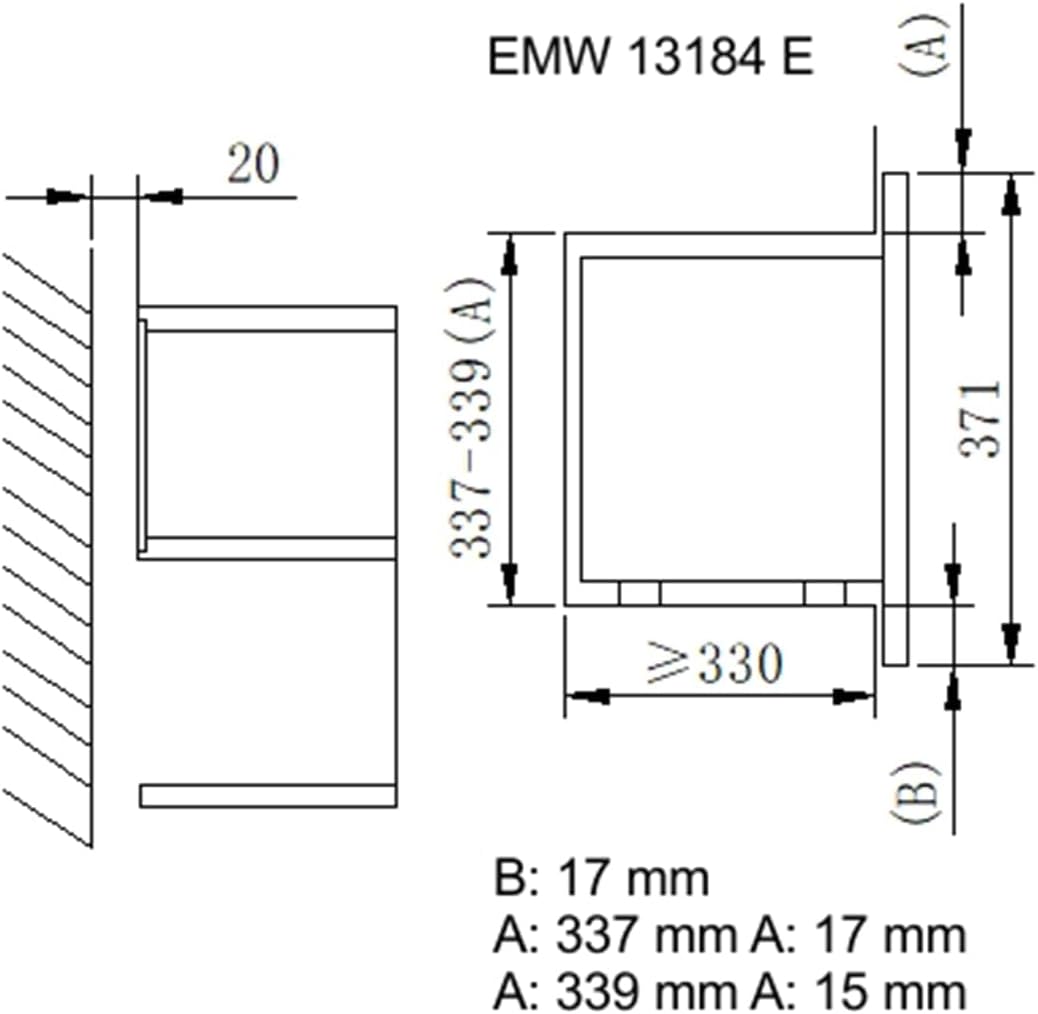
Figure 2: Installation diagram showing required cabinet dimensions and ventilation space for the Amica EMW 13184 E. Key dimensions include a minimum width of 560mm for the opening, a height of 353-375mm, and a minimum depth of 330mm for the appliance itself. The overall front panel dimensions are approximately 595mm wide and 372mm high.
4. Operating Instructions
Familiarize yourself with the control panel before operating the oven. The control panel typically includes a display, function buttons, and a rotary knob for setting time and power levels.
4.1. Setting the Clock (Initial Setup)
- Plug in the oven. The display will show "0:00" or similar.
- Press the "Clock" button (if available) or follow the specific instructions in your full manual for clock setting.
- Use the rotary knob to set the hour, then press "Clock" again.
- Use the rotary knob to set the minutes, then press "Clock" to confirm.
4.2. Microwave Cooking
- Place food in a microwave-safe container on the glass turntable.
- Close the oven door securely.
- Press the "Microwave" button or select the desired power level using the rotary knob.
- Turn the rotary knob to set the cooking time.
- Press the "Start" button to begin cooking.
4.3. Grill Cooking
- Place food on the grill rack (if provided) or a heat-resistant dish.
- Close the oven door.
- Press the "Grill" button.
- Turn the rotary knob to set the grilling time.
- Press the "Start" button. The grill element will heat up.
- Caution: The oven interior and door will become very hot during grill operation.
4.4. Combination Cooking
Combination cooking allows you to use both microwave and grill functions simultaneously or sequentially for faster cooking and browning.
- Place food in a suitable container for both microwave and grill use.
- Press the "Combi" button (or similar) to select the desired combination mode (e.g., Microwave + Grill 1, Microwave + Grill 2).
- Turn the rotary knob to set the total cooking time.
- Press the "Start" button.
4.5. Defrost Function
The defrost function allows you to thaw frozen foods by weight or time.
- Place frozen food in a microwave-safe container.
- Press the "Defrost" button.
- Select defrost by weight or time using the rotary knob or specific buttons.
- Enter the weight or time.
- Press "Start".
5. Maintenance and Cleaning
Regular cleaning and maintenance will ensure the longevity and efficient operation of your microwave oven.
General Cleaning:
- Before Cleaning: Always unplug the oven from the power outlet before cleaning.
- Interior: Wipe the interior cavity with a damp cloth after each use. For stubborn food splatters, place a bowl of water with lemon slices inside and microwave for 2-3 minutes to loosen residue, then wipe clean.
- Exterior: Clean the exterior surfaces with a soft, damp cloth. Avoid abrasive cleaners or harsh detergents that could damage the stainless steel finish.
- Door Seal: Keep the door seal and adjacent parts clean. Use a mild detergent and a soft cloth.
- Turntable: The glass turntable and turntable ring can be removed and washed in warm soapy water or in a dishwasher. Ensure they are completely dry before placing them back in the oven.
- Grill Element: For grill residue, gently wipe with a damp cloth after the oven has cooled completely. Do not use abrasive materials directly on the heating element.
6. Troubleshooting
If you encounter problems with your microwave oven, consult the following table for common issues and solutions. If the problem persists, contact qualified service personnel.
| Problem | Possible Cause | Solution |
|---|---|---|
| Oven does not start. | Power cord not plugged in; Door not closed properly; Fuse blown or circuit breaker tripped. | Ensure power cord is securely plugged in; Close door firmly; Check household fuse/circuit breaker. |
| Food not heating. | Door not closed properly; Cooking time or power level set incorrectly; Food container not microwave-safe. | Ensure door is closed; Adjust cooking time/power; Use microwave-safe cookware. |
| Turntable not rotating. | Turntable not correctly placed; Turntable ring dirty or damaged. | Reposition turntable and ring; Clean turntable ring and roller support. |
| Sparks or arcing inside oven. | Metal objects in oven; Food splatters on cavity walls. | Remove all metal objects; Clean oven interior thoroughly. |
7. Specifications
- Brand: Amica
- Model: EMW13184E
- Type: Built-in Grill Microwave Oven
- Capacity: 20 Liters
- Microwave Power: 800 Watts
- Installation Type: Built-in
- Item Weight: 12500 Grams (12.5 kg)
- Control Interface: Buttons and Rotary Knob
- Material: Stainless Steel (implied by product title)
- ASIN: B06Y3T984B
- GTIN: 04040729131841
8. Warranty and Support
This Amica appliance comes with a manufacturer's warranty. Please refer to the warranty card included with your purchase or contact your retailer for specific warranty terms and conditions.
For technical support, service, or to order spare parts, please contact Amica customer service or an authorized service center. Contact details can typically be found on the Amica official website or in your purchase documentation.


