Introduction
This manual provides detailed instructions for the installation, operation, and maintenance of your eMylo Wireless Relay Remote Control Switch System. This system is designed for remote control applications, offering reliable wireless switching for various electrical devices. Please read this manual thoroughly before use to ensure proper functionality and safety.
Product Features
- RF Technology: Utilizes advanced RF technology for extended remote control distance and stable signal transmission.
- High Sensitivity Receiver: The receiving module offers high signal sensitivity, cost-effectiveness, and robust interference resistance for enhanced stability.
- Non-Directional Wireless Encoding: Employs non-directional wireless encoding, enabling independent control without mutual interference between multiple units.
- Flexible Configuration: Programmable transmitters and receivers allow for flexible quantity configuration and various operating modes.
- Wide Application: Suitable for industrial control and security applications, including lighting, motors, remote controllers, wireless security alarms, and wireless door alarms.
Package Contents
The package includes the following components:
- 2 x Wireless Transmitters
- 4 x Wireless Receivers
- 1 x User Manual
Specifications
Receiver Specifications
| Feature | Specification |
|---|---|
| Input Voltage | AC 220V-230V-240V |
| Channel | 1 channel |
| Frequency | 433MHz |
| Encoding Mode | Intelligent-learning code |
| Output Type | Passive output (Relay with NC-NO contacts) |
| Max Load | 10A / 1000W |
| Sensitivity | -105dB |
| Operating Temperature | -30°C to 70°C |
| Operating Humidity | <95% RH |
| Dimensions | 65mm x 37mm x 22mm (2.56 x 1.46 x 0.87 inches) |
| Mounting Type | Surface Mount |
| Number of Terminals | 3 |
Transmitter Specifications
| Feature | Specification |
|---|---|
| Operating Voltage | DC 6V |
| Operating Frequency | 433MHz |
| Vibration Resistance | 4.7M |
| Chip Type | PT2260 |
| Modulation | ASK (Amplitude Shift Keying) |
| Encode Type | Group Coding |
| Battery Type | 2 x 3V CR2016 batteries |
| Remote Distance | 30-50m (Theoretical value, open area) |
| Ambient Temperature | -30°C to 70°C |
| Operating Humidity | <95% RH |
| Dimensions | 135mm x 42mm x 25mm |
Safety Information
Please observe the following safety precautions to prevent injury or damage to the device:
- Electrical Safety: Installation should be performed by a qualified electrician or knowledgeable individual. Ensure power is disconnected before wiring.
- Voltage Compatibility: Verify that the input voltage of the receiver matches your power supply (AC 220V-240V).
- Load Capacity: Do not exceed the maximum load of 10A or 1000W to prevent overheating and damage.
- Environmental Conditions: Avoid exposing the receiver to extreme temperatures, high humidity, or direct water contact.
- Antenna: Do not cut or modify the antenna on the receiver, as this may reduce performance.
- Children: Keep the device and remote control out of reach of children.
Setup
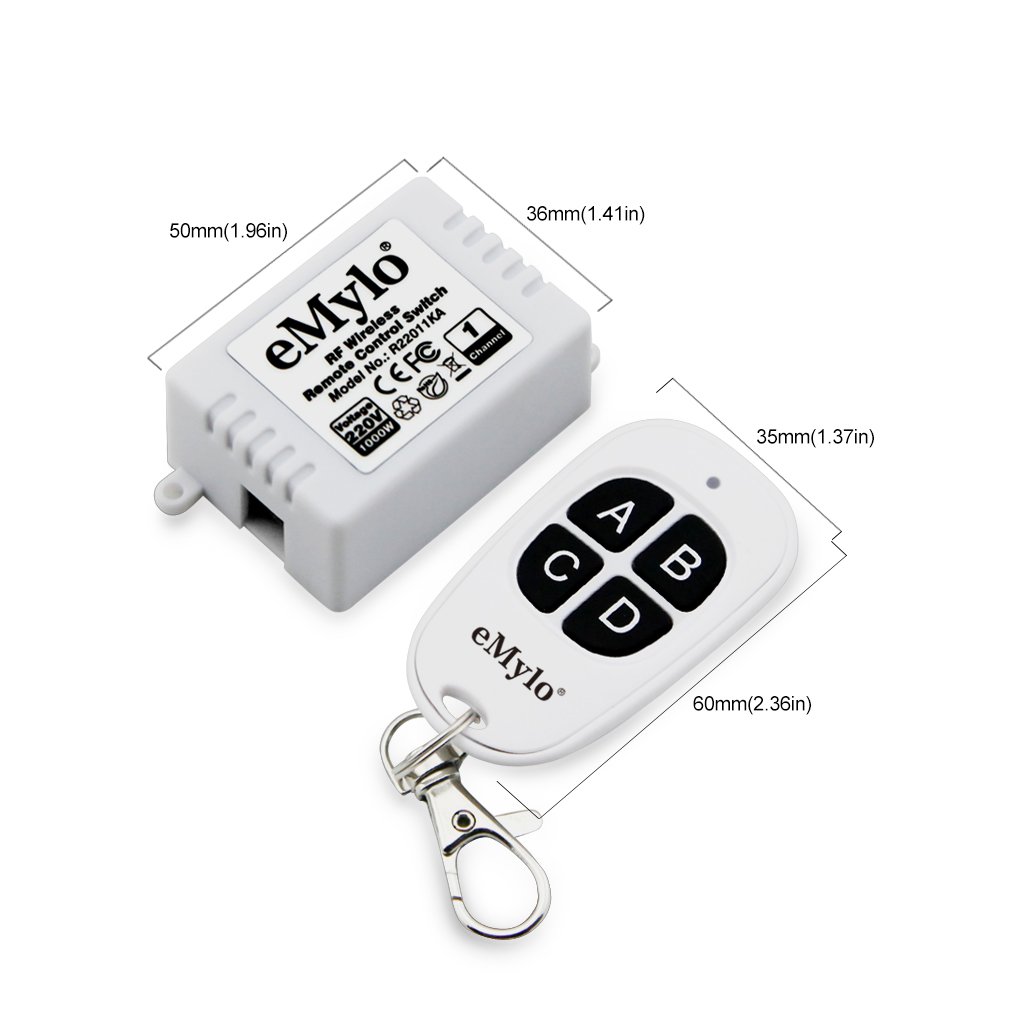
Component Overview and Dimensions
Familiarize yourself with the receiver and transmitter components and their dimensions.
Wiring Diagram for Light Control
The following diagram illustrates how to wire the receiver to control a light fixture. Ensure all connections are secure and insulated.

Wiring Steps:
- Connect the 220V Live line to the appropriate input terminal on the receiver.
- Connect the Null line to the corresponding input terminal on the receiver.
- Connect one wire from your light fixture to the output terminal labeled for the switched live.
- Connect the other wire from your light fixture to the Null line.
- Ensure all connections are tight and properly insulated.
Connecting to Power Source
After completing the wiring, connect the receiver to the AC 220V-240V power source. The green power indicator on the receiver will illuminate, indicating that the device is powered on and ready for operation.
Operating Instructions
This section details how to clear existing codes, select an operating mode, and pair the transmitter with the receiver.
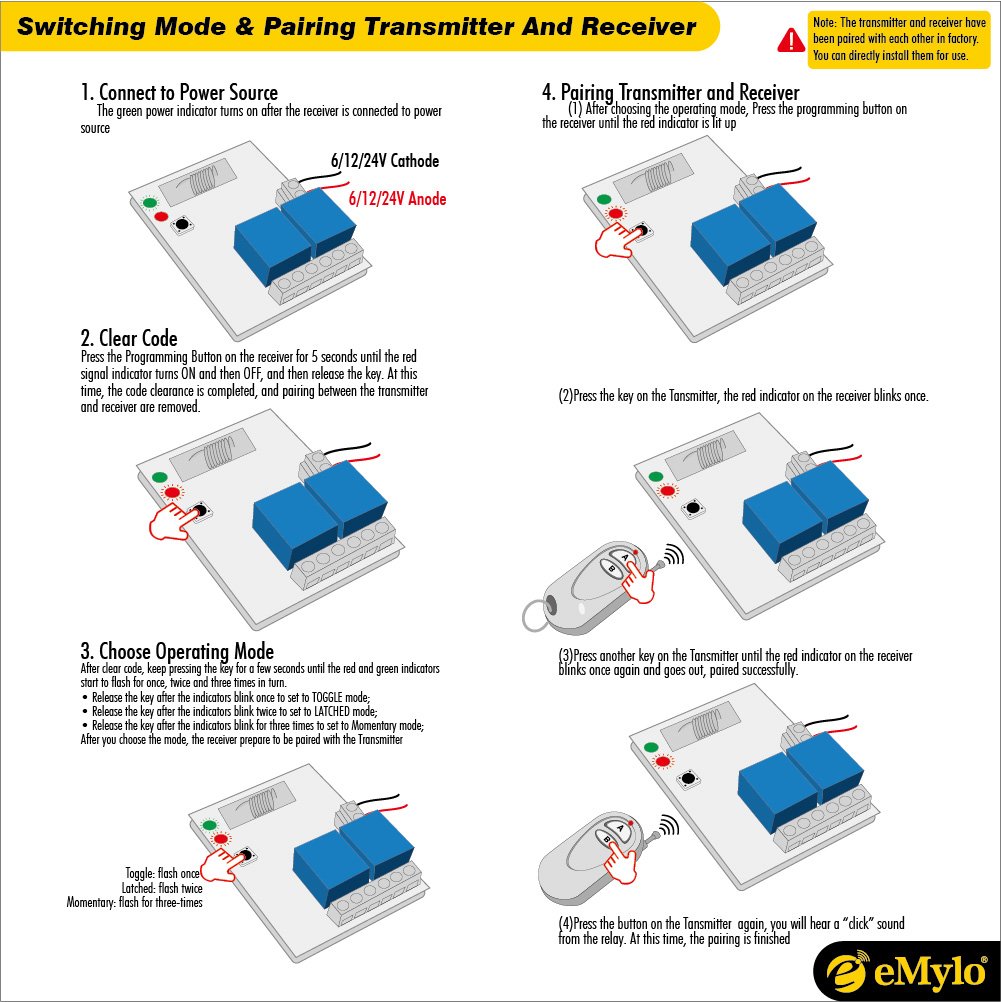
1. Clear Existing Codes
Before pairing a new transmitter or changing operating modes, it is recommended to clear any previously stored codes:
- Press and hold the Programming Button on the receiver for approximately 5 seconds.
- The red signal indicator will turn ON and then OFF.
- Release the button. The code clearance is now complete, and all previous pairings are removed.
2. Choose Operating Mode
After clearing codes, select the desired operating mode by pressing the Programming Button for a specific duration:
- Press and hold the Programming Button for approximately 3 seconds until the red and green indicators begin to flash.
- Toggle Mode: Release the button after the indicators blink once. In this mode, one press of the transmitter button turns the relay ON, and another press turns it OFF.
- Latched Mode: Release the button after the indicators blink twice. In this mode, pressing one transmitter button turns the relay ON, and pressing another transmitter button turns it OFF. (Note: This mode typically requires multiple buttons on the transmitter or multiple transmitters).
- Momentary Mode: Release the button after the indicators blink three times. In this mode, the relay remains ON only while the transmitter button is pressed and held. It turns OFF when the button is released.
Once the mode is selected, the receiver is ready to be paired with the transmitter.
3. Pairing Transmitter and Receiver
To pair your transmitter with the receiver:
- After selecting the operating mode, press any key on the Transmitter. The red indicator on the receiver will blink once.
- Press another key (or the same key, depending on the mode) on the Transmitter. The red indicator on the receiver will blink once again and then go out, indicating successful pairing.
- Press the button on the Transmitter again. You should hear a "click" sound from the relay, confirming that the pairing process is complete and the system is operational.
Maintenance
To ensure the longevity and optimal performance of your eMylo Wireless Relay Remote Control Switch System, follow these maintenance guidelines:
- Cleaning: Use a soft, dry cloth to clean the exterior of the receiver and transmitter. Do not use liquid cleaners or solvents.
- Battery Replacement (Transmitter): When the remote control range decreases or the indicator light on the transmitter dims, it may be time to replace the batteries. The transmitter uses two 3V CR2016 batteries. Open the transmitter casing carefully, replace the old batteries with new ones, ensuring correct polarity, and reassemble.
- Environmental Protection: Protect the receiver from dust, moisture, and extreme temperatures. Ensure it is installed in a well-ventilated area.
- Connection Checks: Periodically check all wired connections to the receiver to ensure they remain secure and free from corrosion.
Troubleshooting
If you encounter issues with your eMylo Wireless Relay Remote Control Switch System, refer to the following troubleshooting steps:
| Problem | Possible Cause | Solution |
|---|---|---|
| Receiver does not respond to transmitter. | Not paired, incorrect operating mode, dead transmitter battery, out of range. | Clear codes and re-pair the transmitter and receiver. Ensure the correct operating mode is selected. Replace transmitter batteries. Move closer to the receiver. |
| Short remote control distance. | Weak transmitter battery, environmental interference, physical obstructions. | Replace transmitter batteries. Reduce sources of interference (e.g., large metal objects, other RF devices). Ensure clear line of sight if possible. |
| Receiver power indicator is off. | No power supply, loose wiring. | Check power source. Verify all wiring connections to the receiver are secure. |
| Relay clicks but device does not turn on/off. | Incorrect wiring to the load, faulty load, overloaded circuit. | Review the wiring diagram and ensure the load is correctly connected. Test the load directly to confirm it is functional. Ensure the load does not exceed 10A/1000W. |
Warranty Information
eMylo products are manufactured to high-quality standards. This product is covered by a standard manufacturer's warranty against defects in materials and workmanship from the date of purchase. Please retain your proof of purchase for warranty claims. The warranty does not cover damage caused by improper installation, misuse, unauthorized modification, or natural disasters.
Customer Support
For technical assistance, troubleshooting, or further inquiries regarding your eMylo Wireless Relay Remote Control Switch System, please contact eMylo customer support. Refer to the product packaging or the eMylo official website for the most current contact information.