1. Introduction
This manual provides comprehensive instructions for the installation, operation, and maintenance of your Winflo 30 In. Convertible Under Cabinet Range Hood. This appliance is designed to efficiently remove smoke, odors, and grease from your cooking area, offering both ducted and ductless ventilation options. Please read this manual thoroughly before installation and use to ensure safe and optimal performance.

Image 1.1: The Winflo 30-inch under cabinet range hood seamlessly integrated into a modern kitchen setting, positioned above a stovetop.
2. Safety Information
To reduce the risk of fire, electric shock, or injury, observe the following safety precautions:
- Read all instructions: Familiarize yourself with the entire manual before operating the appliance.
- Electrical Safety: Ensure the electrical installation is performed by a qualified electrician in accordance with all applicable codes and standards. Always disconnect power at the circuit breaker or fuse box before servicing.
- Proper Installation: Install this range hood according to the instructions provided. Maintain proper distance between the range hood and the cooking surface as specified.
- Ventilation: Ensure adequate ventilation for proper combustion and exhausting of gases through the flue (chimney) of fuel-burning equipment to prevent back-drafting.
- Cleaning: Clean grease filters frequently. Grease accumulated on filters can ignite.
- Flammable Materials: Never use the range hood to exhaust flammable or explosive materials.
3. Package Contents
Verify that all components are present before beginning installation:
- Winflo 30 In. Under Cabinet Range Hood Unit
- LED Lights (pre-installed)
- Installation Instruction Manual
- One-Person Installation Hardware (QUICKINSTALL brackets)
- Mounting Screws
- Rectangular Duct (Optional, for specific venting configurations)

Image 3.1: A visual representation of the Winflo range hood package contents, showing the installation instructions, one-person installation hardware, screws, and an optional rectangular duct component.
4. Specifications
| Feature | Specification |
|---|---|
| Model Number | A-W109C30B |
| Air Flow Capacity | 400 Cubic Feet Per Minute (CFM) |
| Material | Powdered Metal Steel |
| Noise Level | 5 Sones (at high speed) |
| Mounting Type | Under Cabinet Mount |
| Controls Type | Push Button |
| Number of Speeds | 3 |
| Light Source Type | LED (2 lights) |
| Wattage | 157 watts |
| Filter Type | Mesh (Aluminum, Dishwasher Safe) |
| Product Dimensions | 18.9"D x 29.5"W x 5.12"H |
| Ventilation Type | Convertible (Ducted or Ductless) |
| Color | Black |
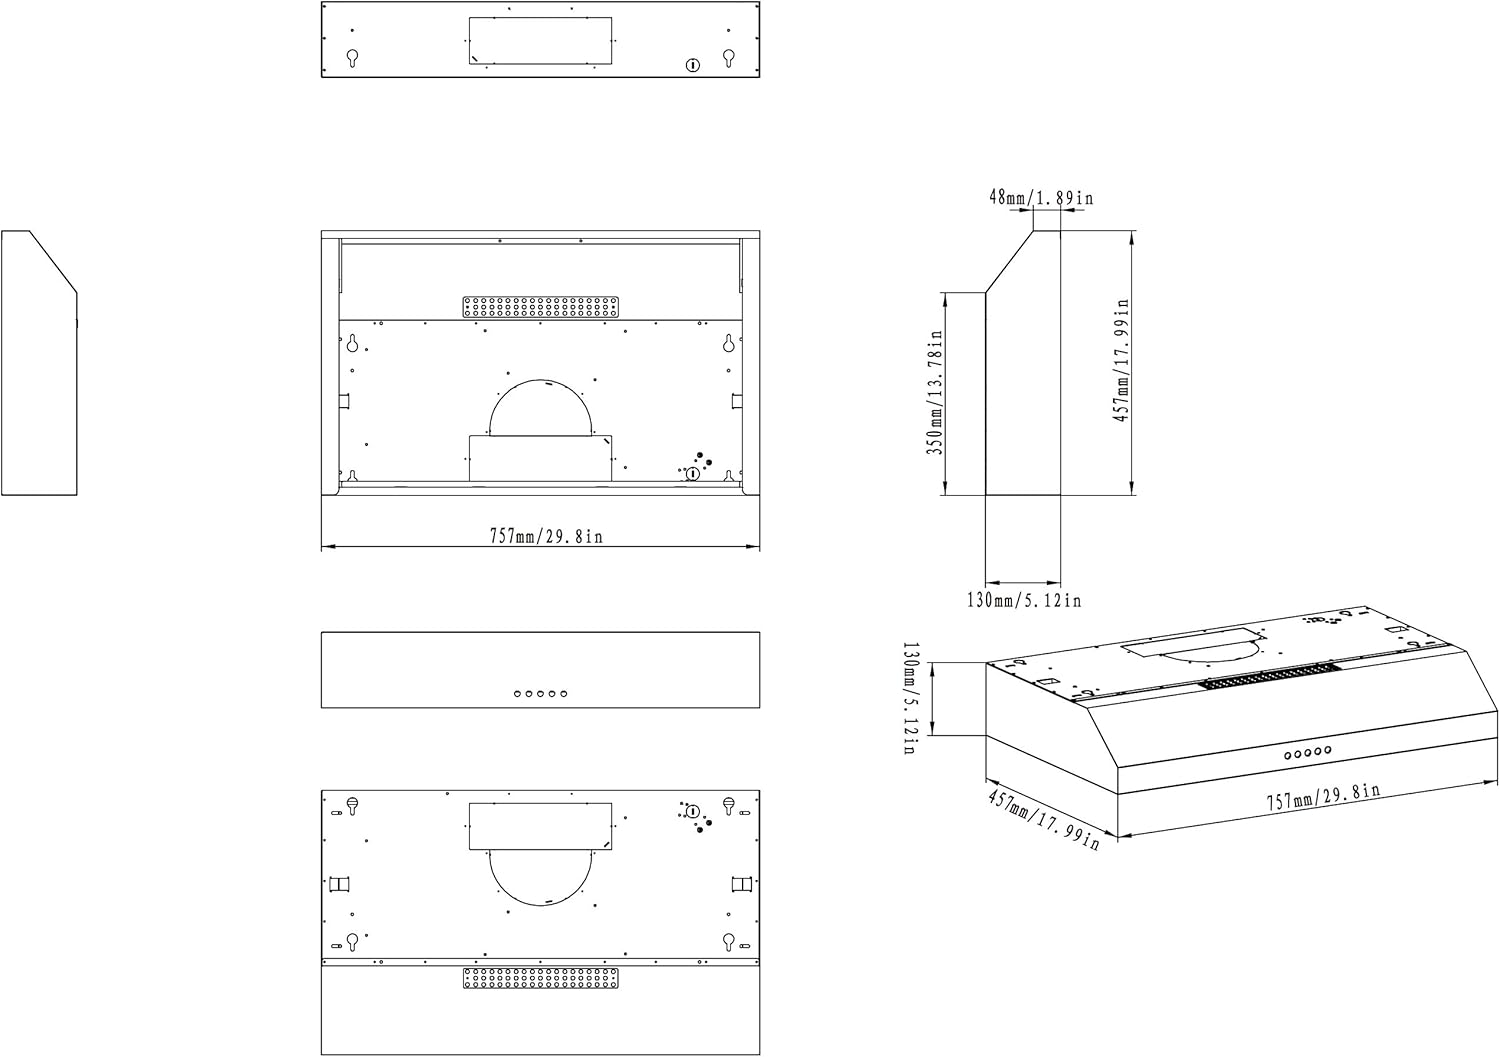
Image 4.1: Detailed technical drawing illustrating the dimensions and different views of the range hood for precise installation planning.
5. Installation (Setup)
The Winflo range hood features patented "QUICKINSTALL" hardware designed for easier one-person installation. Ensure you have all necessary tools and follow local building codes.
5.1. Choosing Your Ventilation Method
This range hood is convertible and can be installed as either ducted (vented to the outside) or ductless (recirculating).
- Ducted Installation: For optimal performance, exhaust air directly outside using a 7-inch round duct or a 3.25 x 10-inch rectangular duct. The unit supports both vertical and horizontal discharge.
- Ductless (Recirculating) Installation: If external venting is not possible, the unit can recirculate filtered air back into the kitchen. This requires the installation of charcoal filters (model WRHF004S2, sold separately). The motor housing has a patented design switch to easily convert between ducted and ductless modes.
5.2. Mounting the Range Hood
- Prepare the Cabinet: Measure and mark the location for the range hood under your cabinet, ensuring it is centered above your cooking surface.
- Install QUICKINSTALL Hardware: Attach the provided QUICKINSTALL brackets to the underside of the cabinet according to the manual's diagrams. These brackets simplify the mounting process.
- Electrical Connection: Connect the range hood's wiring to your household electrical supply. This unit is hardwired. Ensure power is off at the circuit breaker before making connections.
- Mount the Unit: Carefully lift the range hood and engage it with the QUICKINSTALL brackets. Secure the unit with additional screws as instructed.
- Ducting (if applicable): Connect the appropriate ductwork (7-inch round or 3.25 x 10-inch rectangular) to the exhaust outlet on the range hood and route it to the exterior or to the recirculating vent.
Video 5.1: An official Winflo video demonstrating the installation process and key features of the Winflo 350 CFM Convertible Under Cabinet Range Hood, including its convertible ventilation options.
6. Operation
Your Winflo range hood is equipped with user-friendly push-button controls for easy operation of the fan and lighting.

Image 6.1: The front panel of the range hood, highlighting the accessible push-button controls for fan speed and lighting, along with the integrated LED lights.
6.1. Fan Controls
The range hood features a 3-speed fan to accommodate various cooking needs. Press the fan speed buttons to select your desired level:
- Low Speed: Ideal for simmering or light cooking.
- Medium Speed: Suitable for everyday cooking and moderate smoke/odor.
- High Speed: For heavy cooking, frying, or when maximum ventilation is required.
Press the power button to turn the fan off.

Image 6.2: A close-up view of the range hood's push-button control panel, clearly showing the individual buttons for light activation, three fan speed settings, and power on/off.
6.2. Lighting Controls
The range hood is equipped with two bright, energy-saving LED lights to illuminate your cooking surface. Press the light button to turn the lights on or off.

Image 6.3: A detailed view of one of the integrated LED lights, designed to provide clear and efficient illumination over the stovetop.
7. Maintenance
Regular maintenance ensures the longevity and optimal performance of your range hood.
7.1. Cleaning Aluminum Mesh Filters
The aluminum mesh filters trap grease and should be cleaned regularly (approximately every 3-6 months, depending on cooking frequency) to maintain airflow and prevent grease buildup.
- Remove Filters: Locate the small tabs or latches on the filters. Push or pull the tab to release the filter and carefully lower it.
- Clean Filters: The mesh filters are dishwasher safe. Alternatively, wash them by hand using hot water and a mild detergent. Ensure they are completely dry before reinstallation.
- Reinstall Filters: Insert the dry filters back into their slots, ensuring they click securely into place.

Image 7.1: A detailed view of a removable aluminum mesh filter, designed for easy cleaning and maintenance.
7.2. Replacing Charcoal Filters (Ductless Mode Only)
For ductless operation, charcoal filters (model WRHF004S2) are used to remove odors from the recirculated air. These filters are not washable and must be replaced periodically (typically every 3-6 months, depending on usage).
- Remove Mesh Filters: First, remove the aluminum mesh filters as described above.
- Remove Old Charcoal Filters: The charcoal filters are usually attached to the motor housing. Follow the specific instructions in your full manual for removal.
- Install New Charcoal Filters: Attach new WRHF004S2 charcoal filters to the motor housing.
- Reinstall Mesh Filters: Replace the aluminum mesh filters.
8. Troubleshooting
Before contacting customer support, review the following common issues and solutions:
| Problem | Possible Cause | Solution |
|---|---|---|
| Fan does not operate | No power; Motor malfunction; Control panel issue | Check circuit breaker. Ensure unit is properly connected. Contact support if problem persists. |
| Lights do not work | Bulb failure; Wiring issue; Control panel issue | Check LED light connections. Replace LED bulbs if necessary. Contact support. |
| Poor suction | Clogged grease filters; Incorrect ducting; Charcoal filters (if ductless) are old/clogged | Clean or replace filters. Verify ducting is clear and correctly installed. Replace charcoal filters if in ductless mode. |
| Excessive noise | Loose parts; Obstruction in fan; Improper installation | Check for loose screws or objects. Ensure fan blades are clear. Re-check installation. |
For more detailed troubleshooting steps, please refer to the complete instruction manual or contact customer support.
9. Warranty Information
The Winflo 30 In. Convertible Under Cabinet Range Hood comes with a 3-year limited warranty on parts. Labor costs are not included under this warranty. Please retain your proof of purchase for warranty claims.
10. Support and Contact Information
For technical assistance, parts, or warranty inquiries, please contact Winslyn Industries:
- Manufacturer: Winslyn Industries
- Website: www.winslyn.com
- Email: support@winslyn.com
- Phone: 630-401-8050