1. Introduction
Thank you for choosing the Xprite 36-inch Rear LED Chase Light Bar. This product is designed to enhance visibility and safety for off-road vehicles such as UTVs, ATVs, and Side-by-Sides. It integrates multiple lighting functions including running lights, brake lights, turn signals, reverse lights, and strobe patterns into a single, durable unit. Please read this manual thoroughly before installation and operation to ensure proper use and longevity of your light bar.

Image: The Xprite 36-inch Rear LED Chase Light Bar mounted on an off-road vehicle, demonstrating its illuminated functions.
2. Safety Information
Always prioritize safety during installation and operation. Failure to follow these instructions may result in property damage, injury, or product malfunction.
- Electrical Safety: Disconnect the vehicle's battery before performing any electrical work. Ensure all wiring connections are secure and properly insulated to prevent short circuits.
- Mounting: Securely mount the light bar to a stable part of the vehicle. Loose mounting can cause the light bar to detach during operation, leading to damage or injury.
- Voltage: This light bar operates on 12V-24V DC systems. Do not connect to higher voltage sources.
- Visibility: Ensure the light bar does not obstruct the driver's view or interfere with other vehicle components.
- Local Regulations: Be aware of and comply with all local and state regulations regarding auxiliary lighting on vehicles.
3. Package Contents
Verify that all items are present in the package before beginning installation:
- 1 x Xprite 36-inch Rear LED Chase Light Bar
- 2 x Types of Switch Controls (Rocker Switch and In-line Switch)
- Mounting Brackets and Hardware
4. Product Features
The Xprite 36-inch Rear LED Chase Light Bar is engineered with advanced features for optimal performance and durability:
- Multi-Functionality: Features 6 blocks of high-power LEDs. Blocks 1 & 6 serve as running, brake, and turn signal lights. Blocks 2 & 5 provide strobe lighting with 7 distinct patterns. Blocks 3 & 4 function as solid illumination or reverse lights.
- Enhanced Visibility: Flood lenses are integrated to maximize light output, significantly increasing visibility and safety in various weather conditions such as fog, rain, or snow.
- Durable Construction: The lens is made from high-quality PC plastic, offering scratch resistance and shatterproof properties. The black housing and brackets are shockproof and corrosion-resistant, ensuring a lifespan of over 50,000 hours.
- Weatherproof Design: Rated IP67 waterproof, the light bar is protected from outside elements and features an all-weather, sealed housing.
- Intuitive Control: Includes a rocker switch for easy operation. The switch allows you to turn the unit on/off and cycle through 9 different strobe patterns. Brake, reverse, and turn signal lights are controlled independently. Strobe patterns can be turned off by holding the strobe pattern switch for 3 seconds.
- Adjustable Mounting: The updated bracket design seamlessly fits 1.75-inch to 2-inch roll cages and supports 180-degree vertical adjustment. The native side brackets also allow for angle adjustment with screw holes.

Image: Detailed breakdown of the light bar's functions, showing running, brake, turn signal, strobe, and reverse light sections.
5. Specifications
| Rated Lifetime | Over 50,000 Hours |
| LED Type | Epistar |
| Number of LEDs | 36 |
| Power | 36W |
| Strobe Patterns | 7 (up to 9 via rocker switch) |
| Voltage | 12V-24V DC |
| Cable Length | 15 ft (approx. 4.57 m) |
| Dimensions (L x W x H) | 43 x 4 x 3 inches (approx. 109.2 x 10.2 x 7.6 cm) |
| Material | Aluminum Housing, PC Lens |
| Water Resistance | IP67 Waterproof |
| Fit Type | Universal Fit |
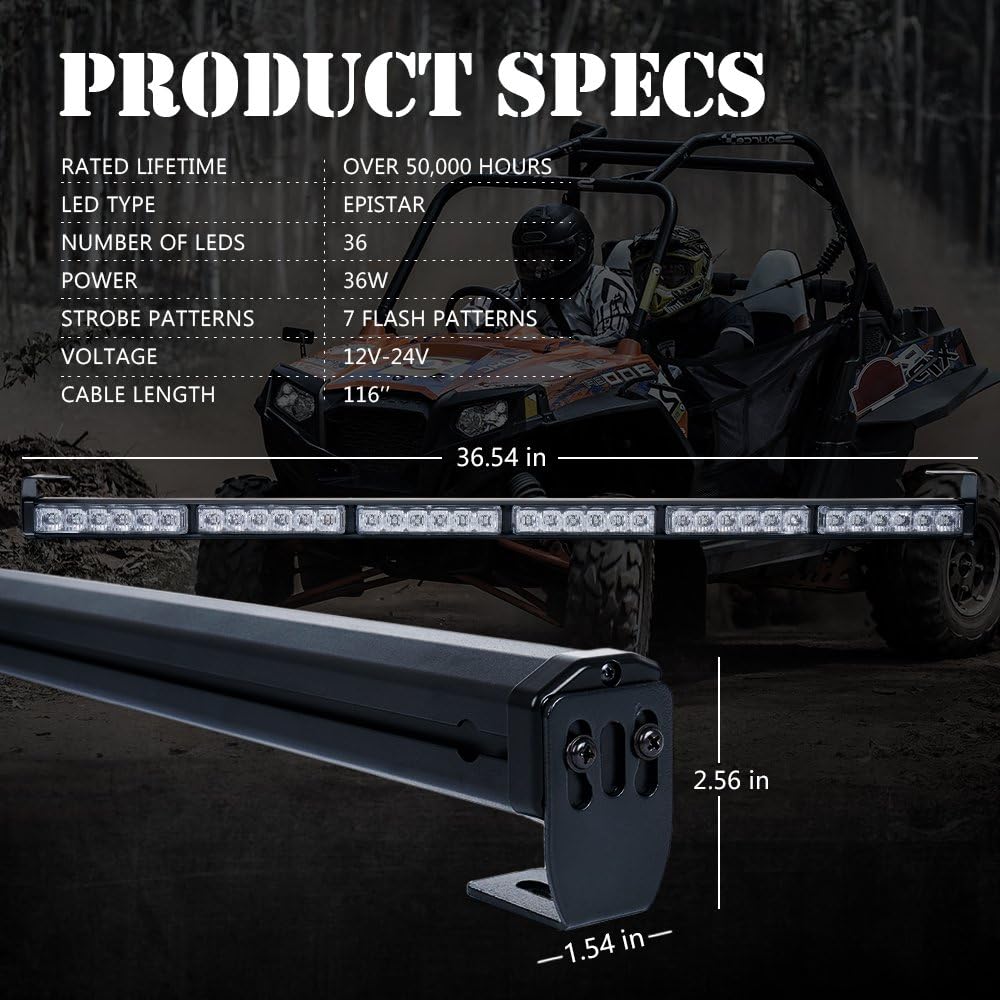
Image: Product specifications and dimensions diagram.
6. Installation
Follow these steps for proper installation of your Xprite LED Chase Light Bar:
6.1 Mounting the Light Bar
- Choose Location: Select a suitable rear location on your off-road vehicle, typically on the roll cage, that provides clear visibility and does not obstruct other vehicle functions.
- Attach Brackets: Use the provided clamp brackets to secure the light bar to roll bars between 1.75 inches and 2 inches in diameter. The brackets allow for 180-degree vertical adjustment to achieve the desired angle. Side brackets are also included for alternative mounting options.
- Secure Fasteners: Ensure all bolts and fasteners are tightened securely to prevent movement during vehicle operation.
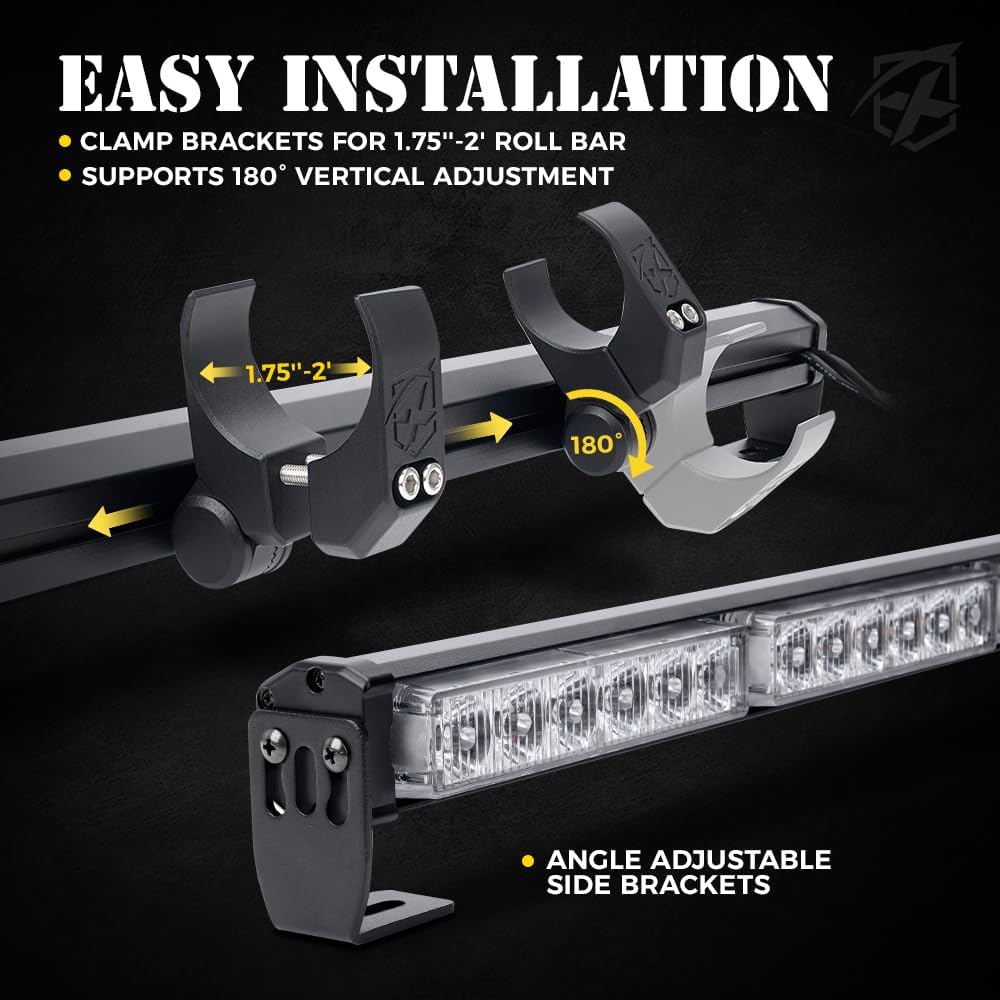
Image: Easy installation guide showing adjustable clamp brackets for roll bars.

Image: Detailed view of the adjustable clamps for secure mounting.
6.2 Wiring Connections
The light bar includes a 15-foot cable. For 4-door models, an extension cable (sold separately) may be required.
- Disconnect Battery: Before starting, disconnect the negative terminal of your vehicle's battery.
- Rocker Switch Cable: Connect the rocker switch cable's positive and ground wires to your vehicle's power source.
- In-line Switch Cable: Connect the in-line switch cable's positive and ground wires to your vehicle's power source.
- Signal Wires: Connect the specific wires from the light bar to your vehicle's corresponding circuits:
- Reverse: Connect to the vehicle's reverse light circuit.
- Left Turn Signal: Connect to the vehicle's left turn signal circuit.
- Right Turn Signal: Connect to the vehicle's right turn signal circuit.
- Brake Light: Connect to the vehicle's brake light circuit.
- Secure Connections: Use appropriate connectors and ensure all connections are waterproof and protected from abrasion.
- Reconnect Battery: Once all wiring is complete and checked, reconnect the vehicle's battery.

Image: Simple installation wiring diagram for the light bar.
7. Operation
The Xprite LED Chase Light Bar is controlled primarily by the included rocker switch and integrates with your vehicle's existing lighting system.
7.1 Rocker Switch Functions
- Power On/Off: Push the rocker switch upward to turn the light bar on, and to the center position to turn it off.
- Strobe Patterns: Push the rocker switch downward to activate strobe patterns. Each subsequent downward push will cycle through the 9 different strobe patterns.
- Disable Strobe: To turn off the strobe patterns, hold the rocker switch in the downward position for approximately 3 seconds.

Image: Rocker switch with 3-pin connection and operational details.
7.2 Integrated Vehicle Functions
When properly wired, the light bar will automatically respond to your vehicle's signals:
- Running Lights: Blocks 1 & 6 will illuminate when your vehicle's running lights are active.
- Brake Lights: Blocks 1 & 6 will brighten when the vehicle's brakes are applied.
- Turn Signals: The corresponding Block 1 (left) or Block 6 (right) will flash when the vehicle's turn signal is activated.
- Reverse Lights: Blocks 3 & 4 will illuminate white when the vehicle is in reverse.
8. Maintenance
To ensure optimal performance and extend the lifespan of your Xprite LED Chase Light Bar, follow these simple maintenance guidelines:
- Regular Cleaning: Clean the lens and housing periodically with a soft cloth and mild soap and water. Avoid abrasive cleaners or solvents that could damage the PC lens.
- Inspect Wiring: Regularly check all wiring connections for signs of wear, corrosion, or looseness. Re-secure or repair as necessary.
- Check Mounting: Periodically inspect the mounting brackets and hardware to ensure they remain tight and secure.
- Environmental Protection: While the light bar is waterproof, prolonged exposure to extreme conditions (e.g., saltwater submersion) should be avoided if possible.
9. Troubleshooting
If you encounter issues with your Xprite LED Chase Light Bar, refer to the following common problems and solutions:
| Problem | Possible Cause | Solution |
|---|---|---|
| Light bar does not turn on. | No power, loose connection, blown fuse. | Check power supply, inspect all wiring connections, check vehicle's fuse box for a blown fuse. |
| Specific functions (e.g., turn signals, reverse) not working. | Incorrect wiring for that specific function. | Verify the wiring for the non-functional light against the wiring diagram in Section 6.2. |
| Strobe patterns not changing or turning off. | Rocker switch malfunction or incorrect operation. | Ensure you are pushing the rocker switch downward to cycle patterns and holding it for 3 seconds to turn off. If issues persist, the switch may be faulty. |
| Dim or flickering lights. | Insufficient power, loose connection, or damaged wiring. | Check voltage supply, inspect all wiring for corrosion or damage, ensure connections are tight. |
10. Warranty and Support
For warranty information, technical support, or replacement parts, please contact Xprite customer service through their official website or the retailer where the product was purchased. Keep your purchase receipt as proof of purchase.
Xprite is committed to providing high-quality products and customer satisfaction. If you have any questions or concerns not addressed in this manual, please do not hesitate to reach out to their support team.


