1. Introduction
This user manual provides detailed instructions for the safe and efficient operation of your Denon AVR-X1400H 7.2CH AV Receiver. This receiver is designed to deliver high-quality audio and video performance, supporting advanced features such as 4K Ultra HD pass-through, Dolby Atmos, DTS:X, and HEOS wireless multi-room audio technology. Please read this manual thoroughly before using the unit and keep it for future reference.
2. Important Safety Instructions
To reduce the risk of electric shock, fire, etc., please read the following safety instructions carefully.
- Power Source: Connect the unit only to an AC outlet of the voltage specified on the rear panel.
- Ventilation: Ensure proper ventilation. Do not block ventilation openings. Allow adequate space around the unit for heat dissipation.
- Water and Moisture: Do not expose the unit to rain or moisture. Do not place objects filled with liquids, such as vases, on the unit.
- Foreign Objects: Do not insert any foreign objects into the unit's openings.
- Cleaning: Unplug the unit from the wall outlet before cleaning. Use a dry cloth only.
- Servicing: Do not attempt to service the unit yourself. Refer all servicing to qualified service personnel.
- Placement: Place the unit on a flat, stable surface. Avoid placing it in direct sunlight or near heat sources.
Proposition 65 Warning: This product may contain chemicals known to the State of California to cause cancer and birth defects or other reproductive harm. For more information, visit www.P65Warnings.ca.gov.
3. Package Contents
Verify that all items listed below are included in the package:
- Denon AVR-X1400H AV Receiver
- Remote Control Unit (with 2 AAA batteries)
- Setup Microphone
- FM Indoor Antenna
- AM Loop Antenna
- Power Cord
- Quick Start Guide
- Safety Instructions

Figure 3.1: Denon AVR-X1400H AV Receiver, remote control, and setup microphone included in the package.
4. Setup
4.1 Connecting Your Speakers
The AVR-X1400H supports a 7.2 channel configuration. Ensure correct polarity when connecting speakers.
- Connect front left and right speakers to the "FRONT L/R" terminals.
- Connect the center speaker to the "CENTER" terminal.
- Connect surround left and right speakers to the "SURROUND L/R" terminals.
- For 7.1 or 7.2 setups, connect surround back speakers to the "SURROUND BACK L/R" terminals. These can also be assigned for Dolby Atmos height speakers.
- Connect subwoofers to the "SUBWOOFER 1" and "SUBWOOFER 2" pre-out jacks.
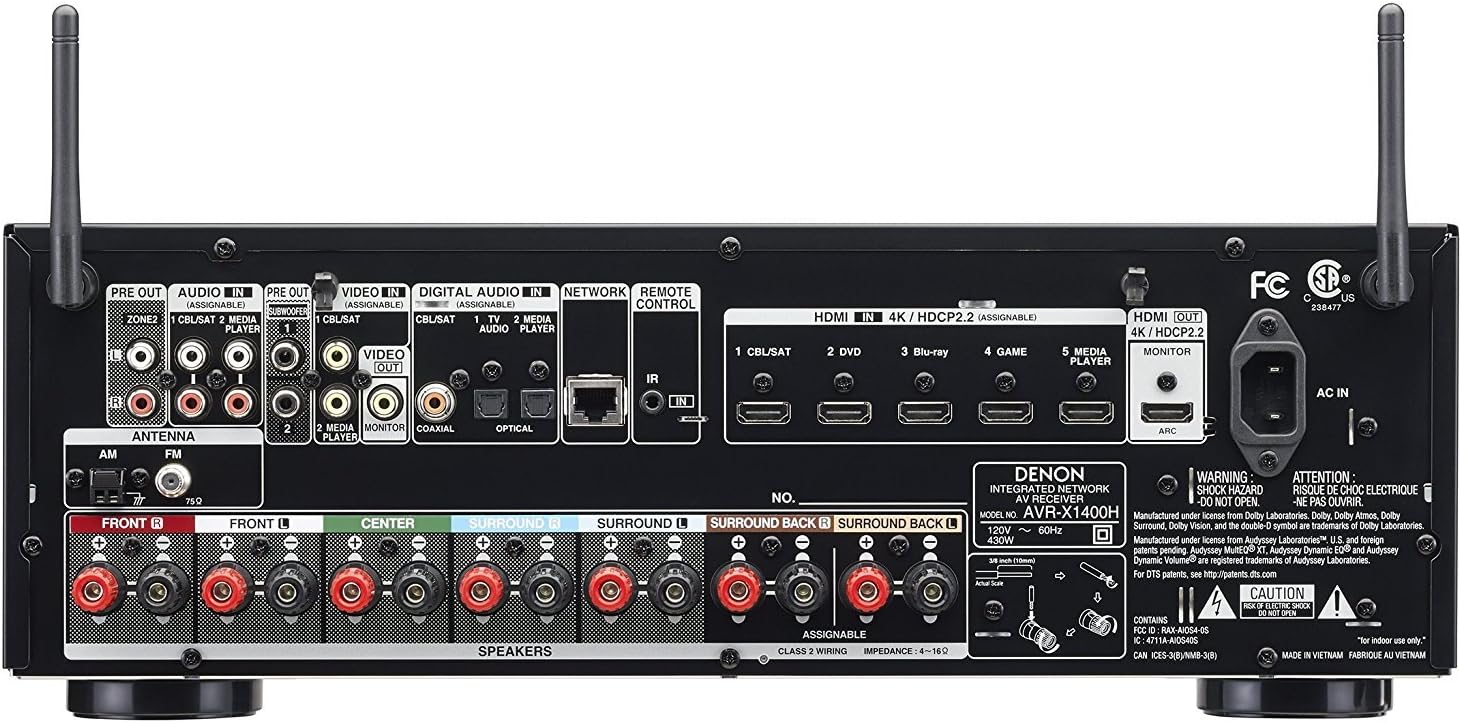
Figure 4.1: Rear panel connections for speakers, HDMI, and other audio/video sources.
4.2 Connecting Audio/Video Devices
The receiver features 6 HDMI inputs and 1 HDMI output with ARC support.
- Connect your TV to the "HDMI MONITOR OUT" port. Ensure your TV's HDMI input supports ARC if you wish to use this feature.
- Connect Blu-ray players, game consoles, and other HDMI sources to the "HDMI IN" ports (e.g., CBL/SAT, DVD, Blu-ray, GAME, MEDIA PLAYER).
- For older devices, use optical, coaxial, or analog audio inputs as needed.
4.3 Network Connection
The AVR-X1400H supports both wired (Ethernet) and wireless (Wi-Fi) network connections for HEOS, firmware updates, and internet radio.
- Wired: Connect an Ethernet cable from your router to the "NETWORK" port on the rear panel.
- Wireless: Attach the two Wi-Fi/Bluetooth antennas to the corresponding terminals on the rear panel. Follow the on-screen setup assistant to connect to your wireless network.
4.4 Initial Setup Assistant
After connecting all components and powering on the receiver, the Setup Assistant will guide you through the initial configuration process, including speaker calibration using Audyssey MultEQ XT.
- Connect the setup microphone to the "SETUP MIC" port on the front panel.
- Place the microphone at your primary listening position.
- Follow the on-screen instructions to perform the Audyssey calibration, which optimizes speaker levels, distances, and equalization for your room.
- Complete the network setup and input assignments as prompted.
5. Operating Instructions
5.1 Basic Operations
- Power On/Off: Press the POWER button on the front panel or remote control.
- Input Selection: Use the SOURCE SELECT knob on the front panel or the dedicated input buttons on the remote control (e.g., CBL/SAT, DVD, Blu-ray).
- Volume Control: Adjust the MASTER VOLUME knob on the front panel or the VOLUME +/- buttons on the remote.
- Sound Mode: Press the MOVIE, MUSIC, or GAME buttons on the remote to select appropriate sound modes (e.g., Dolby Surround, DTS Neural:X, Stereo).

Figure 5.1: Front panel controls including Source Select and Master Volume knobs.
5.2 Advanced Features
- HEOS Multi-room Audio: Download the HEOS app to your smartphone or tablet. Use the app to stream music to the receiver and other HEOS-enabled devices throughout your home.
- Alexa Voice Control: Enable the Denon HEOS Home Entertainment skill in the Amazon Alexa app. Link your Denon account and use voice commands to control playback, volume, and input selection (Alexa device sold separately).
- Bluetooth Streaming: Pair your Bluetooth device with the receiver to stream audio wirelessly. Select "Bluetooth" as the input source and initiate pairing from your device.
- Quick Select Buttons: The four Quick Select buttons on the front panel and remote allow you to store and recall preferred settings for specific inputs, including input source, volume level, and sound mode.
6. Maintenance
- Cleaning: Wipe the unit with a soft, dry cloth. Do not use abrasive cleaners, waxes, or solvents.
- Ventilation: Regularly check that the ventilation openings are not obstructed by dust or debris.
- Firmware Updates: The receiver can receive firmware updates via its network connection. It is recommended to keep the firmware updated for optimal performance and new features. Follow the on-screen prompts for updates.
7. Troubleshooting
| Problem | Possible Cause | Solution |
|---|---|---|
| No power | Power cord not connected; Power outage | Ensure power cord is securely plugged in; Check household circuit breaker. |
| No sound output | Incorrect input selected; Speakers not connected; Mute is on; Volume too low | Select correct input; Check speaker connections; Press MUTE button; Increase volume. |
| No video output | Incorrect HDMI input/output; HDMI cable issue; TV input not selected correctly | Verify HDMI connections; Try a different HDMI cable; Select correct HDMI input on TV. |
| Network connection fails | Incorrect Wi-Fi password; Router issue; Antennas not connected | Re-enter Wi-Fi password; Restart router; Ensure Wi-Fi antennas are securely attached. |
| Alexa voice control not working | Skill not enabled; Accounts not linked; Network issue | Ensure Denon HEOS skill is enabled in Alexa app; Link Denon and Amazon accounts; Check network connection. |
8. Specifications
| Feature | Detail |
|---|---|
| Channels | 7.2 Channel |
| Power Output | 80W per Channel (8 ohms, 20Hz-20kHz, 0.08% THD) |
| HDMI Inputs/Outputs | 6 In / 1 Out (HDCP 2.2, 4K/60Hz Pass-through, HDR, Dolby Vision, BT.2020) |
| Audio Formats | Dolby Atmos, DTS:X, Dolby TrueHD, DTS-HD Master Audio |
| Connectivity | Wi-Fi, Bluetooth, Ethernet |
| Multi-room Technology | HEOS Built-in |
| Voice Control | Works with Amazon Alexa |
| Dimensions (W x D x H) | 17.09 x 13.35 x 5.94 inches (434 x 339 x 151 mm) |
| Weight | 18.74 pounds (8.5 kg) |
9. Warranty and Support
For warranty information and technical support, please refer to the warranty card included with your product or visit the official Denon website.
- Online Support: www.denon.com/en-us/support
- Product Registration: Register your product online to receive updates and support.
- User Guide (PDF): A comprehensive user guide is available for download at Denon AVR-X1400H User Guide.