Introduction
Thank you for choosing the Auxmir LED Makeup Mirror. This manual provides essential information for the safe and efficient use of your mirror. Please read these instructions carefully before use and retain them for future reference.
Safety Information
- Do not expose the mirror to direct sunlight or strong light sources, as this may cause fire or damage.
- Keep the mirror away from water or other liquids to prevent electric shock or damage.
- Do not disassemble or modify the mirror. Repairs should only be performed by qualified personnel.
- Keep out of reach of children.
- Clean the mirror surface with a soft, dry cloth. Avoid abrasive cleaners.
Package Contents
- Auxmir LED Makeup Mirror (BM-1722)
- USB Type-C Cable
- User Manual
Product Overview
The Auxmir LED Makeup Mirror features a tri-fold design with multiple magnification options and adjustable LED lighting. Key components include:
- Main Mirror (1X): Standard reflection.
- Side Mirrors (5X & 10X): Magnified views for detailed tasks.
- LED Lights: Integrated around the main mirror for illumination.
- Touch Sensor Switch: Controls power and light settings.
- 180° Rotary Joint: Allows angle adjustment.
- Storage Base: For small accessories.
- USB-C Port: For power supply.
- Battery Compartment: For AA batteries (not included).
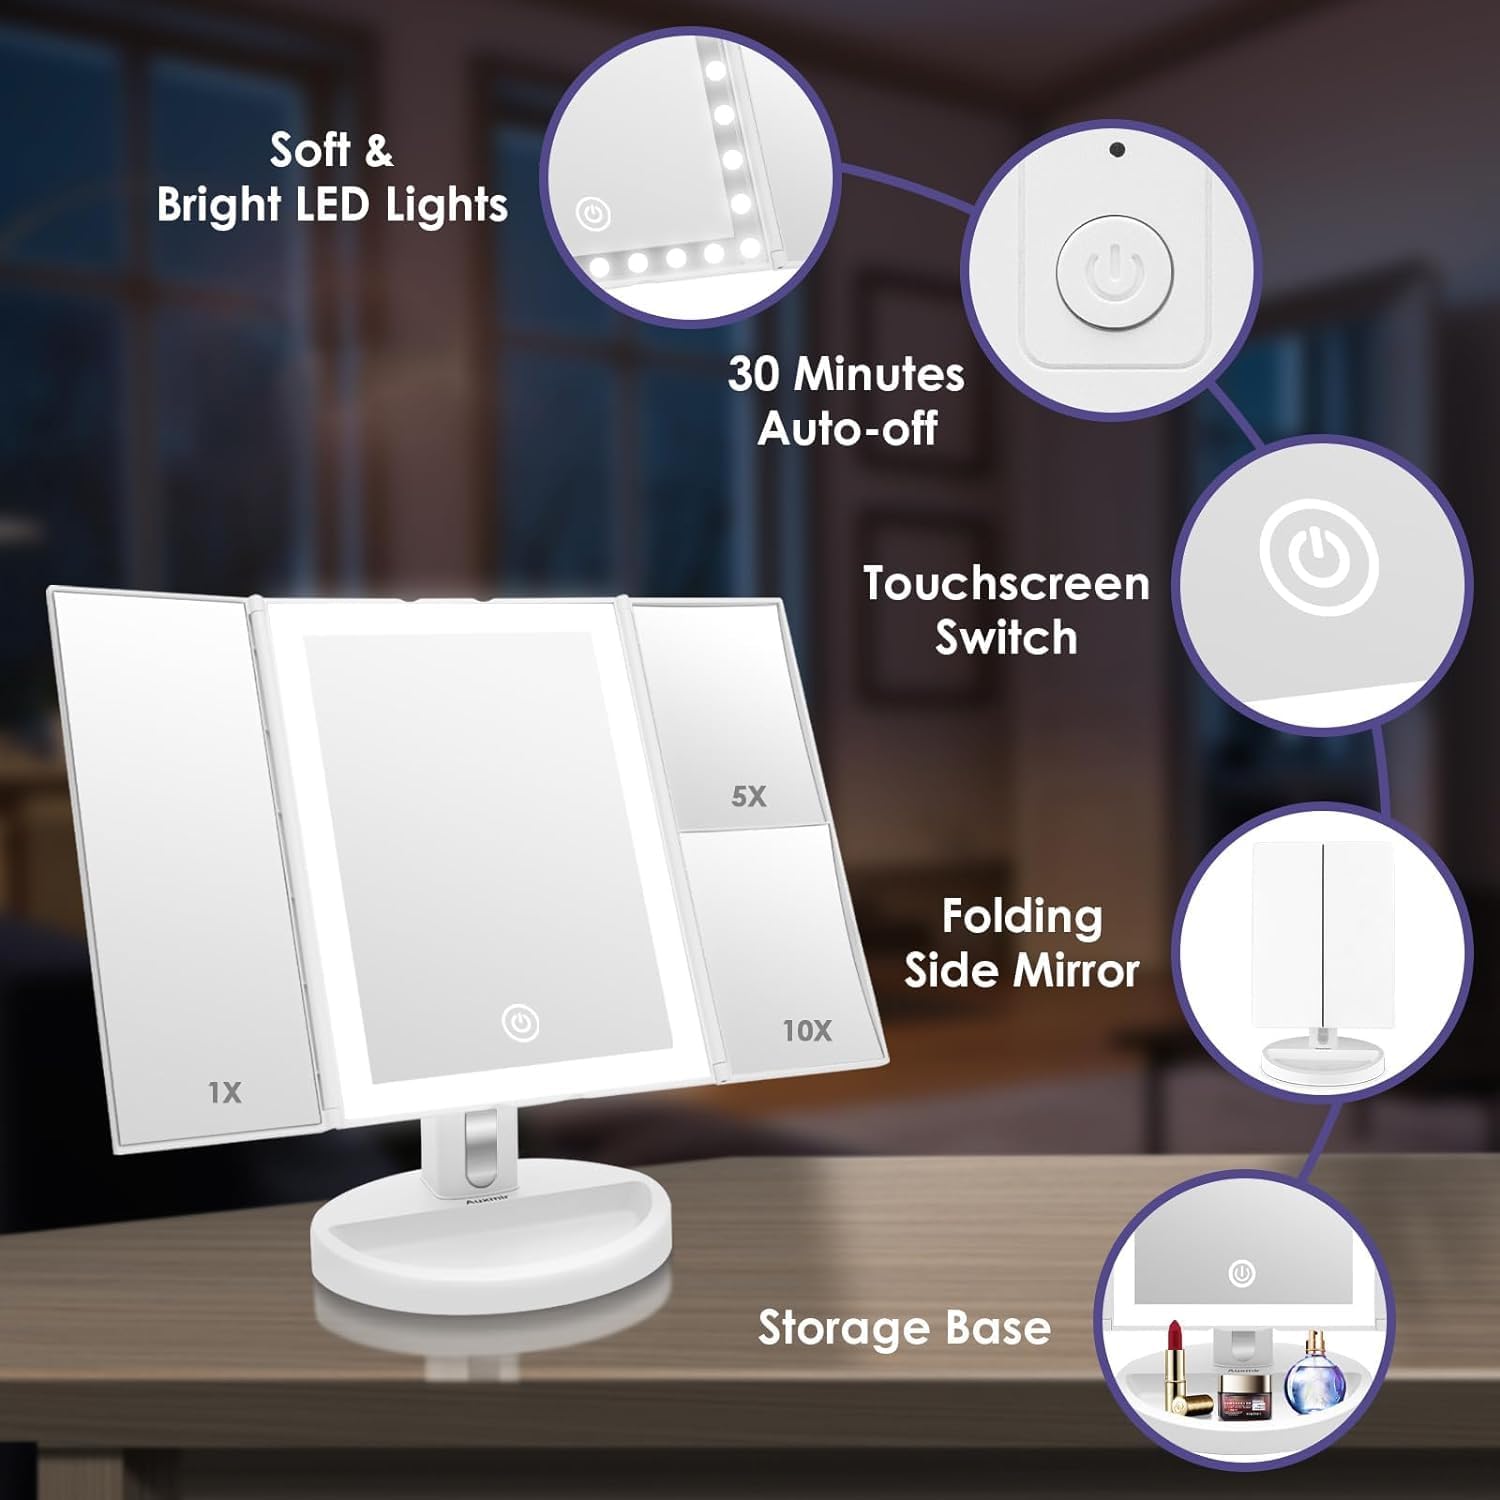
Image: Overview of the Auxmir LED Makeup Mirror's features and components.
Setup
1. Assembly
- Carefully remove all components from the packaging.
- Insert the mirror stand into the slot on the storage base until it clicks securely into place.
Image: Illustration of mirror assembly, showing the stand being inserted into the base.
2. Powering the Mirror
The mirror can be powered by either 4 AA batteries or via the included USB Type-C cable.
Using Batteries (Not Included)
- Locate the battery compartment on the back of the mirror.
- Open the compartment cover.
- Insert 4 AA batteries, ensuring correct polarity (+/-).
- Close the battery compartment cover.

Image: Rear view of the mirror, highlighting the battery compartment and USB-C port.
Image: Diagram showing the process of inserting AA batteries into the mirror's battery compartment.
Using USB Power
- Connect the small end of the USB Type-C cable to the USB-C port on the back of the mirror.
- Connect the larger end of the USB cable to a USB power adapter (not included) or a computer USB port.
Image: Diagram showing how to connect the mirror to a USB power source using the provided cable.
Operating Instructions
1. Power On/Off and LED Lights Control
- Power On: Press the main power button on the back of the mirror.
- Turn Lights On/Off: Tap the touch sensor switch (circle icon) on the main mirror.
- Adjust Brightness (Stepless Dimming): Press and hold the touch sensor switch to adjust the brightness. Release when the desired brightness is reached.
- Change Light Color: Tap the touch sensor switch repeatedly to cycle through white, yellow, and natural light modes.
- Auto-Off Feature: The LED lights will automatically turn off after 30 minutes of inactivity to conserve energy.

Image: Instructions for stepless touch dimming, showing a finger pressing the touch switch.
Image: Visual representation of continuous dimmable brightness from low to high.
Image: Diagram illustrating the three adjustable light color options for the mirror.

Image: Diagram illustrating the energy-saving automatic shut-off feature after 30 minutes.
2. Using Magnification Panels
The mirror features three panels with different magnification levels:
- 1X Magnification: For general makeup application and daily routines.
- 5X Magnification: Ideal for applying eyeliner, lipstick, or detailed eye makeup.
- 10X Magnification: Perfect for precise tasks like eyebrow shaping, contact lens insertion, or detailed skincare.
For optimal clarity with the 5X and 10X mirrors, position your face approximately 10 cm (4 inches) from the mirror surface.

Image: A user applying makeup, demonstrating the different magnification panels (1X, 5X, 10X) and recommended distance.
Image: Visual guide for the appropriate use of each magnification level (1X for daily routine, 5X for eyeliner/lipstick, 10X for skin management/contact lenses).
3. Adjusting the Mirror Angle
The mirror can be rotated 180 degrees vertically to achieve your preferred viewing angle. Gently tilt the mirror panel up or down to adjust.
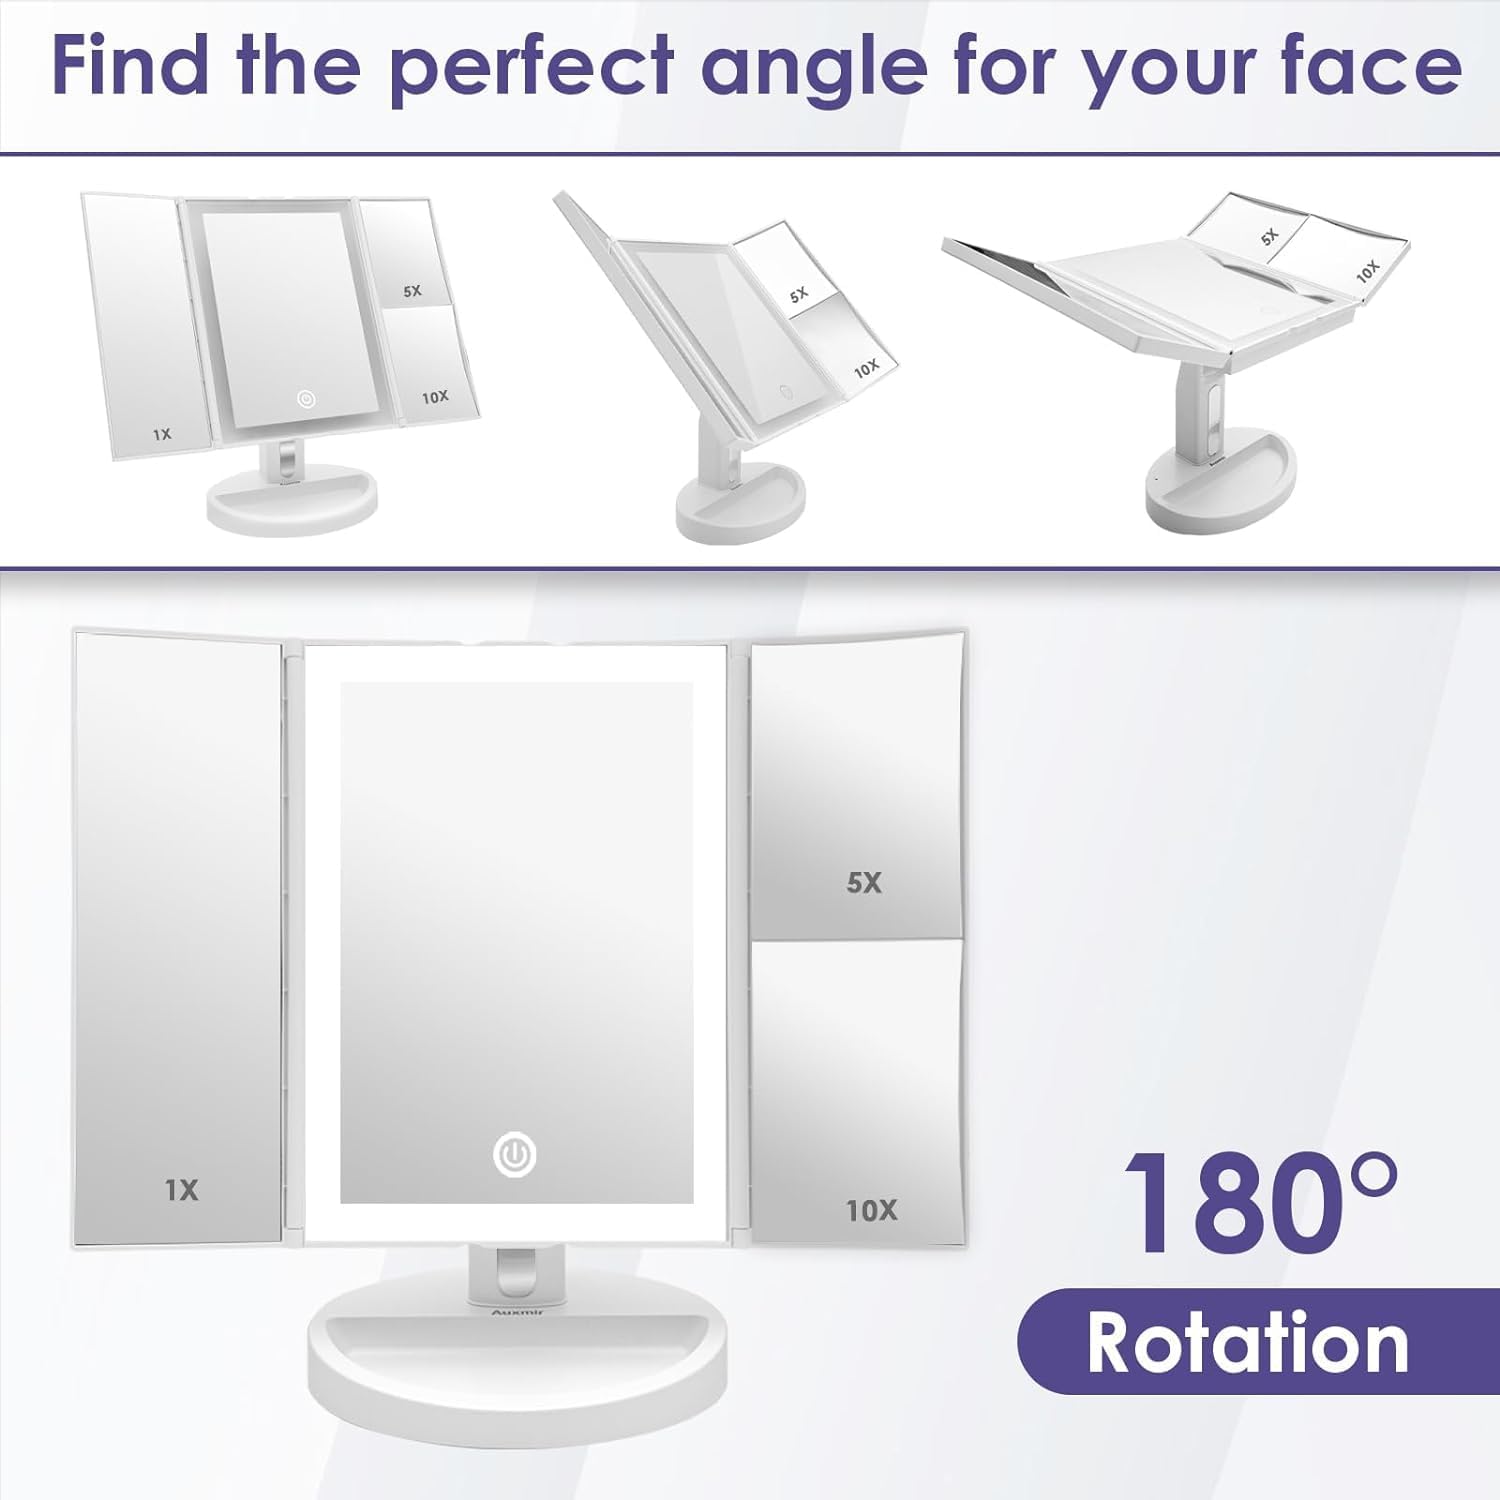
Image: Illustrations demonstrating the 180-degree vertical rotation of the mirror for finding the perfect angle.

Image: Diagram showing the mirror's 180-degree rotation capability for daily use.
4. Using the Storage Base
The base of the mirror is designed with a small tray to hold cosmetic accessories such as earrings, rings, or small makeup tools.
Image: The mirror's functional storage base, holding small cosmetic accessories like rings and bracelets.
5. Folding for Storage/Travel
The side panels of the mirror can be folded inwards, and the mirror can be detached from its base for compact storage or travel.

Image: Comparison of the mirror's dimensions when folded and unfolded, highlighting its compact design.
Maintenance
- Cleaning: Wipe the mirror surface and body with a soft, dry, lint-free cloth. Do not use abrasive cleaners, alcohol, or chemical solvents, as these may damage the finish or mirror coating.
- Storage: When not in use, fold the side panels to protect the mirror surfaces from dust and scratches. Store in a cool, dry place.
- Battery Replacement: If using batteries, replace all 4 AA batteries simultaneously when the LED lights dim or stop working. Do not mix old and new batteries or different types of batteries.
Troubleshooting
| Problem | Possible Cause | Solution |
|---|---|---|
| LED lights do not turn on. | No power supply, batteries are dead, or main power switch is off. | Ensure the main power switch on the back is ON. Check if USB cable is properly connected or replace batteries. |
| LED lights are dim or flickering. | Low battery power. | Replace all 4 AA batteries or connect the mirror via USB power. |
| Touch sensor is unresponsive. | Finger is wet or dirty, or a temporary glitch. | Ensure your finger is clean and dry. Try turning the main power switch off and on again to reset. |
| Mirror is unstable on the base. | Mirror stand not properly inserted. | Ensure the mirror stand is fully and securely inserted into the slot on the storage base. |
Specifications
- Model: BM-1722
- Brand: Auxmir
- Magnification: 1X / 5X / 10X
- LED Lights: 68 LEDs
- Light Colors: White, Yellow, Natural
- Rotation: 180° Vertical
- Power Source: 4 x AA Batteries (not included) or USB Type-C (cable included)
- Material: Plastic
- Dimensions (Unfolded): Approximately 22.5 cm (H) x 32 cm (W)
- Dimensions (Folded): Approximately 29 cm (H) x 17.5 cm (W)
- Weight: Approximately 946.5 grams
Warranty and Support
Auxmir products are designed for quality and reliability. For any questions or support needs, please contact Auxmir customer service.
- Warranty: This product typically comes with a 3-year warranty. Please refer to your purchase documentation for specific terms.
- Customer Support: Auxmir offers 24/7 customer service. For assistance, please visit the official Auxmir website or contact the retailer where you purchased the product.
- Global Reach: Auxmir serves over 60 countries and is trusted by millions of users.

Image: Auxmir's commitment to customer satisfaction, showing global presence, lifetime support, and a 3-year warranty.