Introduction
The Elite Gourmet Americana Retro Nostalgia 3-in-1 Breakfast Maker Station is a compact and versatile appliance designed to simplify your morning routine. This unit integrates a toaster oven, a 4-cup coffeemaker, and a non-stick griddle, allowing you to prepare a complete breakfast with a single device. Its space-saving design makes it ideal for small kitchens, dorm rooms, RVs, or any area where counter space is limited. Please read this manual thoroughly before operating the appliance to ensure safe and efficient use.
Important Safety Instructions
- Read all instructions before using the appliance.
- Do not touch hot surfaces. Use handles or knobs.
- To protect against electrical shock, do not immerse cord, plugs, or the appliance body in water or other liquid.
- Close supervision is necessary when any appliance is used by or near children.
- Unplug from outlet when not in use and before cleaning. Allow to cool before putting on or taking off parts.
- Do not operate any appliance with a damaged cord or plug, or after the appliance malfunctions or has been damaged in any manner.
- The use of accessory attachments not recommended by the appliance manufacturer may cause injuries.
- Do not use outdoors.
- Do not let cord hang over edge of table or counter, or touch hot surfaces.
- Do not place on or near a hot gas or electric burner, or in a heated oven.
- Extreme caution must be used when moving an appliance containing hot oil or other hot liquids.
- Always attach plug to appliance first, then plug cord into the wall outlet. To disconnect, turn any control to "off", then remove plug from wall outlet.
- Do not use appliance for other than intended use.
Product Overview
Familiarize yourself with the components and controls of your 3-in-1 Breakfast Maker Station.
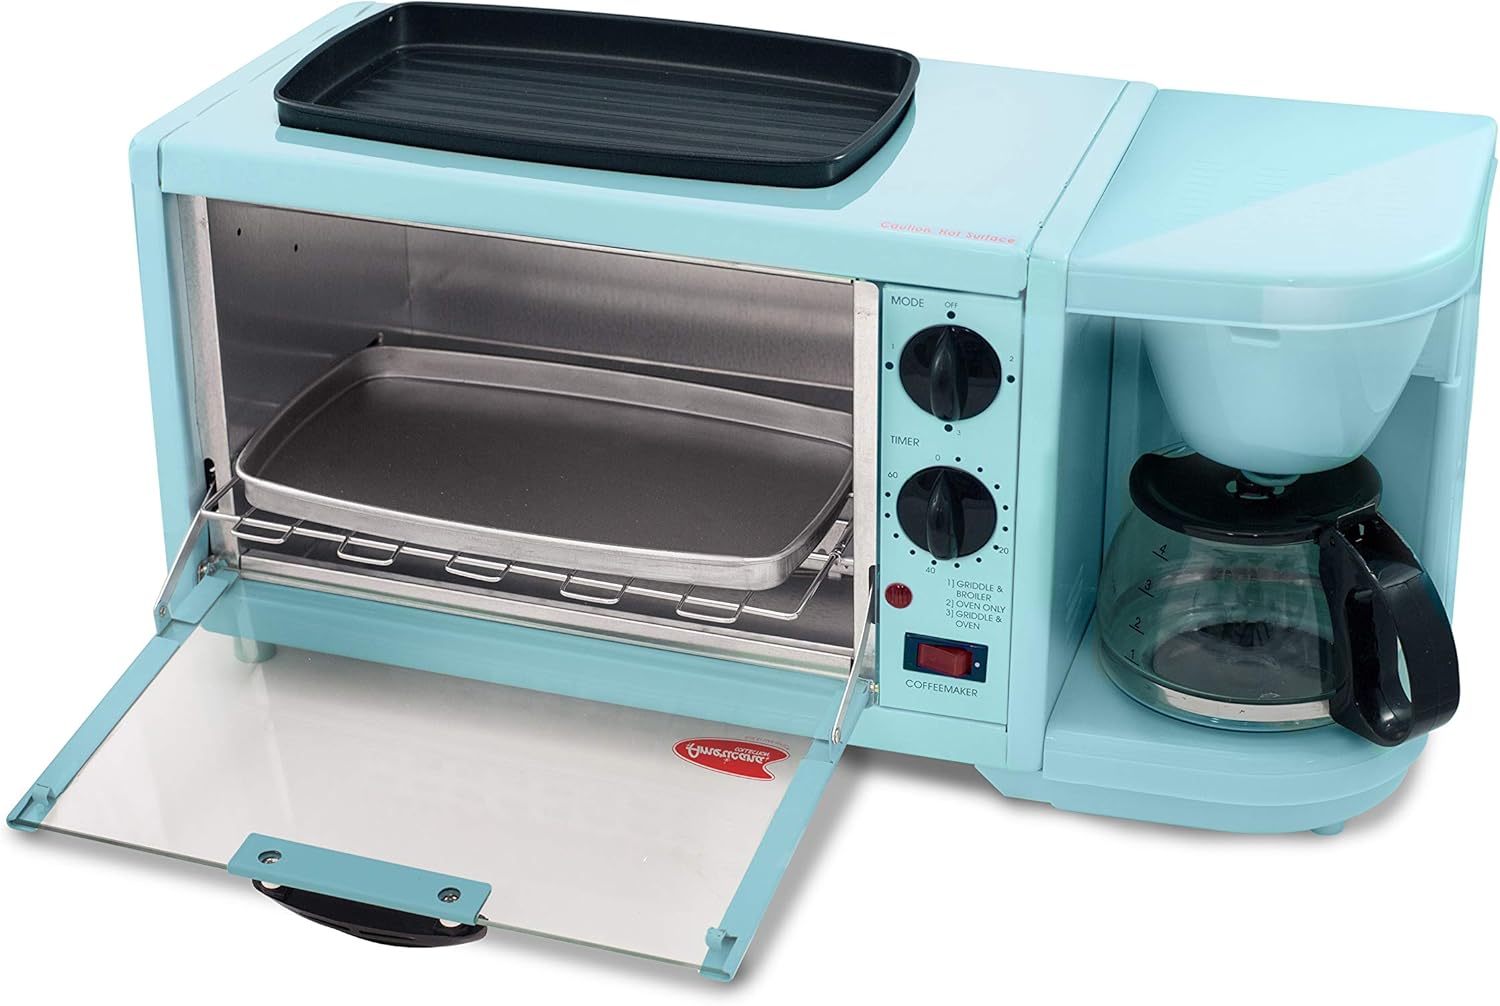
The complete Elite Gourmet 3-in-1 Breakfast Maker Station, showcasing its toaster oven, top griddle, and coffeemaker components.
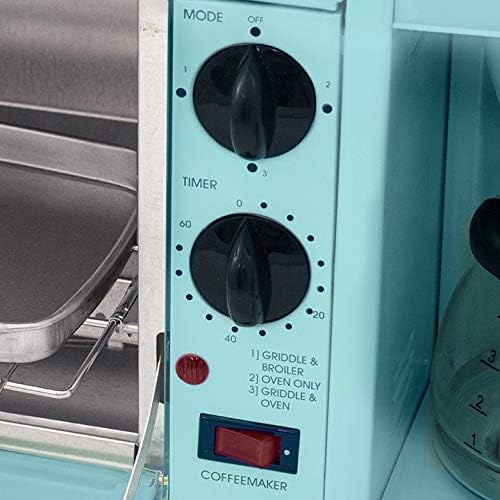
Detailed view of the control panel, featuring the mode selector dial, timer dial, and the coffeemaker on/off switch.
Main Components:
- Toaster Oven: Features a dropdown door, removable baking pan, and wire rack.
- Oven-Top Non-Stick Griddle: For frying and warming foods, utilizing heat from the toaster oven.
- 4-Cup Coffeemaker: Includes a swing-out filter compartment, reusable filter, and glass carafe with a Pause 'n Serve anti-drip feature.
Controls:
- Mode Selector Dial: Controls the function of the toaster oven and griddle (Griddle & Broiler, Oven Only, Griddle & Oven).
- Timer Dial: Sets the cooking time for the toaster oven, up to 15 minutes.
- Coffeemaker On/Off Switch: Activates or deactivates the coffeemaker function.

Key removable components of the breakfast station: the non-stick griddle, the toasting pan, the 4-cup coffee carafe, and the reusable coffee filter.
Setup
- Unpack: Carefully remove all packaging materials, including any protective films or stickers.
- Placement: Place the appliance on a stable, level, and heat-resistant surface. Ensure there is adequate ventilation around the unit, especially at the back and sides. Do not place it directly against a wall or under cabinets.
- Initial Cleaning: Before first use, wipe down the exterior with a damp cloth. Wash the removable griddle, baking pan, wire rack, coffee carafe, and reusable filter in warm, soapy water. Rinse thoroughly and dry completely.
- First Use (Burn-off): It is recommended to run the toaster oven empty for about 10-15 minutes on the highest temperature setting to burn off any manufacturing residues. A slight odor or smoke may be present; this is normal. Ensure the area is well-ventilated.
Operating Instructions
This appliance allows for simultaneous or independent operation of its functions. Refer to the control panel for specific settings.

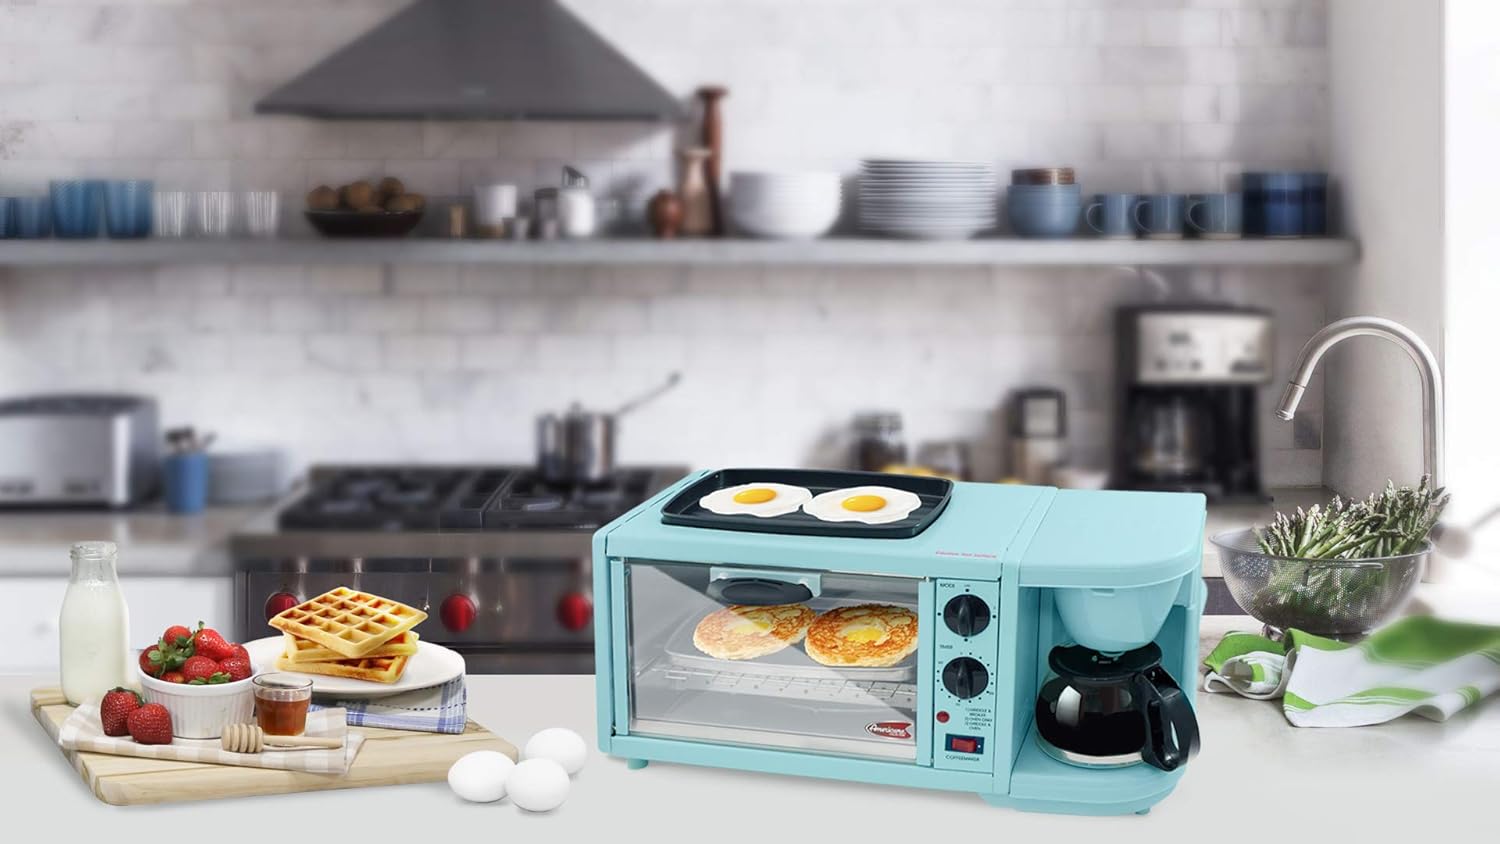
Examples of breakfast items that can be prepared: toast, muffins, fried eggs, bacon, and fresh coffee.

The griddle cooking two fried eggs while the toaster oven warms two pancakes simultaneously.
Toaster Oven Operation:
- Place food on the baking pan or wire rack. Ensure the crumb tray is in place at the bottom of the oven.
- Close the oven door.
- Turn the Mode Selector Dial to the desired function:
- 1) GRIDDLE & BROILER: Heats the top griddle and the top heating elements of the oven for broiling.
- 2) OVEN ONLY: Heats both top and bottom heating elements of the oven for baking/toasting.
- 3) GRIDDLE & OVEN: Heats the top griddle and both top and bottom heating elements of the oven.
- Turn the Timer Dial to the desired cooking time (up to 15 minutes). The oven will begin heating, and the indicator light will illuminate.
- When the timer reaches zero, a bell will sound, and the oven will turn off automatically.
Coffeemaker Operation:
- Open the swing-out filter compartment.
- Place the reusable filter (or a paper filter) into the filter basket.
- Add desired amount of ground coffee into the filter. For a 4-cup capacity, typically 2-4 tablespoons of coffee are used, adjusted to taste.
- Fill the water reservoir with fresh, cold water up to the 4-cup mark. Do not overfill.
- Close the filter compartment and ensure the glass carafe is placed correctly on the warming plate.
- Flip the Coffeemaker On/Off Switch to the "ON" position. The coffeemaker will begin brewing.
- The Pause 'n Serve anti-drip feature allows you to temporarily remove the carafe during brewing to pour a cup, but do not remove for more than 30 seconds to prevent overflow.
- Once brewing is complete, the coffeemaker will keep the coffee warm on the warming plate. Turn the switch to "OFF" when finished.
Griddle Operation:
The non-stick griddle utilizes the heat generated by the toaster oven. It operates when the toaster oven is set to any mode that includes "GRIDDLE" (1 or 3).
- Ensure the griddle pan is clean and properly seated on top of the toaster oven.
- Lightly grease the griddle surface if necessary, especially for first use or specific foods.
- Turn the Mode Selector Dial to "1) GRIDDLE & BROILER" or "3) GRIDDLE & OVEN".
- Allow the griddle to preheat for a few minutes.
- Place food (e.g., eggs, bacon, pancakes) directly onto the hot griddle surface.
- Cook food to desired doneness, turning as needed.
- When cooking is complete, turn the Timer Dial to "OFF" or allow it to complete its cycle.
A visual representation of a full breakfast being prepared, with eggs cooking on the griddle and waffles warming inside the toaster oven.
Cleaning and Maintenance
Regular cleaning ensures optimal performance and extends the life of your appliance.
- Always unplug the appliance from the power outlet and allow it to cool completely before cleaning.
- Exterior: Wipe the exterior surfaces with a soft, damp cloth. Do not use abrasive cleaners or scouring pads, as they may damage the finish.
- Toaster Oven Interior: The interior can be wiped with a damp cloth and mild detergent. For stubborn stains, a non-abrasive cleaner designed for oven interiors may be used. Ensure all cleaning solution is wiped away.
- Removable Crumb Tray: Slide out the crumb tray from the bottom of the toaster oven. Discard crumbs and wash the tray in warm, soapy water. Rinse and dry thoroughly before replacing.
- Baking Pan & Wire Rack: These can be washed in warm, soapy water. For baked-on food, soak them before cleaning. Rinse and dry completely.
- Non-Stick Griddle: After cooling, wipe the griddle surface with a damp cloth. For stuck-on food, use a plastic scraper or sponge with mild dish soap. Do not use metal utensils or abrasive cleaners that could damage the non-stick coating.
- Coffee Carafe & Filter: Wash the glass carafe and reusable filter in warm, soapy water. The carafe is typically dishwasher safe (top rack), but check manufacturer guidelines. Rinse and dry thoroughly.
- Storage: Ensure all parts are clean and dry before storing the appliance in a cool, dry place.
Troubleshooting
If you encounter issues with your breakfast maker, refer to the following common problems and solutions:
| Problem | Possible Cause | Solution |
|---|---|---|
| Appliance does not turn on. | Not plugged in; power outlet malfunction; timer not set. | Ensure the power cord is securely plugged into a working outlet. Check if the timer dial is set for the toaster oven or if the coffeemaker switch is ON. |
| Toaster oven not heating. | Mode selector incorrect; timer not set. | Verify the Mode Selector Dial is set to an oven function (2 or 3) and the Timer Dial is set to a cooking time. |
| Coffeemaker not brewing. | Coffeemaker switch OFF; no water in reservoir. | Ensure the Coffeemaker On/Off Switch is in the "ON" position and the water reservoir is filled. |
| Coffee overflows from filter basket. | Too much coffee grounds; carafe not properly placed; Pause 'n Serve feature stuck. | Use appropriate amount of coffee. Ensure carafe is fully seated. Check if the anti-drip mechanism is clear and moving freely. |
| Griddle not heating. | Incorrect mode selected for toaster oven. | Ensure the Mode Selector Dial is set to "1) GRIDDLE & BROILER" or "3) GRIDDLE & OVEN". |
Specifications
Detailed technical specifications for the Elite Gourmet Americana Retro Nostalgia 3-in-1 Breakfast Maker Station.

Dimensional overview of the appliance, indicating its width, height, and griddle depth.
- Brand: Elite Gourmet
- Model Name: BL Retro Nostalgia 3-in-1 Breakfast Maker Station
- Item Model Number: EBK-300
- Color: Blue
- Special Feature: 3-in-1 Breakfast Center (Toaster Oven, Coffeemaker, Griddle)
- Control Type: Knob
- Door Style: Dropdown Door
- Power Source: Electric
- Size: 2-slice (Toaster Oven)
- Coffeemaker Capacity: 4 Cups
- Wattage: 1450 Watts
- Product Dimensions: 20.47 x 9.53 x 9.45 inches (L x W x H)
- Item Weight: 8.63 pounds
- UPC: 717056125594
- Manufacturer: Maxi-Matic
Warranty and Support
This Elite Gourmet appliance is covered by a limited manufacturer's warranty. Please refer to the warranty card included with your purchase for specific terms and conditions, including the duration of coverage and what is covered. For technical support, replacement parts, or warranty claims, please contact Elite Gourmet customer service. Contact information can typically be found on the manufacturer's website or on the product packaging.