1. Product Overview
The Silverlite 7" LED Light Engine is a high-efficiency, dimmable retrofit kit designed to upgrade existing ceiling lights, ceiling fans, pendants, lanterns, and garden fixtures to modern LED technology. It offers significant energy savings and a long operational lifespan, providing bright, flicker-free 5000K daylight illumination. This product is UL Certified, ensuring safety and reliability for various indoor and damp outdoor applications.

Figure 1: Top-down view of the Silverlite 7" LED Light Engine.
2. Key Features
- Energy Efficiency: Replaces 2x75W incandescent, 2x18W CFL, or 1x32W T9 circline CFL with only 28W, achieving at least 70% energy savings.
- Advanced Technology: Features integral driver-on-board (DOB) and 120V AC drive technology, eliminating the need for an external AC-DC driver.
- Dimmable & Flicker-Free: Supports triac dimming down to 5% lumen output with no flickering, ensuring smooth and even light distribution.
- High Color Rendering: 80+ CRI (Color Rendering Index) provides accurate and vibrant color representation.
- Long Lifespan: Rated for 40,000 hours, significantly longer than traditional lighting sources, reducing replacement frequency.
- UL Certified: Approved for use in luminaires and suitable for damp locations, including bathrooms, where not in direct contact with weather and water.
- Excellent Heat Management: Backed by a tough steel heat sink for superior heat dissipation, contributing to extended product life.
- Versatile Application: Ideal for ceiling fan lights, pendants, ceiling lights, lantern lights, garden lights, and other fixtures.
3. Specifications
| Attribute | Value |
|---|---|
| Size (Overall) | 8.39 inches |
| PCB Diameter | 7 inches |
| Power | 28 Watts |
| Brightness | 2450 Lumens |
| Color Temperature | 5000K (Daylight) |
| CRI | 80+ |
| Voltage | 120V |
| Control | Triac Dimming |
| Lifespan | 40,000 hours |
| Operating Temperature | 0°F to 104°F |
| Material | Iron, Plastic |
| Mounting Type | Ceiling Mount (Surface-Mounted) |
| Model Number | 43219-90845 |
| UPC | 610521629446 |

Figure 2: Product Dimensions.
4. Setup and Installation
Before beginning installation, ensure you have read and understood all instructions. It is recommended to consult a qualified electrician if you are unsure about any steps.
- Step 1: Cut off Power Supply. Locate the circuit breaker controlling the fixture where the LED Light Engine will be installed and turn off the power. Verify power is off using a voltage tester.
- Step 2: Remove Existing Components. Carefully remove the existing lamp socket(s) and any ballast from the fixture. This LED Light Engine operates directly on 120V AC and does not require a ballast.
- Step 3: Choose Installation Method. Select the appropriate installation method for your fixture. The LED Light Engine supports dome installation (not for 3-inch light engine), junction-box mounting, or surface mounting.
- Step 4: Connect Wires. Connect the wires from the LED Light Engine to your fixture's wiring:
- Connect the white wire from the LED Light Engine to the white (neutral) wire from the fixture.
- Connect the black wire from the LED Light Engine to the black (hot) wire from the fixture.
- Connect the ground wire from the LED Light Engine to the ground wire from the fixture.
- Step 5: Secure the Light Engine. Secure the LED Light Engine within the fixture using the chosen installation method. For dome installation, fix the light engine with the existing or supplied threaded tube and hex nut. For surface mounting, use the 4 supplied self-tapping screws.
- Step 6: Restore Power. Once the installation is complete and the light engine is securely mounted, restore power at the circuit breaker.

Figure 3: Dome Installation.
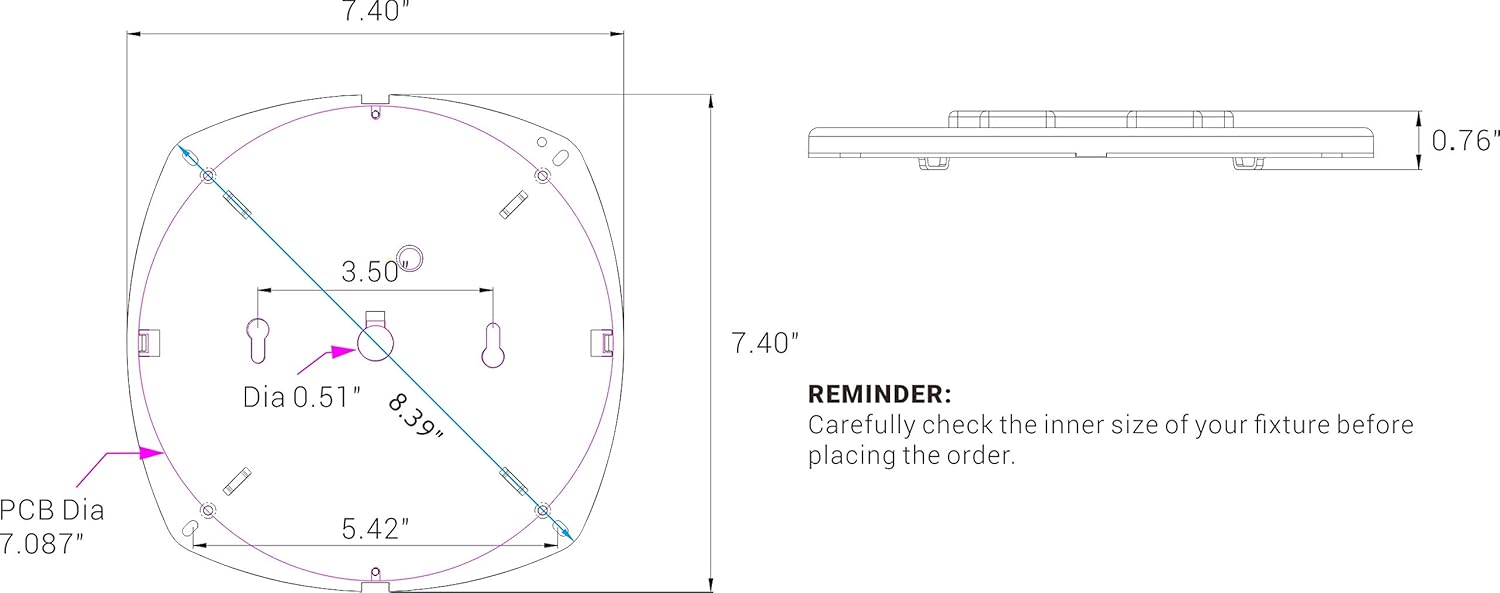
Figure 4: Surface Mounting.
For more detailed installation information, refer to the user manual included with your specific item.
5. Operating Instructions
The Silverlite LED Light Engine is designed for simple operation. Once properly installed and powered, it will illuminate instantly without delay.
- Power On/Off: Control the light engine using your existing wall switch.
- Dimming: This light engine is triac dimmable, allowing you to adjust the brightness from 100% down to 5% using a compatible triac dimmer switch (sold separately). Ensure your dimmer switch is rated for LED lighting to prevent performance issues or damage.
6. Maintenance
The Silverlite LED Light Engine is designed for minimal maintenance due to its long lifespan and robust construction.
- Cleaning: Ensure power is off before cleaning. Use a soft, dry cloth to wipe the surface of the light engine. Avoid using abrasive cleaners, solvents, or harsh chemicals, as these can damage the product.
- Heat Management: The integrated steel heat sink effectively dissipates heat. Ensure the light engine is installed in a fixture that allows for adequate airflow to maintain optimal operating temperature and extend its lifespan.
- No User-Serviceable Parts: The LED Light Engine contains no user-serviceable parts. Do not attempt to disassemble or repair the unit, as this will void the warranty and may pose a safety risk.
7. Troubleshooting
If you experience issues with your Silverlite LED Light Engine, please refer to the following common troubleshooting steps:
- Light Does Not Turn On:
- Check if the power supply to the fixture is on at the wall switch and the circuit breaker.
- Verify that all wire connections (black, white, and ground) are secure and correctly connected.
- Ensure the voltage supplied to the light engine is 120V.
- Light Flickers or Dims Incorrectly:
- Ensure you are using a compatible triac dimmer switch designed for LED lighting. Incompatible dimmers can cause flickering or poor dimming performance.
- Check the dimmer's minimum load requirements; some dimmers require a certain wattage to function correctly.
- Verify that all electrical connections are tight and secure.
- Reduced Brightness or Partial Illumination:
- Confirm the light engine is receiving the correct 120V power supply.
- Ensure the light engine is not overheating. Check for proper ventilation around the fixture.
If the issue persists after attempting these steps, please contact Silverlite customer support for further assistance.
8. Warranty and Support
Warranty: The Silverlite LED Light Engine is backed by a 5-year limited warranty from the date of purchase. This warranty covers defects in materials and workmanship under normal use. It guarantees the need for minimal services or replacements.
Support: For technical assistance, warranty claims, or any product-related inquiries, please contact Silverlite customer support. Keep your purchase receipt as proof of purchase for warranty validation.
For more information and support resources, visit the official Silverlite store on Amazon: Silverlite Store