
BLACK+DECKER GL7033-QS
BLACK+DECKER GL7033-QS String Trimmer
User Instruction Manual
1. Important Safety Instructions
Always read and understand all safety warnings and instructions before operating this product. Failure to follow the warnings and instructions may result in electric shock, fire, and/or serious injury.
- Eye Protection: Always wear safety glasses or goggles with side shields when operating this tool.
- Hearing Protection: Wear ear protection during extended use.
- Footwear: Wear sturdy, non-slip footwear to protect against falling objects and to maintain good footing.
- Clothing: Do not wear loose clothing or jewelry that could get caught in moving parts. Keep long hair tied back.
- Clear Area: Ensure the work area is clear of debris, rocks, and other objects that could be thrown by the cutting line. Keep bystanders, children, and pets at a safe distance (at least 15 meters/50 feet).
- Electrical Safety: Do not expose power tools to rain or wet conditions. Avoid body contact with earthed or grounded surfaces. Use a Residual Current Device (RCD) for added protection.
- Maintenance: Disconnect the tool from the power supply before cleaning, servicing, or changing accessories.
2. Product Overview and Components
The BLACK+DECKER GL7033-QS is a powerful 700W electric string trimmer designed for efficient lawn and garden maintenance. It features a 33 cm cutting width and E-Drive technology for consistent power.
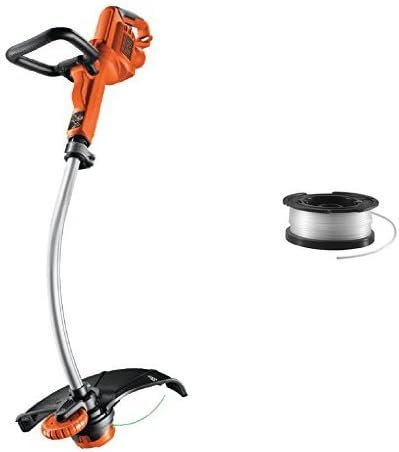
Figure 1: The BLACK+DECKER GL7033-QS string trimmer, which is orange and black with a silver shaft, shown alongside a white replacement line spool (model A6482-XJ).
Key Components:
- Main Handle: For gripping and controlling the trimmer.
- Auxiliary Handle: Provides additional grip and control during operation.
- Power Switch: Activates and deactivates the motor.
- Motor Housing: Contains the 700W motor.
- Shaft: Connects the motor housing to the cutting head.
- Guard: Protects the user from debris and the cutting line.
- Cutting Head/Spool: Holds the cutting line and rotates to trim grass.
- Line Feed Mechanism: Automatically or manually feeds new cutting line.
3. Setup
3.1 Assembly:
- Attach the Guard: Slide the guard onto the trimmer head until it clicks securely into place. Ensure it is firmly attached before use.
- Install the Auxiliary Handle: Position the auxiliary handle on the shaft at a comfortable height. Tighten the securing knob or bolt until the handle is firm.
3.2 Power Connection:
- Ensure the power switch is in the "OFF" position.
- Connect the trimmer's power cord to a suitable outdoor-rated extension cord.
- Plug the extension cord into a grounded electrical outlet.
4. Operating Instructions
4.1 Starting and Stopping:
- To start, firmly grip both handles and press the power switch.
- To stop, release the power switch. The cutting line will stop spinning within a few seconds.
4.2 Trimming Techniques:
- General Trimming: Hold the trimmer at a slight angle to the ground. Use a sweeping motion, moving from side to side, to cut grass.
- Edging: For neat edges along pathways or flowerbeds, rotate the trimmer head 90 degrees (if applicable to your model) and guide the line along the edge.
- E-Drive Technology: This trimmer is equipped with E-Drive technology, providing constant high torque for consistent cutting performance, even in tough conditions.
4.3 Line Feed:
The trimmer features an automatic line feed system. As the line wears down, new line will be automatically dispensed when the trimmer is running and tapped lightly on the ground, or when the motor is stopped and restarted (depending on the specific mechanism).
5. Maintenance
5.1 Cleaning:
- Always disconnect the power before cleaning.
- Wipe the exterior of the trimmer with a damp cloth. Do not use harsh chemicals or abrasive cleaners.
- Remove any grass clippings or debris from the guard and cutting head to ensure proper operation and cooling.
5.2 Replacing the Cutting Line:
When the cutting line runs out, it needs to be replaced. This model uses the BLACK+DECKER A6482-XJ replacement spool.
- Disconnect the trimmer from the power supply.
- Press the tabs on the side of the spool cover and remove it.
- Remove the empty spool.
- Place the new A6482-XJ spool onto the spindle, ensuring the line is fed through the eyelet.
- Replace the spool cover, ensuring it clicks securely into place.
5.3 Storage:
- Store the trimmer in a dry, secure place, out of reach of children.
- Avoid storing in direct sunlight or extreme temperatures.
6. Troubleshooting
| Problem | Possible Cause | Solution |
|---|---|---|
| Trimmer does not start. | No power supply; Power switch off; Faulty extension cord. | Check power outlet and connections; Ensure switch is ON; Test extension cord. |
| Cutting line does not feed. | Spool empty; Line tangled; Debris in head. | Replace spool (A6482-XJ); Untangle line; Clean cutting head. |
| Motor runs but line does not spin. | Spool not correctly installed; Drive mechanism jammed. | Reinstall spool correctly; Clear any obstructions from the cutting head. |
If the problem persists after attempting these solutions, please contact BLACK+DECKER customer service.
7. Specifications
- Model: GL7033-QS
- Power: 700 W
- Cutting Width: 33 cm
- Technology: E-Drive
- Compatible Accessory: A6482-XJ Replacement Spool
- ASIN: B06XRC2BLG
8. Warranty and Support
BLACK+DECKER products are manufactured to high quality standards and are guaranteed for a period of 24 months from the date of purchase against faulty materials or workmanship. This guarantee does not affect your statutory rights.
For detailed warranty information, service, or to purchase genuine BLACK+DECKER accessories and spare parts, please visit the official BLACK+DECKER website or contact their customer support.
You can also visit the BLACK+DECKER Store on Amazon for more products and information.
Related documentsGL7033-QS


Ask a question about this manual
Ask about setup, troubleshooting, compatibility, parts, safety, or missing instructions. Manuals+ will review the question and use this page’s manual context to help answer it.