1. Product Overview
This Hipa kit provides replacement fuel lines and primer bulbs for various Husqvarna outdoor power equipment. These components are essential for proper fuel delivery and engine starting. The kit is designed to replace original parts with numbers 503936601 and 530047721.

The Hipa fuel line and primer bulb kit is compatible with a range of outdoor power equipment, including blowers, chainsaws, cut-off saws, and trimmers.
2. Package Contents
Verify that all components are present in your package:
- 4 x Primer Bulbs
- 2 x 2-foot Fuel Lines

The kit includes four primer bulbs and two lengths of fuel line for replacement.
3. Compatibility
This kit is compatible with various Husqvarna models. Please verify your engine model and part numbers before purchasing to ensure correct fitment. The primer bulb replaces part numbers 503936601 and 530047721.
Compatible Husqvarna Chainsaw Models:
- 235, 235E, 236, 236E, 240, 240E
- 334T, 338XPT, 340, 340E, 345, 346XP
- 350, 350EPA, 353
- 435, 435E, 440E, 445, 445E, 450E
- 455, 455E, 455 Rancher, 460
Compatible Husqvarna Trimmer Models:
- 123L, 225, 225B, 232L, 227L, 227LD, 227R, 227RD
- 240L, 322C, 322L, 322R, 323, 325, 325LX, 325LXT
- 325RX, 325RXT, 325RDX, 325RJX, 325CX
- 326, 326C, 326L, 326LX, 326LS
Compatible Husqvarna Blower Models:
- 125B, 125BX, 125BVX
- 225BX, 225HBV
- 356BF, 356BT
4. Installation Instructions
Always ensure the equipment is turned off, cooled down, and disconnected from any power source (e.g., spark plug wire removed) before beginning any maintenance or installation. Wear appropriate safety gear.
- Access the Fuel System: Locate the existing primer bulb and fuel lines on your equipment. You may need to remove covers or housing to gain access.
- Drain Fuel: Carefully drain any remaining fuel from the fuel tank into an approved container.
- Remove Old Components: Disconnect the old fuel lines from the carburetor and fuel tank. Remove the old primer bulb. Note the routing of the lines before removal.
- Install New Primer Bulb: Insert the new primer bulb into its housing. Ensure it is seated securely.
- Connect Fuel Lines: Refer to the diagram below for proper fuel line routing. The primer bulb typically has two ports: a longer tube for the fuel tank (fuel return line) and a shorter tube for the carburetor (fuel inlet line).
- Route Fuel Lines: Connect one end of a new fuel line to the fuel inlet port on the carburetor. Route the other end into the fuel tank, ensuring it reaches the bottom of the tank to draw fuel. This is typically the Fuel Inlet Line.
- Connect Return Line: Connect the second new fuel line to the fuel return port on the carburetor (or directly from the primer bulb's longer tube). Route this line into the fuel tank. This is typically the Fuel Return Line.
- Secure Connections: Ensure all fuel line connections are snug to prevent leaks.
- Reassemble: Reattach any covers or housing removed earlier.

Detailed diagram showing the fuel line connections: Fuel Inlet Line, Fuel Return Line, and the primer bulb's shorter tube (to carburetor) and longer tube (to fuel tank).
Primer Bulb Dimensions:
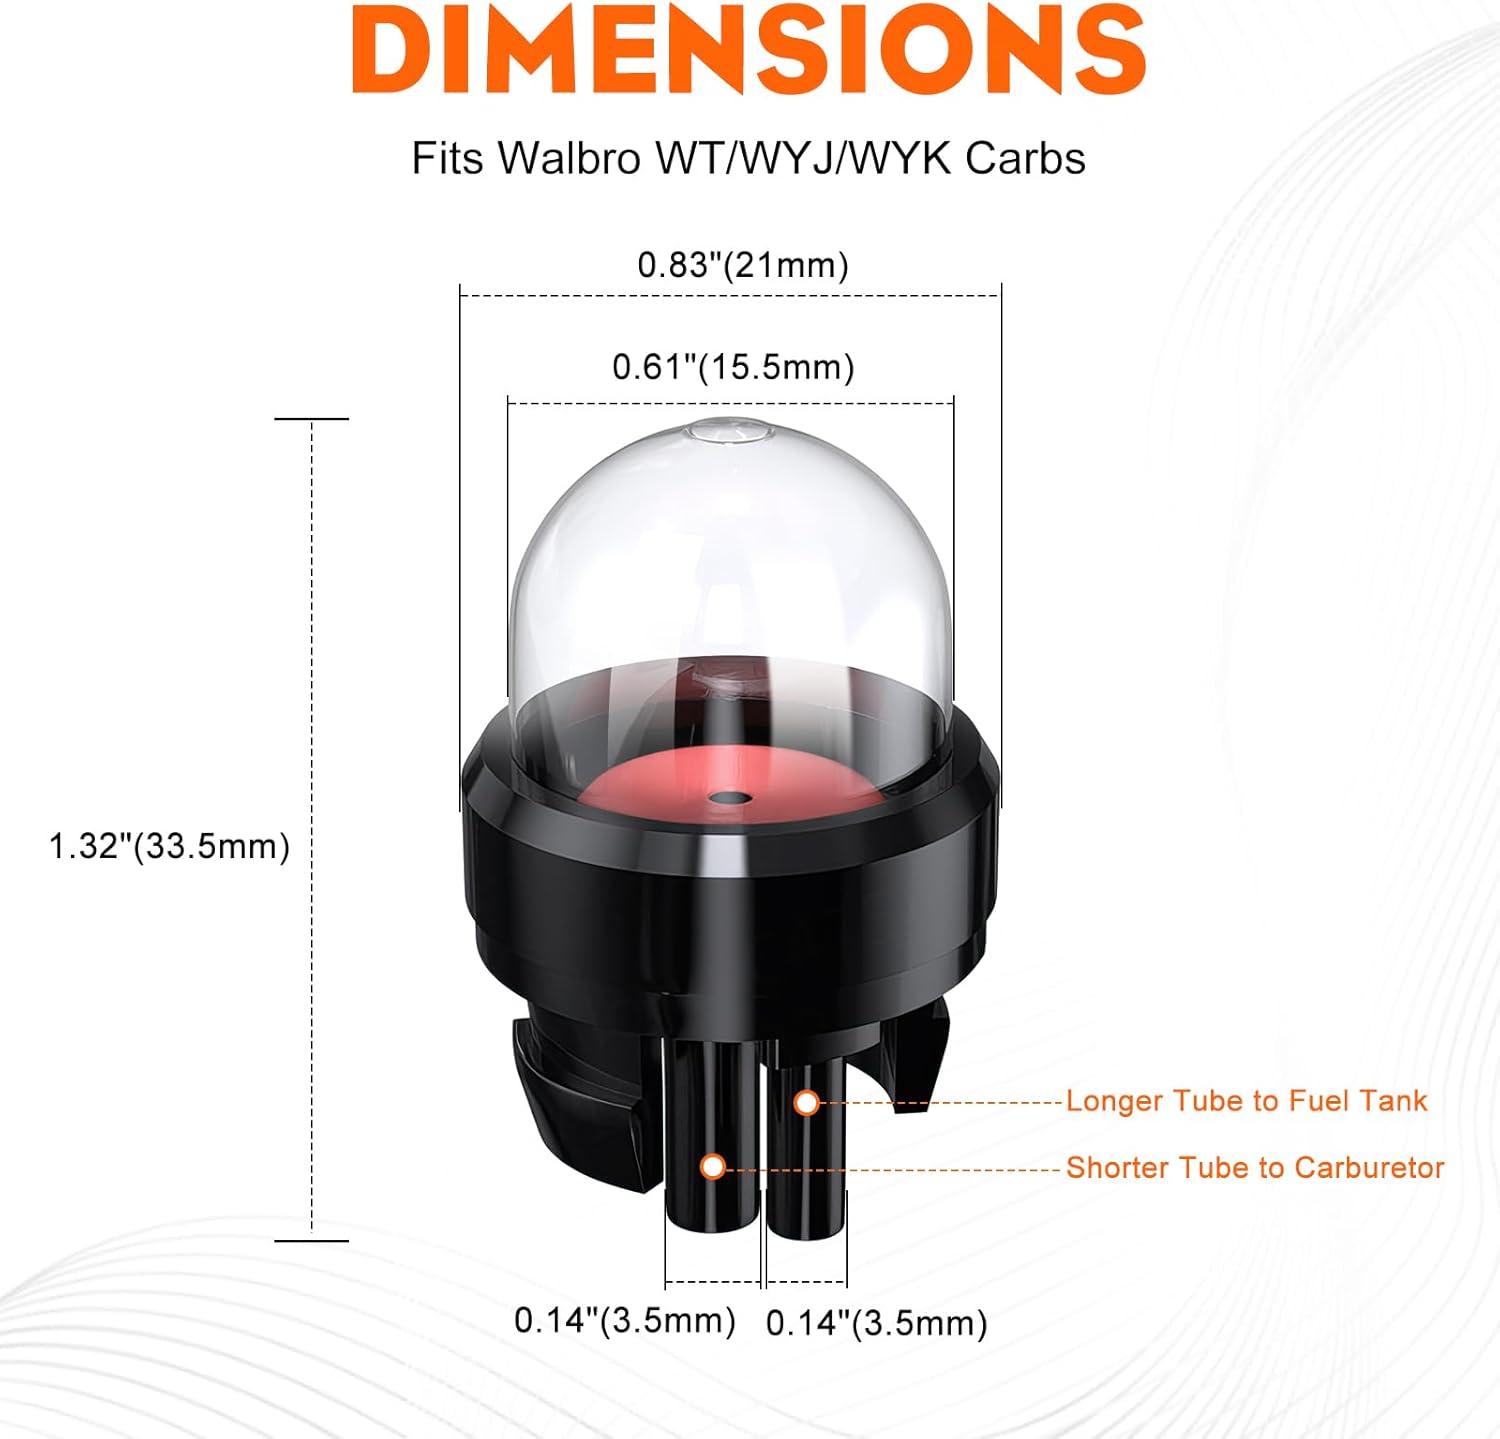
Primer bulb dimensions for reference during installation, indicating the longer tube for the fuel tank and shorter tube for the carburetor.
Fuel Line Dimensions:

Fuel line dimensions: ID 2.4mm x OD 4.8mm and ID 3mm x OD 5mm, ensuring a perfect fit for various applications.
5. Operating Instructions (Priming)
After installation and refueling, the primer bulb is used to draw fuel into the carburetor, preparing the engine for starting.
- Fill Fuel Tank: Ensure the fuel tank is filled with the appropriate fuel mixture for your equipment.
- Prime the System: Press the primer bulb repeatedly until fuel is visible flowing through the clear bulb and into the carburetor. This typically takes 5-10 presses, depending on the equipment. You should see fuel returning to the tank through the return line.
- Start Engine: Follow your equipment's specific starting procedure.
6. Maintenance
Regular inspection of fuel system components can prevent future issues.
- Inspect Fuel Lines: Periodically check fuel lines for cracks, hardening, or leaks. Replace immediately if any damage is observed.
- Inspect Primer Bulb: Ensure the primer bulb is pliable and returns to its original shape after pressing. A stiff or cracked bulb indicates it needs replacement.
- Fuel Quality: Use fresh, clean fuel and the correct oil mixture for 2-stroke engines. Stale fuel can cause damage to fuel system components.
7. Troubleshooting
If your equipment is not starting or running correctly after replacing the fuel lines and primer bulb, consider the following:
- No Fuel in Primer Bulb: Check if the fuel lines are correctly routed and submerged in fuel within the tank. Ensure there are no kinks or blockages in the lines.
- Fuel Leaks: Re-check all connections for tightness. Ensure the primer bulb is properly seated in its housing.
- Engine Still Not Starting: If fuel is priming correctly, the issue might be elsewhere in the engine (e.g., spark plug, carburetor adjustment, air filter). Consult your equipment's specific service manual.
8. Specifications
| Feature | Detail |
|---|---|
| Primer Bulb Replaces Part Numbers | 503936601, 530047721 |
| Primer Bulb Dimensions (Approx.) | 0.83" (21mm) diameter, 1.32" (33.5mm) overall length |
| Fuel Line 1 Dimensions (ID x OD) | 2.4mm x 4.8mm |
| Fuel Line 2 Dimensions (ID x OD) | 3mm x 5mm |
| Material | High-quality, resistant to wear, corrosion, heat, swelling, and cracking. Compatible with 10%+ ethanol fuel. |
| Package Dimensions | 5.55 x 5.39 x 1.1 inches |
| Item Weight | 1.44 ounces |
| Manufacturer | HIPA |
9. Warranty and Support
For warranty information or technical support regarding your Hipa Fuel Line and Primer Bulb kit, please refer to the retailer's return policy or contact Hipa customer service directly through their official channels. Keep your purchase receipt as proof of purchase.