
1. Introduction
This manual provides comprehensive instructions for the installation, operation, and maintenance of the PAIDUOJI XM-18E Digital Incubator Controller. This advanced microprocessor-controlled unit is designed for precise management of temperature, humidity, and egg turning within an incubator, ensuring optimal conditions for various poultry and rare bird species.
The XM-18E controller features high intelligence and accuracy, automating critical incubation processes such as temperature control, humidity regulation, and egg turning. Its user-friendly control panel makes it suitable for both small and medium-sized incubators.
2. Product Overview
2.1 Key Features
- Digital display for temperature, humidity, and egg turning frequency.
- Fully automatic temperature and humidity control with integrated sensors.
- Automatic egg turning with adjustable cycle and duration.
- Automatic ventilation control with adjustable cycle and duration.
- Alarm functions for high/low temperature and humidity deviations.
- Suitable for incubators with capacities ranging from 24 to 6000 eggs.
2.2 Components
The PAIDUOJI XM-18E Digital Incubator Controller package includes:
- 1 x XM-18E Incubator Controller Unit
- 1 x Temperature Sensor (approx. 2m length)
- 1 x Humidity Sensor
- 1 x User Manual (this document)
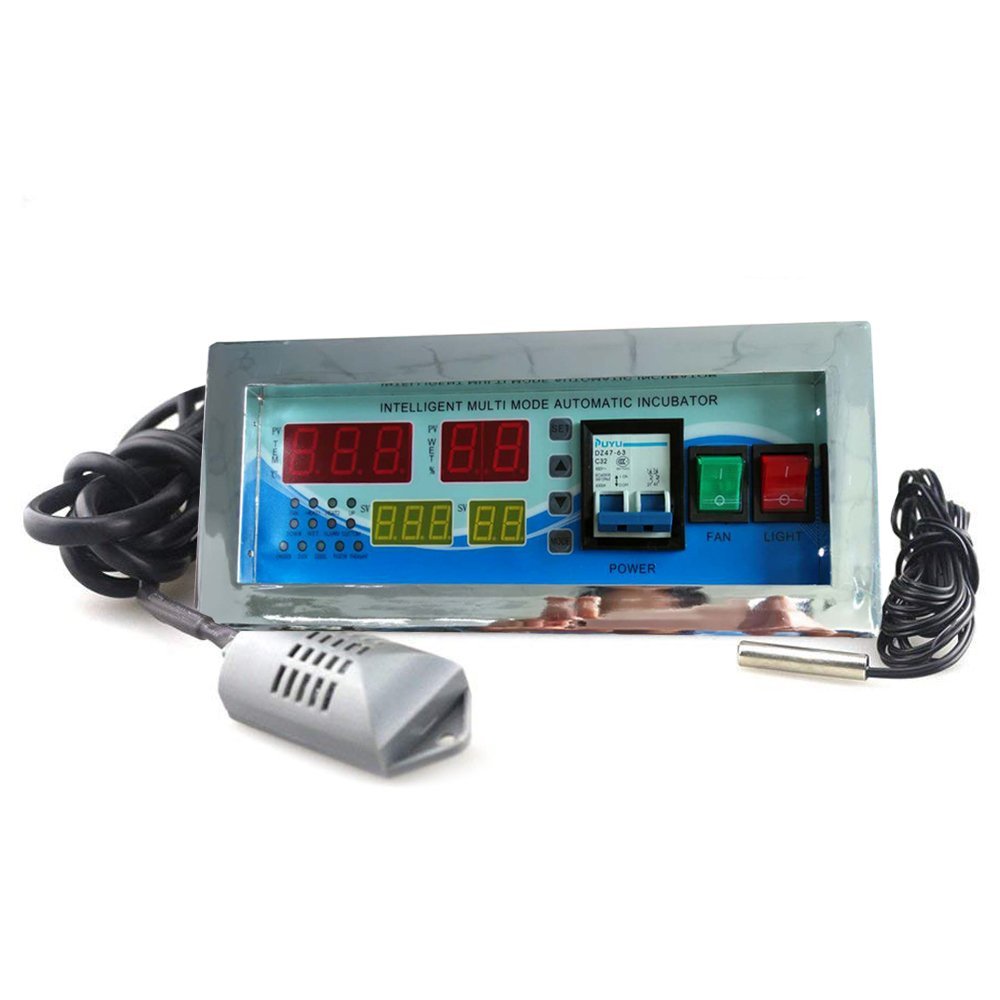
Figure 1: Front panel of the XM-18E Digital Incubator Controller, showing digital displays for temperature and humidity, control buttons, and power switches.

Figure 2: Included temperature sensor (top, metallic probe) and humidity sensor (bottom, grey plastic housing) with connecting cables.
3. Specifications
| Parameter | Value |
|---|---|
| Temperature Measurement Range | 0 ~ 99 °C |
| Temperature Measurement Accuracy | ± 0.1 °C |
| Humidity Measurement Range | 20 ~ 50% RH |
| Humidity Measurement Accuracy | ± 3% RH |
| Output Signals | 7 (High Temp, Temp Control, Low Temp, Left Egg Turn, Right Egg Turn, Humidity Control, Alarm) |
| Max Output Load (Temperature Regulation) | 8 A / 220 V AC |
| Max Output Load (Overload, Egg Turn, Humidity Control) | 1 A / 220 V AC |
| Egg Turning Record | Max 999 times |
| Egg Turning Cycle (Factory Default) | 0 ~ 999 minutes (90 minutes) |
| Egg Turning Duration (Factory Default) | 0 ~ 999 seconds (180 seconds) |
| Ventilation Cycle (Factory Default) | 0 ~ 999 minutes (120 minutes) |
| Ventilation Duration (Factory Default) | 0 ~ 999 seconds (30 seconds) |
| Temperature Sensor Length | Approx. 2 meters |
| Operating Voltage | 220V / 240V AC |
| Weight | 1.02 Kilograms |
| Display Type | Digital |
| Manufacturer | Huatuo |
| Country of Origin | China |
4. Setup and Installation
Proper installation is crucial for the safe and effective operation of your incubator controller. It is recommended that installation be performed by a qualified individual if you are unfamiliar with electrical wiring.
4.1 Wiring Diagram Overview
The controller features multiple terminals for connecting power, heating elements, humidity control, egg turning motors, and sensors. Refer to the internal wiring images for a visual guide. Ensure all connections are secure and correctly matched to their respective functions.

Figure 3: Internal view of the XM-18E controller circuit board, highlighting the terminal blocks for various connections.
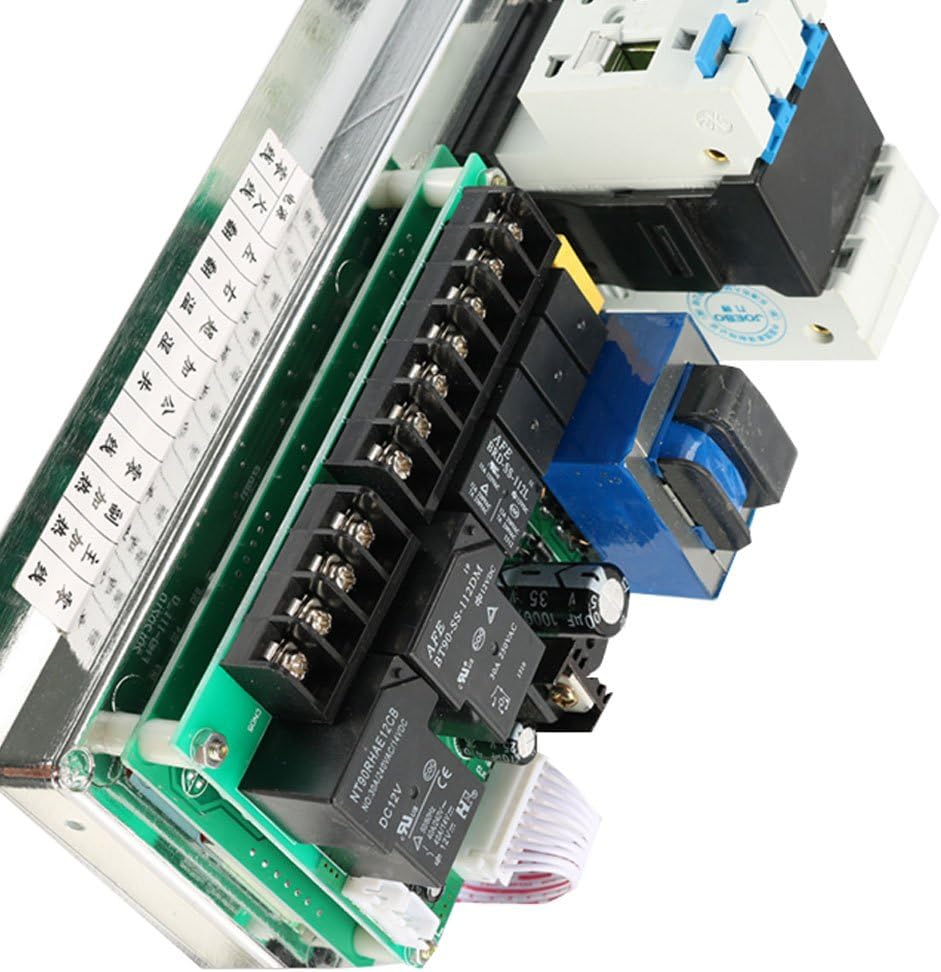
Figure 4: Angled perspective of the controller's internal components, showing relays and power connections.
4.2 Connection Points
- Power Input: Connect the main 220V/240V AC power supply to the designated terminals.
- Heating Elements: Connect your incubator's heating elements to the "Heater" output terminals. The controller supports two heating outputs (HEAT1, HEAT2).
- Humidity Control: Connect a humidifier or water pump to the "Wet" output terminal.
- Egg Turning Motor: Connect the egg turning motor to the "Left Turn" and "Right Turn" output terminals.
- Fan: Connect the ventilation fan to the "Fan" output terminal.
- Temperature Sensor: Plug the temperature sensor into its dedicated port.
- Humidity Sensor: Plug the humidity sensor into its dedicated port.
Warning: Ensure all power is disconnected before performing any wiring. Incorrect wiring can cause damage to the unit or pose a safety hazard.
5. Operating Instructions
The XM-18E controller features a digital display and intuitive buttons for setting and monitoring incubation parameters.
5.1 Display Overview
- PV TEM (°C): Displays the current measured temperature inside the incubator.
- PV WET (%): Displays the current measured relative humidity inside the incubator.
- SV (Set Value): Displays the set point for temperature or humidity during parameter adjustment.
- Indicator Lights: LEDs indicate the status of various functions (FAN, HEAT1, HEAT2, DOWN, WET, ALARM, CUSTOM, CHICKEN, DUCK, GOOSE, PIGEON, PHEASANT).
5.2 Button Functions
- SET: Enters parameter setting mode or confirms a setting.
- UP (▲): Increases the value of a parameter.
- DOWN (▼): Decreases the value of a parameter.
- MODE: Cycles through different parameters in setting mode or selects incubation modes.
5.3 Setting Parameters
To adjust incubation parameters (e.g., target temperature, humidity, egg turning intervals):
- Press the SET button to enter the parameter setting mode. The SV display will show the current parameter value.
- Use the MODE button to cycle through the available parameters (e.g., temperature set point, humidity set point, egg turning cycle, ventilation cycle).
- Once the desired parameter is displayed, use the UP (▲) and DOWN (▼) buttons to adjust the value.
- Press SET again to confirm the new value and move to the next parameter, or hold SET to exit the setting mode.
Note: Specific parameter codes and their functions are typically detailed in the full manual provided with the product. Common parameters include:
- Temperature Set Point: Target temperature for incubation.
- Humidity Set Point: Target humidity level.
- Egg Turning Cycle: Interval between automatic egg turns (factory default: 90 minutes).
- Egg Turning Duration: Length of time the eggs turn during each cycle (factory default: 180 seconds).
- Ventilation Cycle: Interval between automatic ventilation periods (factory default: 120 minutes).
- Ventilation Duration: Length of time the fan operates during each ventilation cycle (factory default: 30 seconds).
- High/Low Temperature Alarm Limits: Thresholds for temperature alarms.
- High/Low Humidity Alarm Limits: Thresholds for humidity alarms.
6. Maintenance
Regular maintenance ensures the longevity and accuracy of your XM-18E controller.
- Cleaning: Keep the controller's display and buttons clean using a soft, dry cloth. Avoid using abrasive cleaners or solvents.
- Sensor Care: Ensure temperature and humidity sensors are free from dust, debris, or moisture buildup, which can affect their accuracy.
- Connections: Periodically check all wiring connections to ensure they are secure and free from corrosion.
- Calibration: While the unit is factory calibrated, some users may wish to perform periodic calibration checks against a known accurate thermometer/hygrometer. Refer to advanced settings in the full product manual for calibration procedures, if available.
Caution: Always disconnect power to the incubator and controller before performing any cleaning or maintenance tasks.
7. Troubleshooting
This section addresses common issues you might encounter with the XM-18E controller.
| Problem | Possible Cause | Solution |
|---|---|---|
| Controller does not power on. | No power supply; loose power connection; internal fuse blown. | Check power source and connections. Ensure the main power switch on the controller is ON. If issues persist, consult a qualified technician. |
| Temperature/Humidity readings are inaccurate. | Sensor malfunction; sensor placed incorrectly; sensor dirty. | Check sensor connections. Clean sensors. Ensure sensors are positioned correctly within the incubator, away from direct heat or moisture sources. Consider recalibration if necessary (refer to full manual). |
| Heater/Humidifier/Fan not activating. | Incorrect settings; loose wiring; faulty component. | Verify set points are correctly configured. Check wiring to the respective components. Test components independently if possible. |
| Egg turning motor not operating. | Incorrect egg turning cycle/duration settings; motor wiring issue; motor malfunction. | Check egg turning parameters. Inspect motor wiring. Ensure the motor itself is functional. |
| Alarm sounds frequently. | Temperature/humidity outside set limits; alarm limits set too narrowly. | Check current temperature/humidity readings. Adjust set points or alarm limits as needed. Ensure incubator environment is stable. |
If you encounter problems not listed here or if the suggested solutions do not resolve the issue, please contact customer support.
8. Warranty and Support
For warranty information, technical support, or service inquiries, please contact the seller or manufacturer directly. Keep your purchase receipt as proof of purchase.
Manufacturer: Huatuo
Model: XM-18E