Introduction
This manual provides detailed instructions for the setup, operation, maintenance, and troubleshooting of your Carlsbro CSD120 Electronic Drum Set. Please read this manual thoroughly before using the product to ensure proper function and longevity.

Image: The complete Carlsbro CSD120 Electronic Drum Set, showcasing the drum pads, cymbals, and module.
Product Components
The Carlsbro CSD120 Electronic Drum Set includes the following main components:
- Drum Module (Commander 120 brain)
- Drum Pads (Snare, Tom x3)
- Cymbal Pads (Hi-Hat, Crash, Ride)
- Hi-Hat Control Pedal
- Kick Drum Pedal
- Drum Rack and Mounting Hardware
- Cables for connecting pads to module
- Power Adapter
The drum module features 20 preset drum kits, 10 user preset kits, 250 drum and percussion samples, and 20 onboard songs.
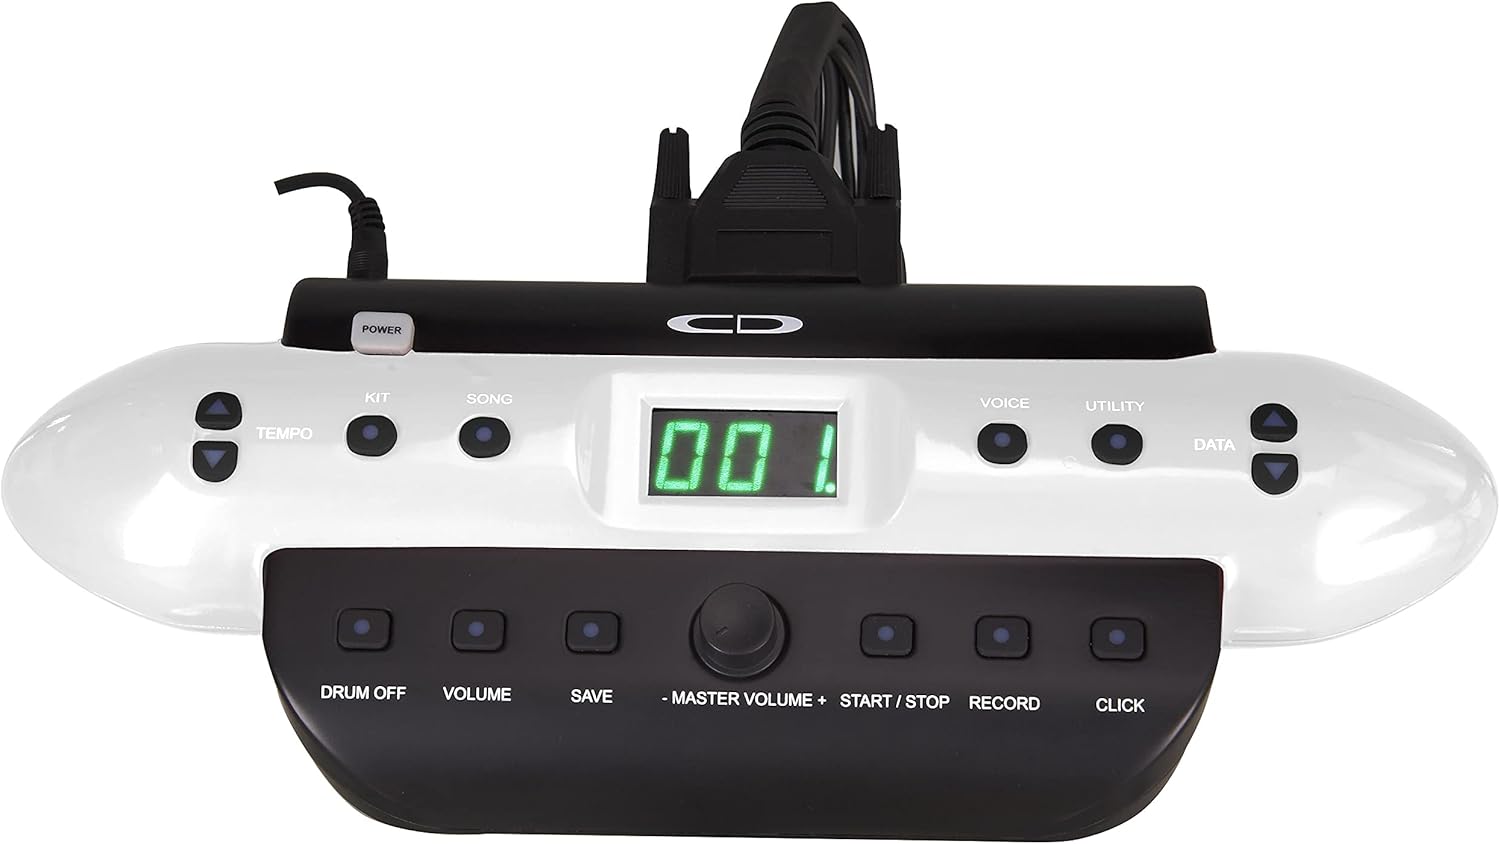
Image: An angled view of the Carlsbro CSD120 Electronic Drum Set, highlighting the compact design.
Setup Instructions
- Unpacking: Carefully remove all components from the packaging. Verify that all parts listed in the "Product Components" section are present.
- Assemble the Drum Rack: Follow the diagrams provided in the quick start guide (not included in this manual) to assemble the main drum rack frame. Ensure all clamps are securely tightened.
- Mount Pads and Cymbals: Attach the drum pads (snare, toms) and cymbal pads (hi-hat, crash, ride) to the drum rack using the provided mounting hardware. Position them ergonomically for comfortable playing.
- Install Pedals: Place the kick drum pedal and hi-hat control pedal on the floor in their respective positions.
- Connect the Drum Module: Mount the Commander 120 drum module to the rack.
- Cable Connections: Connect each drum pad, cymbal pad, and pedal to the corresponding input on the drum module using the included cables. Refer to the module's rear panel for correct port identification.
- Power Connection: Connect the power adapter to the DC IN port on the drum module and then to a suitable power outlet.
- Audio Output: For sound, connect headphones to the PHONES output or connect the OUTPUT (L/Mono, R) jacks to an amplifier or PA system.

Image: Rear view of the Commander 120 drum module, showing various input and output ports for connections.

Image: A close-up view of the Commander 120 drum module's connection ports, including USB, MIDI IN/OUT, AUX IN, OUTPUT, PHONES, and DC IN.
Operating Instructions
Drum Module Overview
The Commander 120 drum module is the central control unit for your electronic drum set. It features a clear display and intuitive buttons for navigation and sound control.

Image: Front view of the Commander 120 drum module, showing the display, control buttons, and master volume knob.
Basic Operation
- Power On/Off: Press the POWER button located on the module to turn the unit on or off.
- Master Volume: Adjust the overall output volume using the large MASTER VOLUME knob.
- Kit Selection: Press the KIT button to enter Kit selection mode. Use the DATA buttons (up/down arrows) or the master volume knob to scroll through the 20 preset kits or 10 user kits.
- Voice Selection: Press the VOICE button to select individual drum or percussion sounds. Use the DATA buttons to choose a voice.
- Song Playback: Press the SONG button to access the onboard songs. Use the DATA buttons to select a song. Press START/STOP to play or pause.
- Tempo Adjustment: Press the TEMPO button and use the DATA buttons to adjust the tempo of songs or the metronome.
- Metronome (Click): Press the CLICK button to activate or deactivate the metronome.
- Recording: Press the RECORD button to start recording your performance. Press again to stop.
- Saving Settings: After making changes to a user kit or other settings, press the SAVE button to store them. Follow the on-screen prompts.
- Utility Functions: Press the UTILITY button to access advanced settings such as sensitivity, trigger curves, and MIDI parameters.
Maintenance
- Cleaning: Use a soft, dry cloth to clean the drum module, pads, and cymbals. For stubborn dirt, a slightly damp cloth can be used, followed by a dry cloth. Avoid abrasive cleaners or solvents.
- Cable Management: Ensure all cables are neatly routed and not under tension to prevent damage.
- Storage: When not in use for extended periods, store the drum set in a cool, dry place away from direct sunlight and extreme temperatures.
- Pad Care: Avoid hitting the pads with excessive force, as this can reduce their lifespan.
Troubleshooting
| Problem | Possible Cause | Solution |
|---|---|---|
| No sound from headphones/speakers. |
|
|
| Specific pad not triggering sound. |
|
|
| Double triggering or missed triggers. |
|
|
Specifications
| Feature | Detail |
|---|---|
| Model Name | CSD120 |
| Drum Kits | 20 Preset, 10 User |
| Sounds | 250 Drum & Percussion Samples |
| Onboard Songs | 20 |
| Connectivity | USB, MIDI In/Out, Aux In, Output (L/Mono, R), Phones, DC In |
| Material | Plastic, Metal |
| Color | Black |
| Item Weight | 33 pounds (14.97 kg) |
| Product Dimensions (L x W x H) | 20 x 8 x 17 inches (50.8 x 20.32 x 43.18 cm) |
| Manufacturer | Samson Technologies |
Warranty Information
Carlsbro products are typically covered by a limited manufacturer's warranty. Please refer to the warranty card included with your product or visit the official Carlsbro website for specific terms and conditions, including warranty duration and coverage details. Keep your proof of purchase for warranty claims.
Customer Support
For technical assistance, spare parts, or further inquiries regarding your Carlsbro CSD120 Electronic Drum Set, please contact Carlsbro customer support through their official website. You may also refer to the retailer where the product was purchased for support options.