1. Introduction
This manual provides essential information for the installation, maintenance, and troubleshooting of the Cutex Rotary Hook Assembly, part number B1830-241-HA0. This component is designed for use with various industrial sewing machines to ensure proper stitch formation.
Product Compatibility:
- Juki: DNU-241, DNU-241H, DU-141H, DDL-201
- Artisan: 797AB, 1797AB
- Brother: B797, B745
- Chandler: 337
- Nakajima: 280L, 180L
2. Safety Information
Always prioritize safety when working with sewing machine components. Failure to follow safety guidelines may result in injury or damage to the machine.
- Disconnect Power: Before performing any installation, maintenance, or adjustment, always turn off the sewing machine and unplug it from the power source.
- Use Proper Tools: Use only appropriate tools for installation and removal to prevent damage to the hook assembly or machine.
- Handle with Care: The rotary hook contains precision parts. Handle it carefully to avoid bending or damaging critical components.
- Keep Fingers Clear: Be aware of sharp points and moving parts when working inside the machine.
3. Package Contents
The package contains one (1) Cutex Rotary Hook Assembly (Part # B1830-241-HA0).
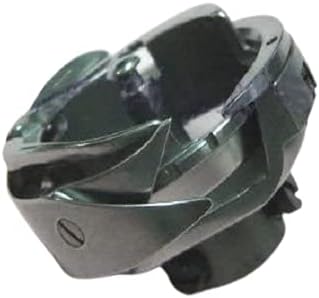
Figure 1: Cutex Rotary Hook Assembly (Part # B1830-241-HA0). This image displays the metallic rotary hook assembly, a crucial component for industrial sewing machines, responsible for forming the lower stitch.
4. Setup and Installation
Installation of a rotary hook assembly requires precision and familiarity with industrial sewing machine mechanics. If you are unsure about any step, it is recommended to seek assistance from a qualified sewing machine technician.
- Prepare the Machine:
- Turn off the sewing machine and unplug it from the power outlet.
- Raise the presser foot and remove the needle.
- Remove the needle plate and bobbin case from the machine.
- Remove the Old Rotary Hook:
- Carefully identify and loosen the screws securing the existing rotary hook in place.
- Gently remove the old rotary hook, noting its orientation and position for reference.
- Clean the Hook Area:
- Thoroughly clean any lint, dust, or old oil from the hook race and surrounding area using a brush or compressed air.
- Inspect for any damage or wear on other components in the hook area.
- Install the New Rotary Hook:
- Position the new Cutex Rotary Hook Assembly into the machine, ensuring it sits correctly in its housing.
- Align the screw holes and gently tighten the securing screws. Do not overtighten.
- Adjust Hook Timing:
- This is a critical step. The timing of the rotary hook relative to the needle must be precisely set for proper stitch formation.
- Refer to your specific sewing machine's service manual for detailed instructions on adjusting hook timing. This typically involves rotating the handwheel to bring the needle to its lowest point, then raising it slightly, and adjusting the hook point to meet the needle at the correct position.
- Ensure the hook point passes the needle scarf at the correct height and distance.
- Reassemble and Test:
- Reinstall the bobbin case and needle plate.
- Insert a new needle and thread the machine.
- Plug in the machine and perform test stitches on scrap fabric to verify proper operation and stitch quality. Make any fine adjustments as needed.
5. Operating
The rotary hook assembly is an internal component of your industrial sewing machine. It does not have direct user-operable controls. Its function is integral to the machine's stitch-forming mechanism, working in conjunction with the needle and bobbin to create secure and consistent stitches.
6. Maintenance
Regular maintenance of the rotary hook assembly is crucial for extending its lifespan and ensuring optimal sewing machine performance.
- Cleaning: Periodically remove the bobbin case and clean the hook race area to remove lint and thread debris. Accumulation can cause skipped stitches or thread breakage.
- Lubrication: Apply a small amount of high-quality sewing machine oil to the hook race and other designated lubrication points as specified in your sewing machine's manual. Proper lubrication reduces friction and wear.
- Inspection: Regularly inspect the hook point for nicks, burrs, or wear. A damaged hook point can cause thread damage and skipped stitches. Replace the hook if significant damage is observed.
7. Troubleshooting
If you experience issues after installing or during the use of the rotary hook assembly, consider the following common problems and solutions:
- Skipped Stitches:
- Check hook timing. Incorrect timing is a primary cause of skipped stitches.
- Inspect the needle for bends or dullness.
- Ensure the hook point is not damaged.
- Thread Breakage:
- Examine the hook point for burrs or sharp edges that could snag the thread.
- Verify proper threading of the machine and bobbin.
- Check for excessive tension.
- Noisy Operation:
- Ensure the hook assembly is properly lubricated.
- Check for loose screws or components.
- Verify that the hook is seated correctly in its housing.
If troubleshooting steps do not resolve the issue, consult your sewing machine's service manual or contact a professional technician.
8. Specifications
| Brand | Cutex |
| Part Number | B1830-241-HA0 |
| ASIN | B06WP4CVLS |
| Compatibility | Juki DNU-241, DNU-241H, DU-141H, DDL-201; Artisan 797AB, 1797AB; Brother B797, B745; Chandler 337; Nakajima 280L, 180L |
| First Available Date | May 8, 2020 |
9. Warranty Information
For specific warranty details regarding your Cutex Rotary Hook Assembly, please refer to the documentation provided with your purchase or contact Cutex customer support directly. Warranty terms typically cover manufacturing defects for a limited period from the date of purchase.
10. Support
If you require further assistance with the installation, operation, or maintenance of your rotary hook assembly, or if you have questions regarding compatibility, please contact Cutex customer support. For machine-specific issues, it is often beneficial to consult the original manufacturer's manual for your sewing machine model or contact a certified technician.