Introduction
This manual provides comprehensive instructions for the installation, operation, and maintenance of the Balboa Water Group ML700 8-Button Overlay. This overlay is designed for use with compatible Balboa spa and hot tub control panels, providing a clear and intuitive interface for managing various spa functions.
Please read this manual thoroughly before installation and operation to ensure proper use and longevity of your product.
Product Overview
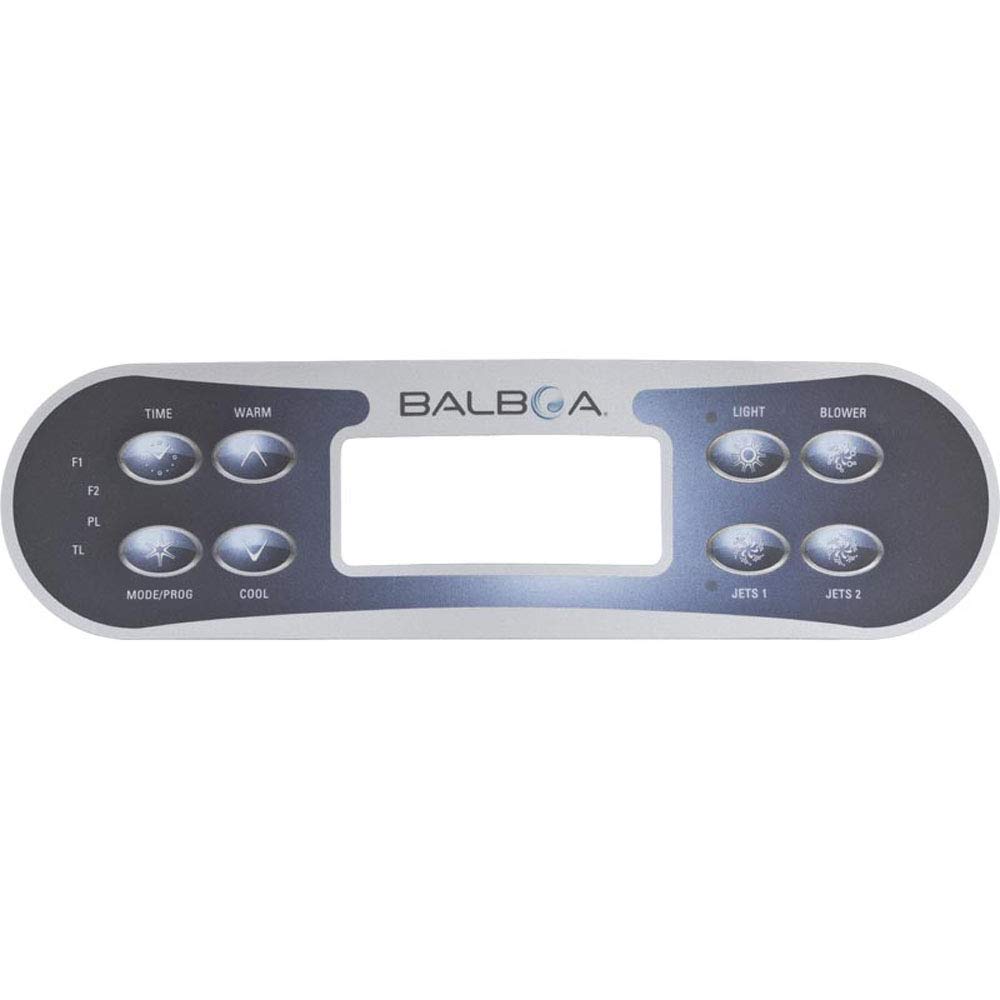
Figure 1: Front view of the Balboa ML700 8-Button Overlay. This image shows the top surface of the overlay with the Balboa logo, a central display window cutout, and eight clearly labeled buttons for functions such as TIME, WARM, LIGHT, BLOWER, MODE/PROG, COOL, JETS 1, and JETS 2. Additional labels F1, F2, PL, TL are visible on the left side.

Figure 2: Rear view of the Balboa ML700 8-Button Overlay, showing the 3M 468MP 200MP adhesive backing. This image displays the reverse side of the overlay, highlighting the pre-applied adhesive layer used for secure attachment to the spa control panel. The adhesive is visible as a brown, textured surface covering most of the back, with a central rectangular cutout corresponding to the display window.
Setup and Installation
The Balboa ML700 8-Button Overlay is designed for easy installation onto a compatible Balboa control panel. Ensure the control panel surface is clean and dry before proceeding.
- Preparation: Turn off all power to the spa or hot tub at the main breaker before beginning installation. This is crucial for safety.
- Remove Old Overlay (if applicable): Carefully peel off the old overlay from the control panel. Use a plastic scraper or similar tool if necessary to avoid damaging the panel surface. Clean any adhesive residue thoroughly using an appropriate cleaner that will not damage the panel.
- Clean Surface: Ensure the control panel surface where the new overlay will be applied is completely clean, dry, and free of dust, grease, or old adhesive. A clean surface ensures optimal adhesion.
- Align Overlay: Carefully align the new ML700 overlay with the buttons and display window of your control panel. Do not remove the adhesive backing yet. Practice the alignment to ensure a perfect fit.
- Apply Overlay: Once confident in the alignment, peel off the protective backing from the 3M adhesive on the back of the new overlay. Starting from one end, carefully press the overlay onto the control panel, working your way across to avoid air bubbles. Apply firm, even pressure across the entire surface, especially around the edges and buttons, to ensure full adhesion.
- Final Check: Verify that all buttons are properly aligned and can be pressed without obstruction. Ensure the display window is clear.
- Restore Power: Once the overlay is securely in place, restore power to the spa or hot tub.
Note: The adhesive is very strong. Once applied, repositioning may be difficult and could compromise the adhesive bond. Take care during initial alignment.
Operating Instructions
The ML700 overlay provides labels for the functions of your Balboa control panel. Refer to your specific Balboa control system's manual for detailed operational procedures, as the overlay itself is a cosmetic and functional label for the underlying buttons.
| Button Label | Typical Function |
|---|---|
| TIME | Adjusts the time settings of the spa. |
| WARM | Increases the set temperature of the spa. |
| LIGHT | Controls the spa's internal lighting system. |
| BLOWER | Activates or deactivates the air blower. |
| MODE/PROG | Cycles through operating modes or enters programming menus. |
| COOL | Decreases the set temperature of the spa. |
| JETS 1 | Controls the primary jet pump. Multiple presses may cycle speeds. |
| JETS 2 | Controls the secondary jet pump (if equipped). Multiple presses may cycle speeds. |
Specific functionality may vary based on the Balboa control system model. Consult your spa's main control system manual for precise button operations and programming details.
Maintenance
Proper maintenance of your ML700 overlay will ensure its longevity and maintain its appearance.
- Cleaning: Clean the overlay surface regularly with a soft, damp cloth. Use mild, non-abrasive cleaners if necessary. Avoid harsh chemicals, solvents, or abrasive pads, as these can damage the overlay's finish and button labels.
- Protection: Protect the overlay from direct, prolonged exposure to harsh sunlight or extreme weather conditions if your spa is outdoors and uncovered, as this can cause fading or material degradation over time.
- Inspection: Periodically inspect the overlay for signs of wear, peeling, or damage. If the overlay begins to peel, ensure the underlying panel is clean and dry, and re-apply pressure. If damage is significant, replacement may be necessary.
Troubleshooting
This section addresses common issues related to the ML700 overlay itself. For issues related to spa functionality (e.g., jets not working, heating problems), refer to your spa's main control system manual.
- Overlay Not Sticking:
- Ensure the control panel surface was thoroughly cleaned and dry before application.
- Apply firm, even pressure across the entire overlay during installation to activate the adhesive.
- If the surface was not clean, the adhesive bond may be compromised. A new overlay may be required.
- Buttons Not Responding:
- Verify the overlay is correctly aligned over the physical buttons on the control panel. Misalignment can prevent proper button presses.
- Ensure the control panel itself is receiving power and functioning correctly. This overlay is a cosmetic and protective layer; it does not contain electronic components.
- If the underlying button on the control panel is faulty, replacing the overlay will not resolve the issue.
- Display Window Obscured:
- Ensure the overlay's display window cutout is perfectly aligned with the control panel's display screen.
- Clean the display window area on both the overlay and the control panel.
Specifications
| Attribute | Detail |
|---|---|
| Brand | Balboa Water Group |
| Model Name | ML700 |
| Item Model Number | 11281 |
| Number of Buttons | 8 |
| Product Dimensions | 9.7 x 2.9 x 0.65 inches |
| Item Weight | 4 ounces |
| UPC | 753610461371 |
| Specific Uses For Product | Spa/Hot Tub Control Panels |
Warranty and Support
This Balboa Water Group product is manufactured to high-quality standards. For specific warranty information, please refer to the documentation provided with your original Balboa control system or contact Balboa Water Group directly.
For technical support or further assistance, please contact your authorized Balboa Water Group dealer or the manufacturer's customer service. Ensure you have your product model number (ML700 or 11281) and any relevant purchase information available when seeking support.
Disclaimer: This overlay is a replacement part. Its functionality is dependent on the underlying Balboa control panel. Balboa Water Group is not responsible for issues arising from improper installation or incompatibility with non-Balboa systems.


