1. Introduction
This manual provides detailed instructions for the installation, operation, and maintenance of your Biostar TB85 motherboard. The Biostar TB85 is an ATX form factor motherboard designed for Intel Socket 1150 processors, supporting DDR3 memory. It features an Intel B85 chipset, offering a reliable foundation for personal computer systems.

Figure 1: Overview of the Biostar TB85 Motherboard. This image displays the full layout of the motherboard, including the CPU socket, RAM slots, PCIe slots, and various connectors.
2. Setup and Installation
Before beginning installation, ensure your system is powered off and disconnected from the power source. Handle the motherboard by its edges to avoid static discharge.
2.1 CPU Installation
The Biostar TB85 motherboard uses an LGA 1150 socket.
- Locate the CPU socket on the motherboard.
- Gently push down the load lever and pull it sideways to open the socket retention frame.
- Align the triangular mark on the CPU with the corresponding mark on the socket. Carefully place the CPU into the socket without forcing it.
- Close the retention frame and secure it with the load lever.
- Apply thermal paste to the CPU and install the CPU cooler according to its manufacturer's instructions.
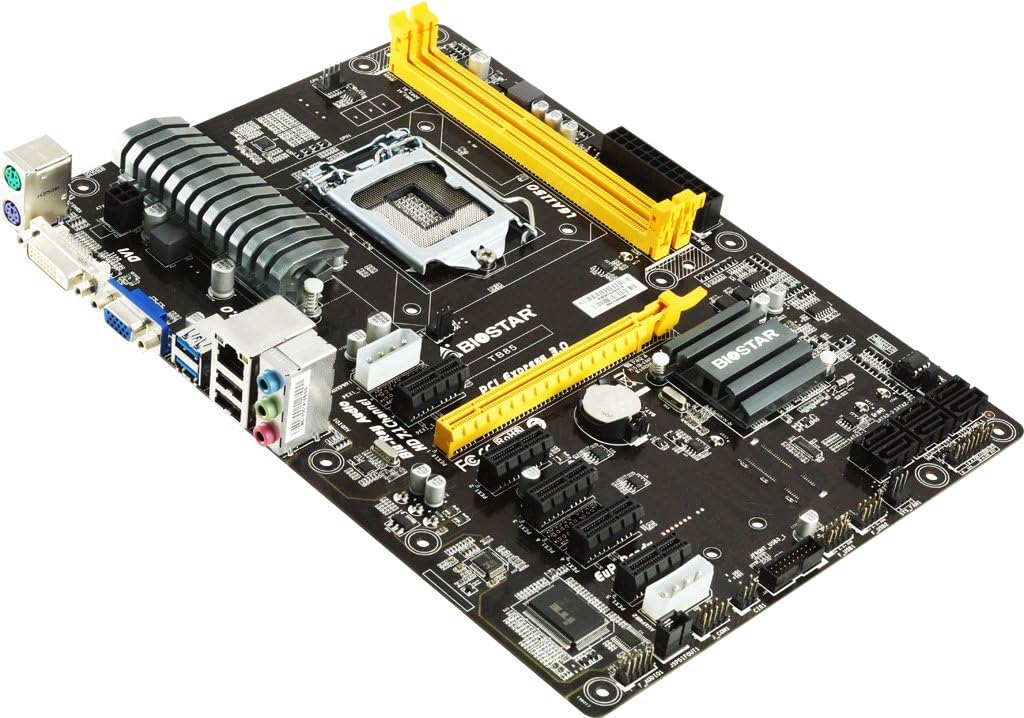
Figure 2: Detailed view of the LGA 1150 CPU socket and the two yellow DDR3 RAM slots on the Biostar TB85 motherboard.
2.2 RAM Installation
The motherboard supports DDR3 RAM modules. It has two DIMM slots, supporting up to 16 GB total memory.
- Open the clips at both ends of the DIMM slot.
- Align the notch on the DDR3 memory module with the key in the DIMM slot.
- Insert the memory module firmly into the slot until the clips snap into place.
2.3 Storage Device Installation (SATA)
The Biostar TB85 includes SATA 3 ports for connecting storage devices such as HDDs and SSDs. While the specifications list 1 total SATA port, the motherboard visually features multiple SATA 3 ports for connectivity.
- Connect one end of a SATA data cable to a SATA port on the motherboard.
- Connect the other end of the SATA data cable to your storage device.
- Connect a SATA power cable from your power supply unit (PSU) to the storage device.
2.4 Expansion Card Installation (PCIe)
The motherboard features multiple PCIe slots for expansion cards like graphics cards, network cards, or sound cards. It has 4 total PCIe ports.
- Select an appropriate PCIe slot for your expansion card.
- Remove the corresponding metal bracket cover from your PC case.
- Align the expansion card with the slot and press it down firmly until it is fully seated.
- Secure the card with a screw to the PC case.
2.5 Power Connections
Connect the main 24-pin ATX power connector and the 8-pin (or 4-pin) CPU power connector from your PSU to the corresponding sockets on the motherboard. Ensure all power cables are securely connected.
2.6 Front Panel and Rear I/O Connections
Connect your PC case's front panel connectors (power button, reset button, USB ports, audio jacks, indicator LEDs) to the appropriate headers on the motherboard. Refer to the motherboard's silkscreen labels for correct pin assignments.
The rear I/O panel includes ports for peripherals:
- PS/2 ports for keyboard/mouse
- VGA and DVI display outputs
- USB 3.0 and USB 2.0 ports (The specifications list 2 total USB ports, but the rear I/O panel typically offers more)
- LAN port
- Audio jacks (HD 7.1 Channel Blu-Ray Audio)
3. Operating Instructions
3.1 Initial Boot and BIOS Setup
After assembling your system, connect a monitor, keyboard, and mouse. Power on the system. During startup, press the designated key (usually DEL or F2) to enter the BIOS/UEFI setup utility.
- Check System Information: Verify that the CPU, RAM, and storage devices are correctly detected.
- Set Boot Order: Configure the boot order to prioritize your operating system installation media (USB drive or optical drive).
- Save and Exit: Save your changes and exit the BIOS. The system will restart.
3.2 Operating System and Driver Installation
Install your preferred operating system (e.g., Windows, Linux) by following its installation prompts. After the OS is installed, install the necessary drivers for the motherboard components.
- Chipset Drivers: Install the Intel B85 chipset drivers.
- Graphics Drivers: Install drivers for integrated graphics (if used) or your dedicated graphics card.
- Audio Drivers: Install HD Audio drivers for 7.1 channel support.
- LAN Drivers: Install network drivers for internet connectivity.
- USB 3.0 Drivers: Ensure USB 3.0 functionality.
Drivers can typically be found on the Biostar official website or on the driver CD included with the motherboard (if applicable).
4. Maintenance
Regular maintenance helps ensure the longevity and stable operation of your motherboard and system.
- Dust Removal: Periodically clean dust from the motherboard, CPU cooler, and case fans using compressed air. Ensure the system is powered off and unplugged.
- BIOS Updates: Check the Biostar website for BIOS updates. BIOS updates can improve compatibility, stability, and performance. Follow Biostar's specific instructions for BIOS flashing carefully to avoid system damage.
- Driver Updates: Keep your drivers updated to ensure optimal performance and compatibility with new software and hardware.
- Component Checks: Ensure all cables are securely connected and no components are loose.
5. Troubleshooting
If you encounter issues, refer to the following common troubleshooting steps.
- No Power:
- Ensure the PSU is switched on and all power cables (24-pin ATX, 8-pin CPU) are firmly connected to the motherboard and PSU.
- Check the front panel power switch connection to the motherboard.
- No Display:
- Verify that the monitor is connected to the correct display output (VGA/DVI on motherboard or dedicated graphics card).
- Reseat the RAM modules. Try booting with only one RAM module installed.
- Reseat the graphics card (if applicable).
- System Instability/Crashes:
- Check CPU and GPU temperatures. Ensure adequate cooling.
- Run memory diagnostic tools to check for faulty RAM.
- Ensure all drivers are correctly installed and up to date.
- Peripheral Not Detected:
- Try connecting the peripheral to a different port.
- Ensure the peripheral's drivers are installed.
- Check BIOS settings for port enablement.
For more advanced troubleshooting or persistent issues, contact Biostar technical support.
6. Specifications
Below are the key technical specifications for the Biostar TB85 motherboard.
| Feature | Specification |
|---|---|
| Brand | Biostar |
| Model Name | TB85 |
| CPU Socket | LGA 1150 |
| Compatible Processors | Intel Core i3-4xxx, i5-4xxx, i7-4xxx, i3-5xxx, i5-5xxx, i7-5xxx |
| Chipset Type | Intel B85 |
| RAM Memory Technology | DDR3 |
| Memory Storage Capacity (Max) | 16 GB |
| Main Power Connector Type | 24-Pin |
| Graphics Card Interface | Integrated (VGA, DVI outputs) |
| Total SATA Ports | 1 (SATA 3 supported) |
| Total USB Ports | 2 (as per spec, typically more via headers) |
| Total PCIe Ports | 4 |
| Audio | HD 7.1 Channel Blu-Ray Audio |
| Form Factor | ATX |
| Item Weight | 2.05 Pounds |
7. Warranty Information
Biostar motherboards typically come with a manufacturer's limited warranty. The duration and terms of the warranty may vary by region and retailer.
- Warranty Period: Refer to your purchase documentation or the official Biostar website for specific warranty periods applicable to your region.
- Proof of Purchase: Always retain your proof of purchase (invoice or receipt) as it is required for warranty claims.
- Warranty Exclusions: The warranty generally does not cover damage caused by improper installation, misuse, unauthorized modifications, accidents, or natural disasters.
For detailed warranty terms and conditions, please visit the official Biostar support website.
8. Support
For technical assistance, driver downloads, BIOS updates, or further information regarding your Biostar TB85 motherboard, please utilize the following resources:
- Official Biostar Website: www.biostar.com.tw (Check for support section, drivers, and FAQs)
- Product Support Page: Look for a dedicated support page for the TB85 model on the Biostar website.
- Contact Support: Information for contacting Biostar technical support via email or phone can usually be found on their website.
When contacting support, have your motherboard model (TB85) and a detailed description of your issue ready.


