1. Introduction
This manual provides detailed instructions for the proper installation of the Infini Model IW7004 1/700 scale wooden deck and etched parts set. This set is designed to enhance the detail and realism of your 1/700 scale Japanese Navy Battleship Kii plastic model kit, specifically compatible with Company F 460031 NEXT003 kits. Please read all instructions carefully before beginning assembly.
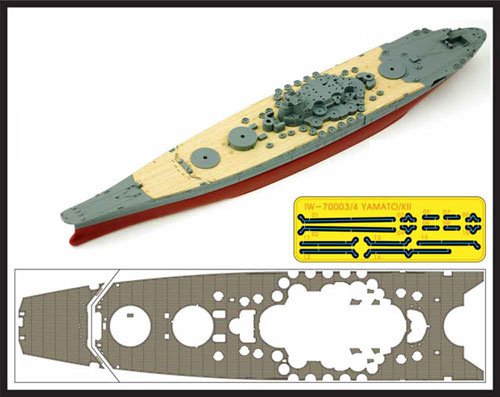
Figure 1: Infini Model IW7004 Wooden Deck and Etched Parts packaging. This image shows the product as it appears in its packaging.
2. Safety Information
Model building involves small parts and sharp tools. Always exercise caution and follow these safety guidelines:
- Age Recommendation: This product is recommended for individuals aged 15 years and above.
- Ventilation: Work in a well-ventilated area, especially when using adhesives, paints, or solvents.
- Sharp Tools: Handle hobby knives, tweezers, and other sharp tools with extreme care. Keep them away from children.
- Small Parts: This kit contains small parts that can be a choking hazard. Keep them out of reach of small children and pets.
- Adhesives and Paints: Use model-specific adhesives and paints according to their manufacturer's instructions. Avoid contact with skin and eyes.
- Eye Protection: Consider wearing safety glasses to protect your eyes from small flying debris or chemical splashes.
3. Package Contents
Before starting, verify that all components are present and undamaged. The Infini Model IW7004 set typically includes:
- Pre-cut wooden deck sheet (ultra-thin 0.12 mm)
- Photo-etched (PE) parts sheet (e.g., corrugated board, washboard)
- Instruction sheet (this document serves as a comprehensive guide)
Note: The plastic model kit of the Japanese Navy Battleship Kii is sold separately and is required for the use of this product.
4. Tools Required (Sold Separately)
The following tools and materials are essential for successful installation and are not included with this product:
- Hobby Knife: A sharp hobby knife with a fresh blade for precise cutting.
- Fine-Tip Tweezers: For handling small etched parts and positioning the wooden deck.
- Plastic Cement/Adhesive: For assembling the base plastic model kit.
- Cyanoacrylate (CA) Glue (Super Glue): A thin, fast-drying CA glue is recommended for attaching the wooden deck and etched parts.
- CA Accelerator (Optional): To speed up the curing of CA glue.
- Sanding Sticks/Files: Fine-grit sanding tools for preparing surfaces.
- Cutting Mat: To protect your work surface.
- Cotton Swabs/Toothpicks: For applying small amounts of glue.
- Paints and Brushes: For detailing and finishing the model.
5. Setup and Preparation
Proper preparation of your workspace and the model kit is crucial for a clean and accurate installation.
- Prepare Your Workspace: Ensure your work area is clean, well-lit, and free from dust. Lay down a cutting mat to protect your table.
- Assemble the Base Model: Fully assemble the main hull and superstructure of your 1/700 Japanese Navy Battleship Kii plastic model kit according to its manufacturer's instructions. Do not attach any deck details or railings that will be replaced by the wooden deck or etched parts.
- Clean the Model Surface: Thoroughly clean the deck areas where the wooden deck will be applied. Remove any mold lines, flash, or paint that might interfere with adhesion. A light sanding with fine-grit sandpaper (e.g., 600-800 grit) followed by a wipe with a lint-free cloth and isopropyl alcohol can ensure optimal adhesion.
- Pre-fit Components: Carefully dry-fit the wooden deck sections onto the plastic model's deck. Ensure they align correctly with the molded details and edges. If any adjustments are needed, gently trim the wooden deck with a sharp hobby knife.
6. Installation Guide
6.1. Installing the Wooden Deck
The wooden deck is self-adhesive, but for best results and long-term durability, a thin layer of CA glue is recommended.
- Identify Sections: The wooden deck sheet is typically divided into several sections corresponding to different parts of the ship's deck. Refer to the included diagram (if any) or the model's instructions to identify each piece.
- Peel and Align: Carefully peel off the backing paper from one section of the wooden deck. Avoid touching the adhesive side. Align the piece precisely with the corresponding area on the plastic model's deck. Start from one edge and slowly lay it down, ensuring no air bubbles are trapped underneath.
- Apply Pressure: Once aligned, gently press down on the entire surface of the wooden deck piece, working from the center outwards, to ensure firm adhesion. Use a soft cloth or cotton swab to apply even pressure.
- Secure with CA Glue (Optional but Recommended): For added security, lift a small edge of the wooden deck and apply a tiny drop of thin CA glue underneath. Press down immediately. Repeat this process around the edges and at key points across the deck section. Be careful not to use too much glue, as it can seep through the wood veneer.
- Repeat for All Sections: Continue this process for all remaining wooden deck sections, ensuring each piece is perfectly aligned before pressing it down.
6.2. Installing Etched Parts
Etched parts are delicate and require careful handling. Use fine-tip tweezers and CA glue for attachment.
- Cut from Sprue: Using a sharp hobby knife, carefully cut each etched part from its metal sprue. Place the part on a cutting mat and press down firmly with the knife blade. Avoid twisting or bending the part.
- Clean Parts: If necessary, gently clean the etched parts to remove any residue from the manufacturing process.
- Bend (if required): Some etched parts, such as railings or ladders, may require bending into specific shapes. Use a photo-etch bending tool or two flat-edged blades (e.g., hobby knife blades) to achieve clean, sharp bends. Refer to the model kit's instructions or reference photos for correct angles.
- Apply Glue: Apply a very small amount of thin CA glue to the attachment point on the plastic model using a toothpick or the tip of a hobby knife. Alternatively, apply a tiny dot of glue to the etched part itself.
- Position and Attach: Using fine-tip tweezers, carefully pick up the etched part and position it precisely onto the glued area. Hold it in place for a few seconds until the glue sets. An accelerator can be used sparingly to speed up drying.
- Repeat: Continue this process for all etched parts, such as corrugated board, washboards, railings, and other fine details.
7. Maintenance
Once installed, the wooden deck and etched parts require minimal maintenance to preserve their appearance.
- Dusting: Regularly dust your model with a soft brush or a can of compressed air to prevent dust buildup, which can obscure fine details.
- Avoid Direct Sunlight: Prolonged exposure to direct sunlight can cause the wooden deck to fade or warp over time. Display your model in a shaded area.
- Humidity Control: Extreme changes in humidity can affect wooden components. Store your model in a stable environment.
- Handling: Handle the model by its base or sturdy parts of the hull to avoid damaging delicate etched parts or lifting the wooden deck.
8. Troubleshooting
Here are solutions to common issues encountered during installation:
| Problem | Possible Cause | Solution |
|---|---|---|
| Wooden deck not adhering properly. | Dust or grease on the model surface; insufficient pressure; old adhesive. | Ensure the surface is clean and dry. Apply firm, even pressure. Use a small amount of fresh CA glue for reinforcement. |
| Air bubbles under the wooden deck. | Deck applied too quickly or unevenly. | Carefully lift the affected area with a hobby knife and reapply, pressing from the center outwards. For small bubbles, a pinprick might release air, then press down. |
| Etched part breaks during removal or bending. | Excessive force; dull knife blade; incorrect bending technique. | Use a very sharp blade and apply gentle, even pressure. Use a proper photo-etch bending tool. If a part breaks, attempt to repair with CA glue or use a spare if available. |
| Etched part does not sit flush. | Excess glue; warped part; uneven surface. | Use minimal glue. Ensure the plastic surface is smooth. Gently bend the etched part to match the contour if needed. |
9. Specifications
| Feature | Detail |
|---|---|
| Product Name | IW Series Japanese Navy Battleship Kii, Wooden Deck, For Company F, Etched Parts |
| Model Number | IW7004 |
| Brand | Infini model |
| Scale | 1/700 |
| Material | Wood (0.12 mm ultra-thin), Photo-Etched Metal |
| Compatibility | F Company 460031 NEXT003: For Japanese Navy Battleship Kii plastic model kit |
| Recommended Age | 15 years and above |
10. Warranty and Support
Infini Model products are manufactured to high standards. Due to the nature of model kit accessories, specific warranty details are typically handled by the retailer or distributor where the product was purchased.
- Missing or Damaged Parts: If you find any parts missing or damaged upon opening the package, please contact your retailer or the Infini Model distributor in your region immediately. Provide proof of purchase and details of the issue.
- Technical Support: For technical questions regarding the installation or compatibility of Infini Model products, please refer to the official Infini Model website or contact their customer support channels.
Please retain your proof of purchase for any warranty or support claims.