Introduction
This manual provides comprehensive instructions for the installation, operation, and maintenance of your PowerBass OE65C-TY 6.5-inch Toyota OEM Component Speaker Upgrade Kit. Please read this manual thoroughly before installation to ensure proper setup and optimal performance. This kit is designed to provide a significant audio upgrade for compatible Toyota, Lexus, and Scion vehicles.

Image: The PowerBass OE65C-TY component speaker system, featuring two 6.5-inch woofers and two tweeters with wiring adapters, designed for OEM replacement in Toyota vehicles.
Product Features
- 6.5-inch Upgraded OEM Replacement Component System
- 60 Watts RMS / 120 Watts Max Power Handling
- Factory Plug and Play Wiring Adapters for Select Toyota Vehicles
- 4-ohm System Impedance
- 1-inch Inverted Titanium Dome Tweeters
Package Contents
Your PowerBass OE65C-TY kit includes the following components:
- Two (2) 6.5-inch Woofers
- Two (2) 1-inch Inverted Titanium Dome Tweeters
- Vehicle-specific Wiring Adapters
- Mounting Hardware (e.g., rivets, screws)
Vehicle Compatibility
The PowerBass OE65C-TY speaker kit is designed for specific Toyota, Lexus, and Scion vehicles. Refer to the application guide below to confirm compatibility with your vehicle model and year. For vehicles not listed, consult a certified installer.
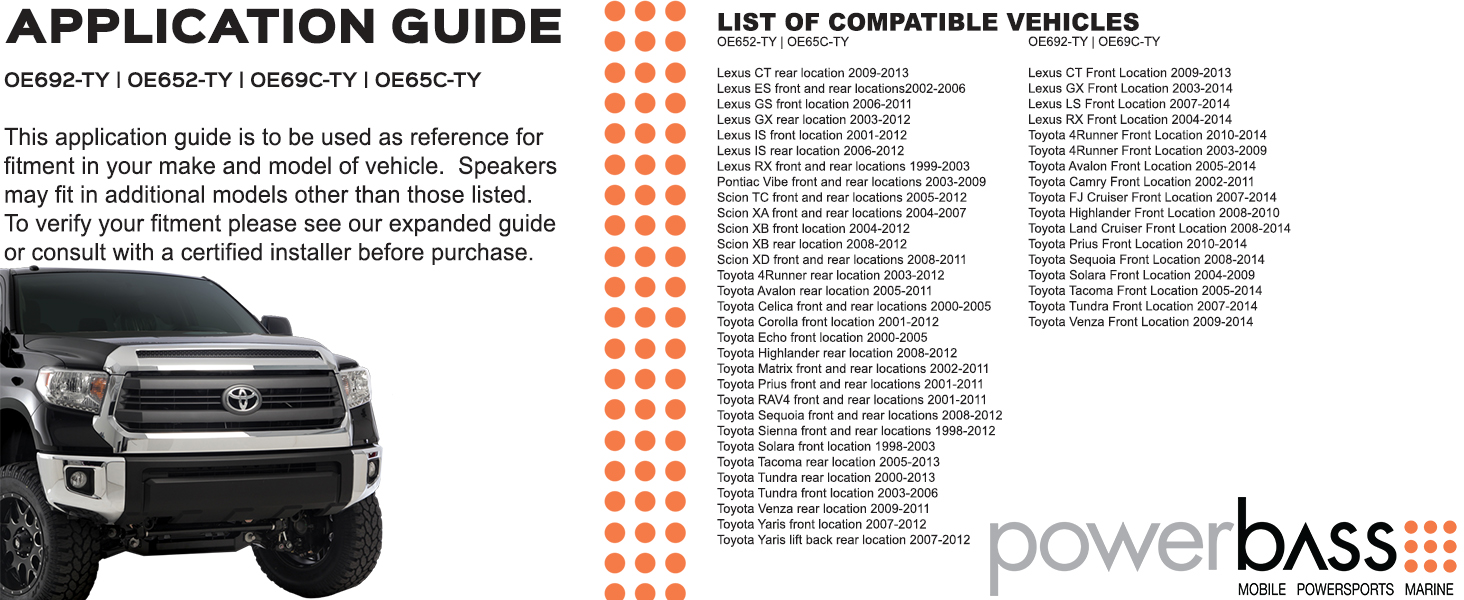
Image: PowerBass OE Series Application Guide. This image displays a list of compatible Toyota, Lexus, and Scion vehicle models and years for various OE series speaker models, including the OE65C-TY. A Toyota Tundra truck is shown at the bottom left.
Note: This application guide is for reference. Speakers may fit in additional models not listed. Always verify fitment or consult a certified installer before purchase.
Setup and Installation
Important Safety Information: Before beginning installation, disconnect the vehicle's battery to prevent electrical shorts and potential damage. Wear appropriate safety gear, including eye protection, especially when drilling or using a rivet gun. If you are unsure about any step, consult a professional installer.
Tools and Materials Required:
- Drill with 1/8-inch drill bit (for removing factory rivets)
- Rivet gun (for installing new speakers)
- Screwdrivers (Phillips and flathead)
- Panel removal tools (plastic pry tools)
- Wire strippers/crimpers (if splicing is required for tweeters, depending on vehicle)
- Adhesive strip foam or putty (for securing tweeters, if needed for a snug fit)
Installation Steps:
- Accessing Factory Speakers: Carefully remove the door panels and any other trim pieces necessary to access the factory woofers and tweeters. Refer to your vehicle's service manual or an online guide for specific instructions on panel removal for your vehicle model.
- Removing Factory Woofers: The factory woofers are typically secured with rivets. Use a drill with a 1/8-inch bit to carefully drill out these rivets. Once the rivets are removed, disconnect the wiring harness and remove the old woofer.
- Installing New Woofers: Connect the provided plug-and-play wiring adapter to the PowerBass woofer and then to the vehicle's factory wiring harness. Position the new woofer into the factory mounting location. Use a rivet gun to secure the new woofer with the provided rivets. Ensure the speaker is firmly seated and does not vibrate.
- Removing Factory Tweeters: Locate the factory tweeters, often found in the dash, A-pillars, or door panels. Disconnect their wiring and carefully remove them from their housing.
- Installing New Tweeters: Connect the PowerBass tweeter to the vehicle's wiring. The provided wiring adapters are designed for direct connection. In some cases, minor modification or additional adhesive (like foam strips or putty) may be needed to ensure a snug fit within the factory tweeter housing. Ensure the tweeter is securely mounted and does not rattle.
- Testing and Reassembly: Before reassembling the door panels and trim, temporarily reconnect the vehicle's battery and test the speakers to ensure they are functioning correctly. Verify that both woofers and tweeters are producing clear sound. Once confirmed, disconnect the battery again and reassemble all removed panels and trim pieces in reverse order. Reconnect the battery.

Image: A single PowerBass OE65C-TY 6.5-inch woofer. The speaker features a black cone and a foam surround, mounted within a black plastic frame designed for OEM fitment. This image shows the woofer component of the speaker kit.

Image: A PowerBass OE65C-TY tweeter with its attached wiring and factory-style connector. The tweeter has a metallic dome and is housed in a compact, circular mounting bracket, ready for integration into the vehicle's existing wiring.
Operating Instructions
The PowerBass OE65C-TY speakers are designed to integrate seamlessly with your vehicle's existing audio system. No special operating procedures are required beyond the normal use of your car's head unit.
- Audio Settings: Adjust the bass, treble, balance, and fader settings on your car's head unit to optimize sound quality to your preference. Start with flat settings and make small adjustments.
- Volume Levels: Avoid excessively high volume levels for extended periods, as this can cause distortion and potential damage to the speakers.
- Break-in Period: Allow a short break-in period (e.g., 10-20 hours of normal listening) for the speaker components to fully settle and achieve their optimal sound characteristics.
Maintenance
The PowerBass OE65C-TY speakers require minimal maintenance.
- Cleaning: Use a soft, dry cloth to gently wipe away dust from the speaker grilles and surrounds. Avoid using harsh chemicals or abrasive cleaners.
- Inspection: Periodically inspect the speaker cones and surrounds for any signs of damage or wear. Ensure all mounting points remain secure.
- Environmental Factors: While designed for automotive use, avoid exposing speakers to extreme moisture or direct sunlight for prolonged periods, as this can degrade materials over time.
Troubleshooting
If you experience issues with your PowerBass OE65C-TY speakers, refer to the following common troubleshooting steps:
- No Sound from a Speaker:
- Check all wiring connections at the speaker and the head unit. Ensure they are secure and properly connected.
- Verify that the speaker wire is not pinched or cut.
- Confirm the balance and fader settings on your head unit are centered or adjusted correctly.
- Distorted Sound:
- Reduce the volume level. Distortion often occurs when the amplifier or head unit is overdriven.
- Check for loose speaker mounting. Vibrations can cause distortion.
- Inspect the speaker cone and surround for any physical damage.
- Ensure the wiring is not shorting out.
- Weak or No Bass:
- Check the polarity of the speaker wiring. Incorrect polarity can cause bass cancellation.
- Adjust the bass settings on your head unit.
- Ensure the woofer is properly sealed in its mounting location.
- Harsh or Muffled Treble:
- Adjust the treble settings on your head unit.
- Ensure tweeters are properly installed and not obstructed.
If these steps do not resolve the issue, contact PowerBass customer support or a certified car audio technician.
Specifications
| Feature | Specification |
|---|---|
| Model Name | OE65C-TY |
| Speaker Type | Component System |
| Woofer Size | 6.5 Inches |
| Tweeter Size | 1 Inch (2.54 cm) Inverted Titanium Dome |
| RMS Power Handling | 60 Watts |
| Maximum Power Handling | 120 Watts |
| System Impedance | 4 Ohms |
| Mounting Type | OEM Plug and Play |
| Compatibility | Select Toyota, Lexus, and Scion vehicles |
| Item Weight | 5.15 Pounds (approximate, for the pair) |
Warranty and Support
The PowerBass OE65C-TY speaker kit comes with a 1-Year Manufacturer Warranty. This warranty covers defects in materials and workmanship under normal use from the date of purchase.
For warranty claims, technical support, or further assistance, please contact PowerBass customer service directly. Keep your proof of purchase for warranty validation.
Manufacturer: PowerBass
For the most current support information, please visit the official PowerBass website or refer to the contact details provided with your product packaging.


