1. Introduction
This manual provides detailed instructions for the installation, operation, and maintenance of your A-ZONE 3MP PoE Security Camera System. Please read this manual thoroughly before using the product to ensure proper functionality and safety. Keep this manual for future reference.
2. Product Overview
The A-ZONE 3MP PoE Security Camera System is designed to provide reliable surveillance with advanced features for enhanced home or business security.
Key Features:
- 3MP High Resolution: Captures clear and detailed images, exceeding Full HD quality.
- Audio Recording: Built-in audio pickup allows simultaneous video and audio recording within a 10-meter range.
- Efficient Video Compression (H.265): Utilizes advanced H.265 compression technology, offering approximately twice the efficiency of H.264, saving storage space and improving processing speed.
- Motion Detection & Night Vision: Equipped with motion detection for alarm notifications and infrared LEDs for clear night vision up to 30 meters. IR-CUT technology ensures automatic switching between day and night modes.
- IP67 Weatherproof: High-quality metal cameras are designed for outdoor use, resistant to dust and water, operating reliably in temperatures from -20°C to 60°C.
- Easy PoE Installation: Power over Ethernet (PoE) simplifies installation, requiring only a single LAN cable for both power and data transmission.

Figure 2.1: A-ZONE 3MP PoE Security Camera. This image shows a single white bullet-style camera with multiple infrared LEDs and a lens, indicating its robust design for outdoor surveillance.

Figure 2.2: Two-way audio communication. This image illustrates the two-way audio feature, showing a child speaking into the camera and a parent responding via a smartphone, demonstrating remote communication capabilities.

Figure 2.3: IP67 Waterproof and Dustproof Camera. This image highlights the camera's IP67 rating, indicating its resilience against water and dust for reliable outdoor performance in various weather conditions.
3. Setup Instructions
Follow these steps to set up your A-ZONE PoE Security Camera System.
3.1 Package Contents:
- 8-Channel NVR (Network Video Recorder)
- 4 x 3MP PoE Cameras
- 4 x 18.3-meter LAN Cables
- 1TB Hard Disk Drive (pre-installed)
- Power Adapter for NVR (PSE certified)
- USB Mouse
- Mounting Screws and Anchors
- User Manual
3.2 Hardware Connection:
- Connect Cameras: Connect each PoE camera to the PoE ports on the back of the NVR using the provided LAN cables.
- Connect Monitor: Connect a monitor to the NVR using an HDMI or VGA cable.
- Connect Network (Optional for Remote Access): Connect the NVR's LAN port to your router using an Ethernet cable for remote viewing capabilities.
- Connect Power: Connect the NVR to a power outlet using the provided power adapter. The system will power on automatically.
- Initial Setup: Upon first boot, follow the on-screen wizard to configure basic settings, including language, date/time, and network settings. If a new HDD is installed or the existing one is not formatted, the system may prompt you to format it.

Figure 3.1: System Connection Diagram. This diagram illustrates how the NVR connects to multiple cameras and a monitor, showing the simplicity of the PoE setup.

Figure 3.2: Easy Setup with PoE. This image emphasizes the ease of installation, showing a single cable connecting the camera to the NVR, highlighting the Power over Ethernet (PoE) advantage.
4. Operating Instructions
This section covers the basic operation of your security camera system.
4.1 Live View:
After successful setup, the NVR will display live feeds from all connected cameras on the monitor. You can switch between single-camera view and multi-camera grid view (e.g., 4-channel display) using the NVR's interface or connected mouse.
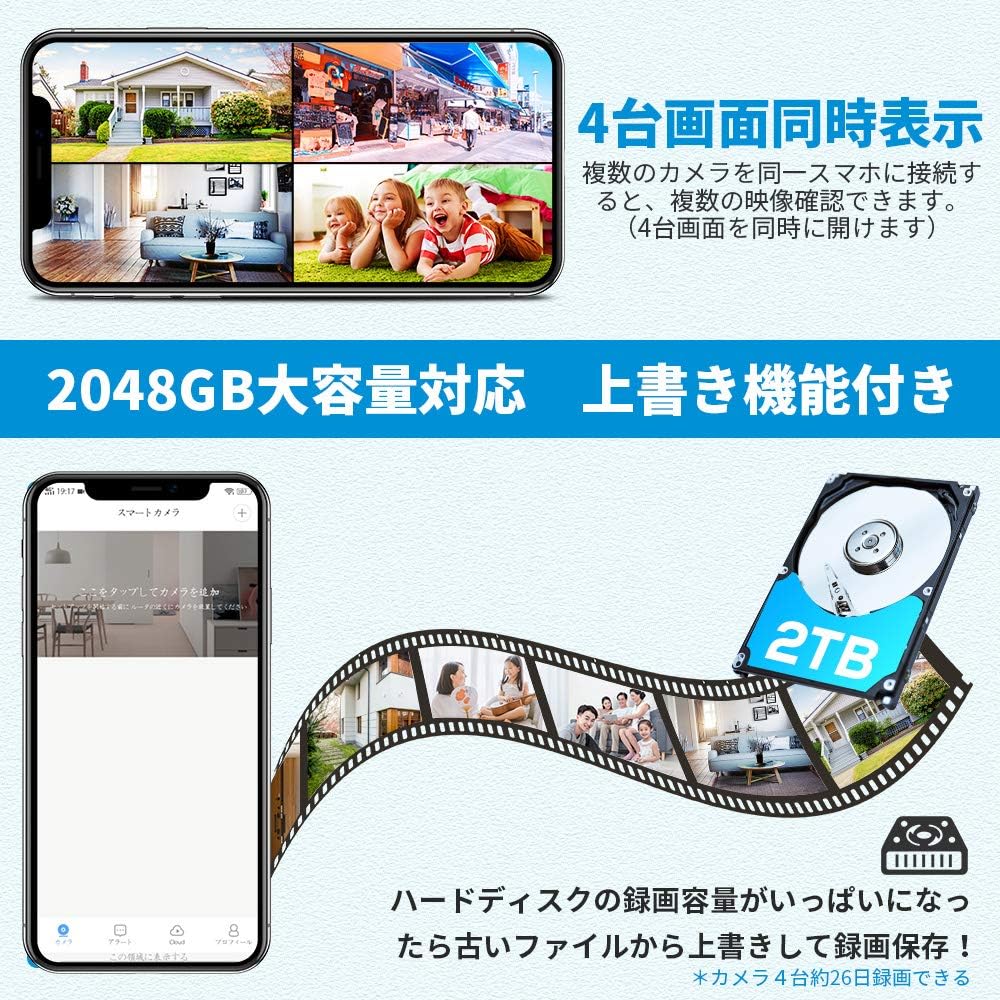
Figure 4.1: 4-Channel Live View Display. This image shows a monitor displaying live feeds from four cameras simultaneously, demonstrating the multi-channel viewing capability of the system.
4.2 Recording:
- Continuous Recording: The system is configured for 24/7 continuous recording by default, utilizing the 1TB HDD.
- Motion-Triggered Recording: You can configure specific channels to record only when motion is detected. This saves storage space and makes reviewing events easier.
- Audio Recording: Audio is recorded simultaneously with video.
4.3 Playback:
Access recorded footage through the NVR's playback menu. You can search by date, time, and event type (e.g., motion detection). The system supports playing back videos with audio.
4.4 Digital Zoom:
The system features advanced digital zoom. On the live view or playback screen, you can use the mouse to select and enlarge specific areas to identify details like faces or license plates.

Figure 4.2: Night Vision and Digital Zoom. This image demonstrates the camera's night vision capability, showing a clear view in low light, and highlights the digital zoom feature for closer inspection of details.
4.5 Remote Access:
For remote monitoring, download the dedicated mobile application or access the NVR via a web browser. Ensure the NVR is connected to your network and configured for remote access. This allows you to view live feeds and playback recordings from anywhere.
5. Maintenance
Regular maintenance ensures the longevity and optimal performance of your security system.
- Camera Cleaning: Periodically clean the camera lenses with a soft, damp cloth to remove dust, dirt, or water spots that may obstruct the view.
- Connection Check: Regularly inspect all cable connections (PoE, HDMI/VGA, network, power) to ensure they are secure and free from damage.
- HDD Management: The system's 1TB HDD has an overwrite function, automatically deleting the oldest recordings to make space for new ones. No manual intervention is typically required, but ensure the HDD is functioning correctly. The storage can be expanded up to 8TB if needed.
- Firmware Updates: Check the manufacturer's website periodically for firmware updates to ensure your system has the latest features and security patches.
6. Troubleshooting
If you encounter issues with your A-ZONE security camera system, refer to the following common problems and solutions.
6.1 No Image Display on Monitor:
- Check Power: Ensure the NVR is powered on and the power adapter is securely connected. Check if the power indicator light on the NVR is illuminated.
- Check Monitor Connection: Verify that the HDMI or VGA cable is securely connected between the NVR and the monitor.
- Check Camera Connections: Ensure all LAN cables are properly connected to the NVR's PoE ports and the cameras. Check if the LAN indicator lights on the NVR ports are green.
- Check Channel Status: On the NVR interface, ensure that the camera channels are not closed. If a channel is closed, click the appropriate icon (often a 'play' or 'open' icon) to activate it.
6.2 Cannot Log In / Forgot Password:
- If you forget your password, click the '?' icon on the login dialog. A KEY NO will be displayed. Contact A-ZONE customer support with this KEY NO to generate a super password for recovery.
6.3 Motion Detection Not Working / Too Sensitive:
- Adjust the motion detection sensitivity settings in the NVR's configuration menu. You can also define specific detection zones to minimize false alarms.
6.4 Poor Night Vision:
- Ensure there are no obstructions directly in front of the camera lens that could block the infrared LEDs.
- Verify that the IR-CUT function is operating correctly and switching to night mode in low light conditions.
7. Specifications
| Feature | Description |
|---|---|
| Brand | A-ZONE |
| Model Number | AZ-F5C440-N1-FBA |
| Camera Resolution | 3 Megapixels (3MP) |
| Video Compression | H.265, H.264+, H.264 |
| Storage | 1TB HDD (expandable up to 8TB) |
| Night Vision Distance | Approx. 30 meters |
| Waterproof Rating | IP67 |
| Operating Temperature | -20°C to 60°C |
| Connectivity | PoE (Power over Ethernet), Wi-Fi (for remote access), Ethernet |
| Included Cameras | 4 |
| Audio | Built-in audio pickup (10m range) |
| Features | Motion Detection, IR-CUT, Digital Zoom |
| Package Dimensions | 44.5 x 28.8 x 19.8 cm |
| Package Weight | 5.48 kg |
8. Warranty and Support
A-ZONE is committed to providing reliable products and excellent customer service.
8.1 Warranty:
This product comes with a 2-year warranty from the date of purchase. Please retain your proof of purchase for warranty claims.
8.2 Technical Support:
Our professional technical support team is available to assist you with any questions or issues you may encounter during the installation or operation of your system.
- Phone Support (Japan): 034-588-9368 (Weekdays 10:00 - 19:30 JST)
- Email Support: hana@azonecctvstore.com (24-hour response)
- LINE ID: azone1234

Figure 8.1: Customer Support Information. This image displays the contact details for A-ZONE customer support, including phone, email, and LINE ID, ensuring users can easily reach out for assistance.