
VuPoint Solutions ST470
VuPoint ST470 Magic Wand Portable Scanner User Manual
Model: ST470 with Auto-Feed Docking Station
Introduction
Thank you for choosing the VuPoint ST470 Magic Wand Portable Scanner with Auto-Feed Docking Station. This device is designed for convenient and high-quality scanning of documents, photos, and other materials, offering both portable handheld scanning and automated sheet-fed scanning. This manual provides detailed instructions on setting up, operating, and maintaining your scanner to ensure optimal performance.
Product Overview and Components
The VuPoint ST470 system consists of two primary components: the portable Magic Wand scanner and the auto-feed docking station. Together, they provide versatile scanning capabilities.

Image: The VuPoint ST470 Magic Wand Portable Scanner (foreground) and its Auto-Feed Docking Station (background).
The Magic Wand scanner can be used independently for scanning books, large documents, or irregular surfaces. When docked, it transforms into a sheet-fed scanner, allowing for automatic feeding of standard-sized documents and photos.

Image: The 2-in-1 functionality of the VuPoint ST470, highlighting the portable wand and the docking station, capable of scanning at 1200 dpi.
Package Contents:
- VuPoint ST470 Magic Wand Portable Scanner
- Auto-Feed Docking Station
- USB Cable
- Power Adapter
- Cleaning Cloth
- Carrying Pouch
- Calibration Sheet
- Software CD (Note: A CD drive is required for software installation. Check manufacturer's website for digital downloads if no CD drive is available.)

Image: Included accessories: power adapter, USB cable, cleaning cloth, and carrying pouch.
Setup
1. Charging the Scanner:
Before first use, fully charge the scanner's internal battery. Connect the scanner to the power adapter using the provided USB cable, or connect it to a computer's USB port. The charging indicator will show the charging status.
2. Inserting a MicroSD Card:
The scanner saves scanned images to a MicroSD card (not included). Locate the MicroSD card slot on the scanner and insert the card with the gold contacts facing down until it clicks into place. Ensure the card is properly formatted (FAT32 recommended) for optimal performance.
3. Software Installation (Optional):
While the scanner can operate independently, the included software (on CD) may offer additional features like OCR (Optical Character Recognition) or enhanced image editing. Insert the software CD into your computer's CD drive and follow the on-screen instructions for installation. The scanner is compatible with both Mac and Windows operating systems.

Image: Connecting the scanner via USB, illustrating its compatibility with Mac and Windows operating systems.
Operating Instructions
Using the Magic Wand Scanner (Handheld Mode):
- Power On: Press and hold the Power button until the display turns on.
- Select Settings: Use the mode buttons to select desired resolution (e.g., 300 dpi, 600 dpi, 1200 dpi) and file format (JPEG or PDF).
- Position Scanner: Place the scanner flat on the document you wish to scan.
- Start Scan: Press the Scan button. A green light typically indicates scanning is active.
- Scan Movement: Slowly and steadily drag the scanner across the document. Maintain even pressure and a consistent speed for best results. Avoid tilting or lifting the scanner.
- End Scan: Press the Scan button again to stop. The scanned image will be saved to the MicroSD card.
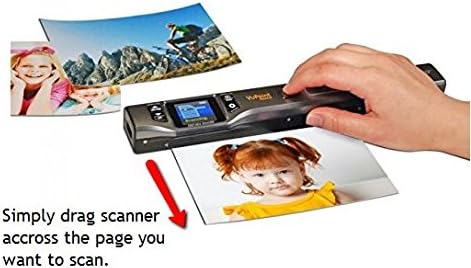
Image: Demonstrating handheld scanning by dragging the Magic Wand scanner across a photo.
Using the Auto-Feed Docking Station:
- Dock the Scanner: Gently slide the Magic Wand scanner into the docking station until it clicks securely into place.
- Power On: Ensure the scanner is powered on.
- Adjust Settings: Use the scanner's controls to select your desired resolution and file format.
- Insert Document: Place a single document or photo into the feeder slot of the docking station. The scanner will automatically detect the document and begin feeding it through.
- Scanning: The document will be pulled through the scanner, and the image will be saved to the MicroSD card.
- Retrieve Document: Once the scan is complete, the document will exit the other side of the docking station.

Image: Automatic feeding of documents and pictures through the scanner when it is docked in the auto-feed station.
Important Note on Document Feeding: The feeder lip is designed for single sheets. For documents that are not perfectly flat (e.g., due to staple removal or wear), you may need to guide them gently with both hands to ensure smooth feeding and prevent jams or skewed scans.
Transferring Files to Computer:
You can transfer scanned files to your computer in two ways:
- Direct Connection: Connect the scanner (or docking station with scanner docked) to your computer using the USB cable. The scanner will appear as a removable storage device, allowing you to copy files directly from the MicroSD card.
- MicroSD Card Reader: Remove the MicroSD card from the scanner and insert it into a compatible card reader connected to your computer.
Maintenance
Cleaning the Scanner:
Regular cleaning ensures clear scans. Use the provided cleaning cloth or a soft, lint-free cloth to gently wipe the scanner's glass scanning surface and rollers. For stubborn marks, a small amount of screen cleaner can be applied to the cloth (not directly to the scanner).
Calibration:
If your scans appear discolored, have streaks, or show inconsistent shading, the scanner may require calibration. Use the included calibration sheet. The calibration process typically involves scanning the sheet in a specific mode. Important: When calibrating, move the scanner very slowly and steadily across the calibration sheet to ensure successful completion. Refer to the scanner's on-screen prompts or the full digital manual for precise calibration steps.
Troubleshooting
| Problem | Possible Cause / Solution |
|---|---|
| Scans are blurry or distorted. |
|
| Scanner not recognized by computer. |
|
| Documents jam or feed incorrectly in docking station. |
|
| Scans have incorrect colors or shading. |
|
| MicroSD card error. |
|
Specifications
- Model: ST470 (PDSDK-ST470-VP)
- Scanner Type: Portable Wand Scanner with Auto-Feed Docking Station
- Scan Resolution: Up to 1200 dpi
- Media Type: Receipt, Paper, Photo, Book (handheld mode)
- File Formats: JPEG, PDF
- Storage: MicroSD card (not included)
- Connectivity: USB 2.0
- Minimum System Requirements: Windows 7 (and compatible with Mac)
- Item Weight (Scanner): Approximately 0.05 Pounds (0.8 ounces)
- Product Dimensions (Packaged): Approximately 15 x 7 x 4 inches
- UPC: 697691859088
Warranty and Support
This VuPoint ST470 scanner is a renewed product. Renewed products are typically tested and certified to work and look like new. It comes with a 90-day manufacturer's warranty, ensuring that the device is free from defects in materials and workmanship under normal use during this period.

Image: Details regarding the Certified Refurbished status, including the 90-day manufacturer's warranty.
For technical support, warranty claims, or further assistance, please refer to the contact information provided with your purchase or visit the official VuPoint Solutions website. Keep your proof of purchase for warranty purposes.
Related documentsST470


Ask a question about this manual
Ask about setup, troubleshooting, compatibility, parts, safety, or missing instructions. Manuals+ will review the question and use this page’s manual context to help answer it.