
1. Introduction
This manual provides detailed instructions for the installation, operation, and maintenance of your new FLYPIG Replacement Carburetor. This carburetor is designed as a direct replacement for specific Honda GX series engines, ensuring proper fuel-air mixture for optimal engine performance. Please read this manual thoroughly before attempting any installation or maintenance.
2. Product Overview and Package Contents
The FLYPIG Replacement Carburetor is a non-original, high-quality component designed to replace Honda part number 16100-ZH7-821. It ensures reliable engine operation by providing the correct fuel delivery.
Package Contents:
- 1x Carburetor
- 1x Choke Lever
- 3x Mounting Gaskets
- 1x Fuel Line

Figure 1: Complete package contents including the carburetor, choke lever, fuel line, and three gaskets.
3. Compatibility
This replacement carburetor is compatible with the following engine models:
- HONDA GX110 4hp Engines
- HONDA GX120 4hp Engines
- HONDA GX140 Engines (5.5-6.5 HP)
- HONDA GX160 Engines (5.5-6.5 HP)
- HONDA GX168 Engines (5.5-6.5 HP)
- HONDA GX200 Engines (5.5-6.5 HP)
- Chinese 168 Engine Motors
It replaces part numbers: 16100-ZH7-821, 16100-Z0T-911, 16212-ZH7-800, 16221-ZH8-801, 16211-ZE1-000, 16100-ZH8-W61, 16100-ZH7-W51.
4. Specifications
- Manufacturer: FLYPIG
- Part Number: 16100-ZH7-821
- Item Weight: Approximately 10.2 ounces (289 grams)
- Package Dimensions: Approximately 4.41 x 3.62 x 2.83 inches (11.2 x 9.2 x 7.2 cm)
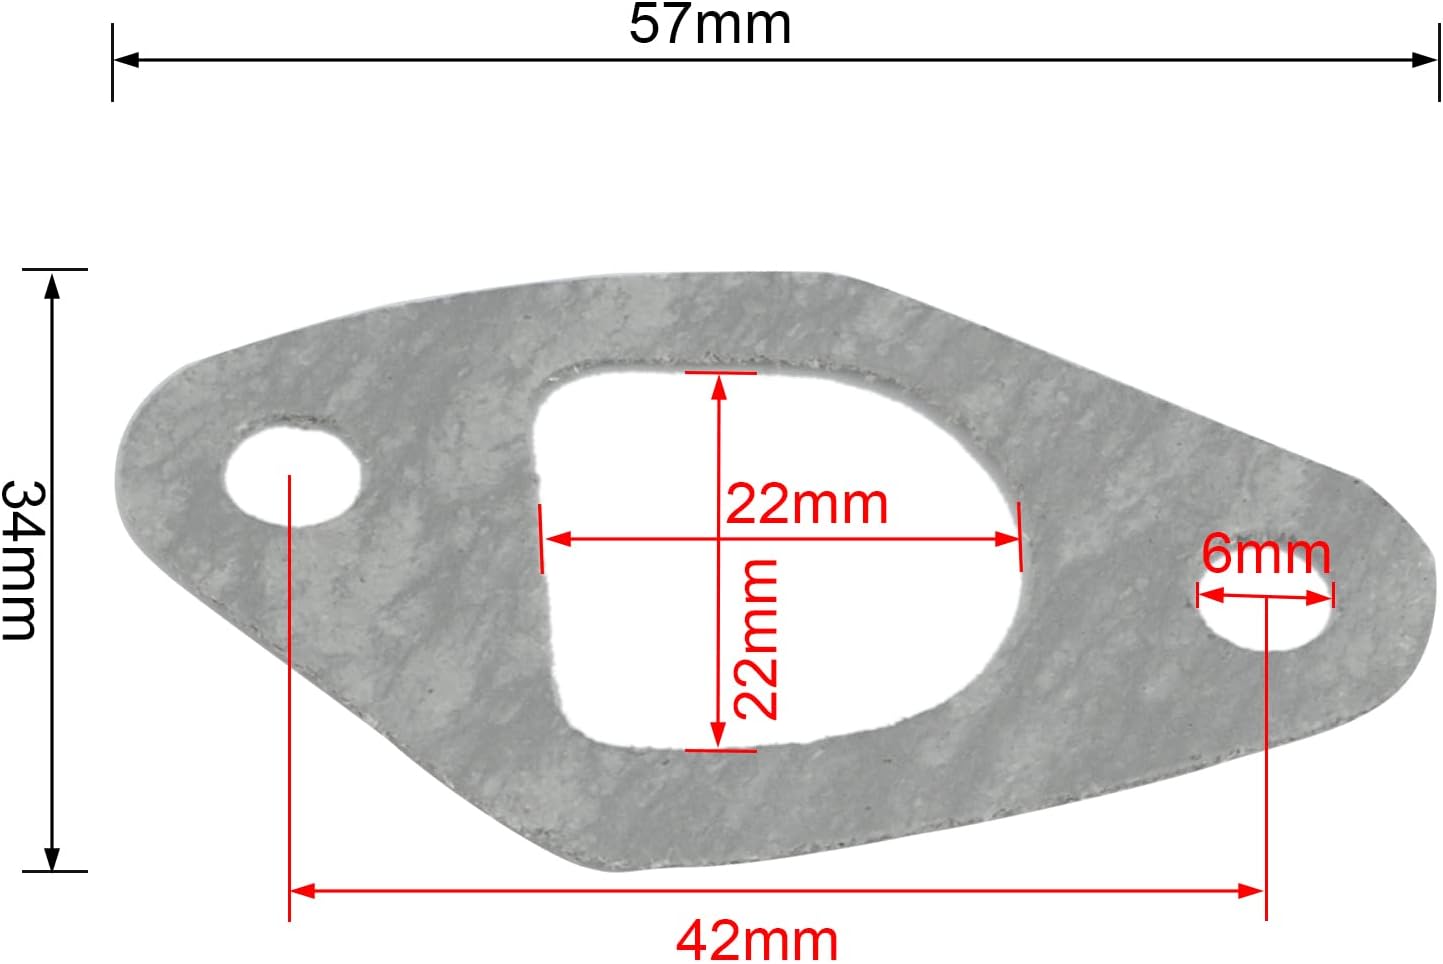
Figure 2: Carburetor dimensions (Unit: mm).

Figure 3: Gasket 1 dimensions.

Figure 4: Gasket 2 dimensions.

Figure 5: Gasket 3 dimensions.
5. Installation Instructions
Safety Precautions:
- Always ensure the engine is turned off and cooled down before beginning any work.
- Disconnect the spark plug wire to prevent accidental starting.
- Work in a well-ventilated area.
- Wear appropriate personal protective equipment, such as gloves and eye protection.
- Have a fire extinguisher nearby when working with fuel.
Step-by-Step Installation:
- Drain Fuel: Turn off the fuel supply valve and drain any fuel from the carburetor float bowl.
- Remove Air Filter Assembly: Carefully remove the air filter housing and any associated ducting to gain access to the carburetor.
- Disconnect Linkages and Fuel Line: Disconnect the throttle linkage, choke linkage, and the fuel line from the old carburetor. Be prepared for some fuel spillage from the fuel line.
- Remove Old Carburetor: Unbolt the old carburetor from the engine. Note the position and orientation of any gaskets.
- Clean Mounting Surfaces: Thoroughly clean the engine's mounting surface and the intake manifold surface to ensure a proper seal with the new gaskets.
- Install New Gaskets: Place the new mounting gaskets in the correct order and orientation between the engine, carburetor, and air filter housing. Refer to your engine's service manual for the exact gasket placement if unsure.
- Mount New Carburetor: Position the new FLYPIG carburetor onto the mounting studs, ensuring it aligns with the gaskets. Secure it with the original bolts, tightening them evenly to prevent warping.
- Connect Linkages and Fuel Line: Reconnect the throttle and choke linkages to the new carburetor. Attach the new fuel line (if replacing) or the original fuel line, securing it with clamps.
- Install Air Filter Assembly: Reinstall the air filter housing and any other components removed earlier.
- Refill Fuel and Test: Turn on the fuel supply. Allow a few minutes for the carburetor float bowl to fill. Start the engine and check for any fuel leaks or abnormal operation. Adjust idle speed if necessary.

Figure 6: Example of carburetor installation on an engine.
6. Operation
After successful installation, the carburetor will regulate the fuel-air mixture delivered to the engine. Ensure the choke lever operates smoothly for cold starts. For optimal performance, use fresh, clean fuel. If the engine runs rough or stalls, refer to the troubleshooting section.
7. Maintenance
Regular maintenance helps prolong the life of your carburetor and ensures consistent engine performance.
- Fuel Quality: Always use fresh, clean, and appropriate octane fuel. Stale or contaminated fuel is a common cause of carburetor issues. Consider using a fuel stabilizer if the engine will be stored for extended periods.
- Fuel Filter: Regularly check and replace the fuel filter to prevent debris from reaching the carburetor.
- Air Filter: Ensure the air filter is clean and properly installed. A dirty air filter can restrict airflow, leading to a rich fuel mixture and poor engine performance.
- Carburetor Cleaning: If the engine experiences fuel delivery issues, the carburetor may need cleaning. This typically involves disassembling the carburetor, cleaning jets and passages with carburetor cleaner, and replacing gaskets if necessary. This task is recommended for experienced users or professional technicians.
- Storage: Before long-term storage, run the engine until it runs out of fuel, or drain the fuel from the carburetor float bowl to prevent fuel degradation and gumming.
8. Troubleshooting
Refer to the table below for common issues and potential solutions.
| Problem | Possible Cause | Solution |
|---|---|---|
| Engine will not start | No fuel, clogged fuel line/filter, incorrect choke position, fouled spark plug. | Check fuel level, clean/replace fuel filter, adjust choke, check/replace spark plug. |
| Engine runs rough or stalls | Dirty carburetor jets, stale fuel, air leak at gaskets, dirty air filter. | Clean carburetor, use fresh fuel, check gasket seals, clean/replace air filter. |
| Fuel leaks from carburetor | Damaged float, stuck float needle, loose drain screw, damaged gaskets. | Inspect/replace float and needle, tighten drain screw, replace gaskets. |
| Engine lacks power | Restricted fuel flow, dirty air filter, incorrect carburetor adjustment. | Check fuel system, clean/replace air filter, consult engine manual for carburetor adjustment. |
9. Warranty and Support
For any questions regarding the FLYPIG Replacement Carburetor, including warranty information or technical support, please contact the seller or manufacturer directly through your purchase platform. Keep your purchase receipt as proof of purchase.