Introduction
This manual provides essential instructions for the proper installation, operation, and maintenance of your Generic DAYU 101 (K710NA(A)) Right Angle Adjustable Sewing Machine Binder. Designed for industrial and domestic sewing machines, this accessory facilitates precise fabric binding, creating clean and professional edges. Please read this manual thoroughly before use to ensure optimal performance and longevity of the product.
Setup and Installation
Proper installation of the binder is crucial for achieving consistent and high-quality binding results. Follow these steps carefully:
1. Identify Components
Familiarize yourself with the binder's structure. The binder consists of a main body, an adjustable guide, and fabric feeding wires.
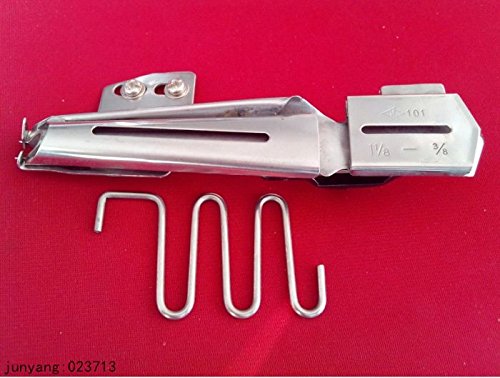
Figure 1: Top view of the DAYU 101 Right Angle Binder, showing the main body and the wire fabric guides. The markings "1 1/8''" and "3/8''" indicate the input and output fabric widths.
2. Mounting the Binder
- Locate the mounting holes on your sewing machine's needle plate or accessory attachment area.
- Align the binder's mounting plate with these holes. The binder is typically mounted to the right of the needle.
- Secure the binder using appropriate screws (not included, typically supplied with the sewing machine or purchased separately). Ensure it is firmly attached and does not wobble during operation.

Figure 2: Bottom view of the DAYU 101 Right Angle Binder, illustrating the mounting plate and screw holes for attachment to the sewing machine.
3. Adjusting the Binder
This binder is adjustable, allowing for different fabric widths. The "1 1/8''" marking typically refers to the input width of the binding material, and "3/8''" refers to the finished width. Adjust the guide screws (visible in Figure 2) to fine-tune the fabric feed and finished binding width as needed for your specific project.
Operating Instructions
Once the binder is installed, follow these steps for effective binding:
- Prepare Binding Material: Cut your binding fabric to the appropriate width (e.g., 1 1/8 inches for a 3/8 inch finished binding). Ensure the edges are straight.
- Insert Binding Material: Feed the binding material into the wider opening of the binder (the "1 1/8''" side). The binder will fold the edges inwards.
- Insert Main Fabric: Feed the edge of the main fabric you wish to bind into the narrower slot of the binder, ensuring it sits snugly against the folded binding material.
- Position Under Needle: Carefully position the assembled fabrics under the sewing machine needle.
- Begin Sewing: Start sewing slowly, guiding both the main fabric and the binding material through the binder. The binder will automatically fold and guide the binding around the edge of your main fabric, allowing the needle to stitch it in place.
- Maintain Tension: Ensure consistent tension on both fabrics to prevent puckering or uneven binding.
Maintenance
To ensure the longevity and smooth operation of your binder, follow these maintenance guidelines:
- Cleaning: Regularly wipe down the binder with a soft, dry cloth to remove lint, dust, and fabric fibers.
- Lubrication: The binder itself typically does not require lubrication. However, ensure your sewing machine is properly lubricated according to its own manual.
- Storage: When not in use, store the binder in a clean, dry place to prevent rust or damage.
- Inspection: Periodically check for any loose screws or signs of wear. Tighten screws as needed.
Troubleshooting
If you encounter issues while using the binder, consider the following common problems and solutions:
| Problem | Possible Cause | Solution |
|---|---|---|
| Uneven binding | Incorrect fabric feeding; binder not securely mounted; inconsistent fabric tension. | Ensure fabrics are fed smoothly; re-secure binder; maintain even tension. |
| Fabric jams in binder | Binding material too wide or too thick; incorrect adjustment. | Verify binding material width matches binder specifications; adjust binder guides. |
| Stitches miss binding edge | Binder misaligned with needle; incorrect needle position. | Adjust binder position slightly; ensure needle is centered for the binding. |
Specifications
- Product Type: Right Angle Adjustable Sewing Machine Binder
- Model Number: KVRAZ15A (DAYU 101 / K710NA(A))
- Brand: Generic
- Input Binding Width: Approximately 1 1/8 inches (28.5 mm)
- Finished Binding Width: Approximately 3/8 inches (9.5 mm)
- Material: Metal (likely stainless steel or chrome-plated steel)
- Compatibility: Suitable for various industrial and domestic sewing machines (verify mounting compatibility)