1. Introduction
This manual provides essential information for the safe and effective use of your ProPlus PLUS-580084 Torque Wrench. A torque wrench is a precision tool designed to apply a specific amount of rotational force (torque) to a fastener, ensuring components are tightened to manufacturer specifications. Proper use prevents both under-tightening, which can lead to loose parts, and over-tightening, which can cause damage to fasteners or components.
2. Product Overview & Package Contents
Your ProPlus PLUS-580084 Torque Wrench comes in a durable storage case, protecting the tool and its accessories. Please inspect all components upon unpacking.

Image 2.1: The ProPlus Torque Wrench and its included accessories, neatly organized within the protective black plastic case.
The package typically includes:
- ProPlus Torque Wrench (Model: PLUS-580084)
- Assorted Sockets (e.g., 17mm, 19mm, 21mm)
- Extension Bar
- Durable Storage Case

Image 2.2: All components of the ProPlus Torque Wrench set, including the wrench, three sockets, and an extension bar, displayed outside the case.
3. Safety Instructions
Always follow these safety guidelines to prevent injury and damage to the tool or workpiece.
- Read the Manual: Familiarize yourself with all instructions before using the torque wrench.
- Wear Eye Protection: Always wear safety glasses to protect against flying debris.
- Proper Use: This tool is designed for applying specific torque. Do not use it as a breaker bar or for loosening seized fasteners.
- Do Not Exceed Torque: Never exceed the maximum torque setting of 210 Newton-meters.
- Keep Clean and Dry: Ensure the tool is clean and free from oil or grease to maintain a secure grip.
- Inspect Before Use: Check the wrench and sockets for any signs of damage or wear before each use.
- Children Away: Keep children and unauthorized persons away from the work area.
4. Setup
Follow these steps to prepare your torque wrench for use:
- Select the Correct Socket: Choose the appropriate socket size for your fastener.
- Attach Socket: Firmly attach the selected socket to the square drive of the torque wrench. Ensure it clicks securely into place. If needed, use the extension bar.
- Unlock Adjustment: Locate the locking mechanism (usually a knurled ring or knob at the base of the handle) and unlock it.
- Set Desired Torque: Rotate the handle to align the desired torque value on the scale. The main scale indicates major increments, and the smaller scale on the handle provides fine adjustments. For example, to set 100 Nm, align the '0' on the handle scale with the '100' mark on the main scale. For 105 Nm, align the '5' on the handle scale with the '100' mark.
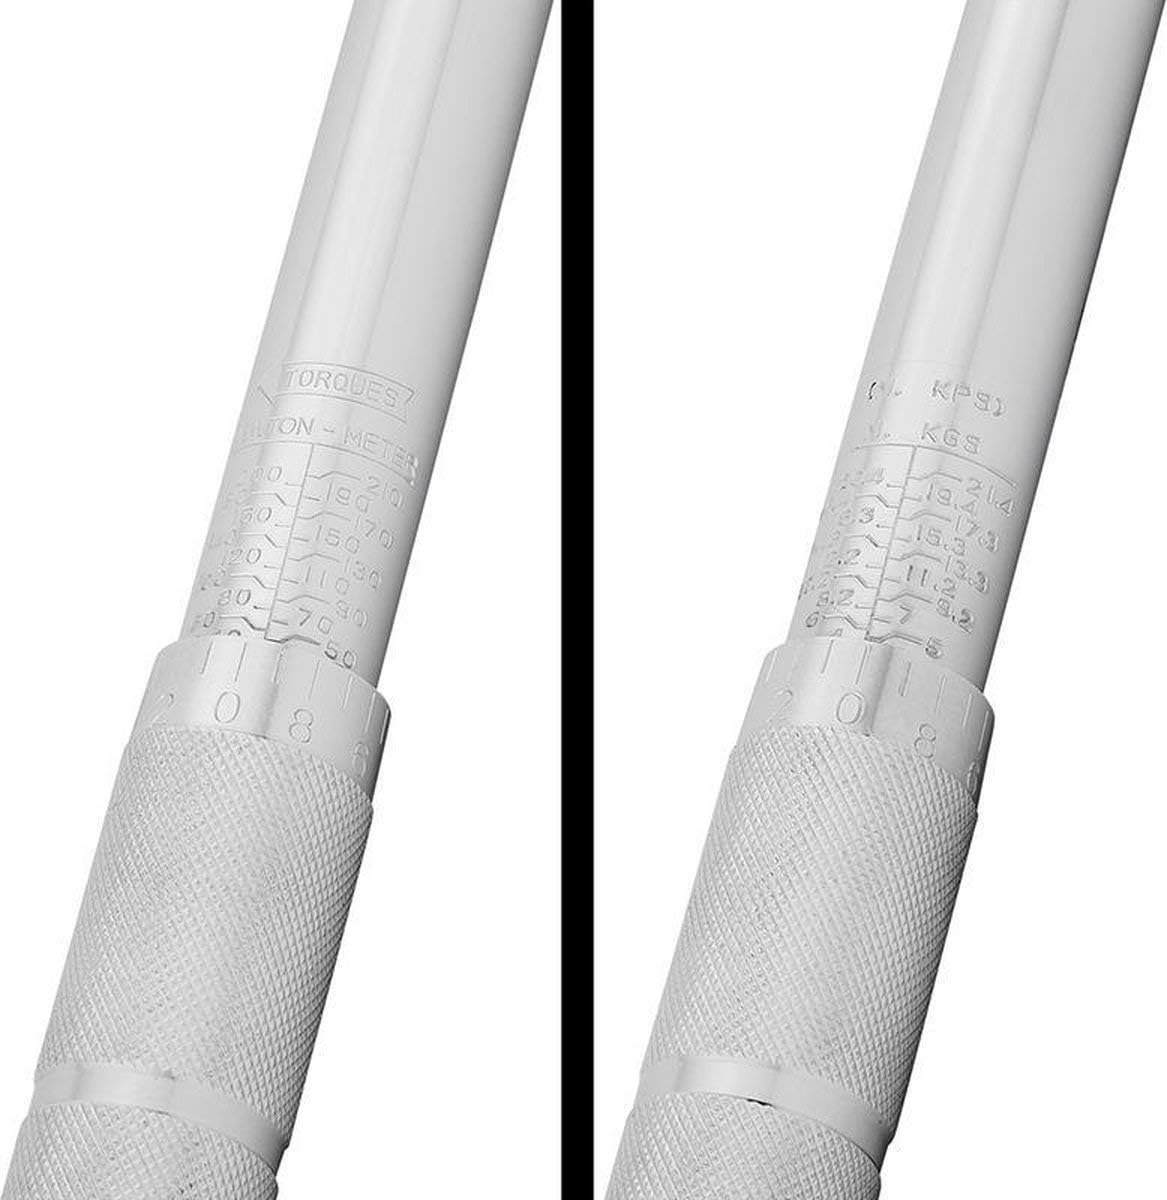
Image 4.1: Detailed view of the torque setting scales on the wrench handle, showing both Newton-meter and KGS units for precise adjustment.
- Lock Adjustment: Once the desired torque is set, lock the adjustment mechanism to prevent accidental changes during use.
5. Operating Instructions
Using your torque wrench correctly ensures accurate tightening:
- Position the Wrench: Place the socket firmly onto the fastener (nut or bolt head).
- Apply Steady Pressure: Hold the wrench by the handle and apply a slow, steady, and smooth pulling or pushing force. Avoid jerky movements.
- Listen for the Click: Continue applying force until you feel and hear a distinct "click" from the wrench. This indicates that the preset torque has been reached.

Image 5.1: A person demonstrating the use of the torque wrench to tighten lug nuts on a vehicle wheel, applying steady force.
- Stop Immediately: As soon as the click is heard/felt, stop applying force. Do not continue to tighten the fastener beyond the click, as this will result in over-tightening and inaccurate torque.
- Release Pressure: Remove the wrench from the fastener.
- Reset for Storage: After use, unlock the adjustment and rotate the handle to the lowest torque setting (but not below the minimum) before storing. This relieves tension on the internal spring and helps maintain calibration accuracy.
6. Maintenance
Proper maintenance ensures the longevity and accuracy of your torque wrench:
- Cleaning: Wipe the wrench clean with a soft, dry cloth after each use. Do not use solvents or immerse the tool in liquids.
- Storage: Always store the torque wrench in its original protective case. Ensure the torque setting is at its lowest value before storage to relieve spring tension. Store in a dry, clean environment.

Image 6.1: The ProPlus Torque Wrench stored securely in its black plastic case, ready for transport or long-term storage.
- Calibration: Torque wrenches are precision instruments and may require periodic calibration to maintain accuracy. The frequency depends on usage, but annual calibration is generally recommended for professional use.
7. Troubleshooting
If you encounter issues with your torque wrench, consider the following:
- Wrench Not Clicking:
- Ensure the torque setting is above the minimum value.
- Verify the locking mechanism is disengaged before adjusting and engaged after setting.
- Apply force smoothly and steadily; a quick, jerky motion might prevent the click.
- The fastener might already be at or above the set torque.
- Inaccurate Readings:
- Ensure the wrench is held correctly and force is applied consistently.
- Check if the wrench has been dropped or misused, which can affect calibration.
- Consider professional calibration if accuracy is critical and issues persist.
8. Specifications
| Feature | Specification |
|---|---|
| Brand | ProPlus |
| Model Number | PLUS-580084 |
| Maximum Torque | 210 Newton-meters |
| Product Dimensions (L x W x H) | 46 x 8 x 5.51 cm |
| Item Weight | 1.66 kg (3.67 lbs) |
| Head Style | Square Drive |
| Quantity in Package | 1 |
9. Warranty and Support
For warranty information or technical support, please refer to the documentation provided at the time of purchase or contact your retailer. Keep your purchase receipt as proof of purchase.