1. Introduction
This manual provides essential information for the safe and effective installation, operation, and maintenance of the REPORSHOP Thermocouple Heater, Model IB14UN01. This component is designed as a replacement part for specific Junkers gas heater models, including W125 and WR400. Understanding the instructions within this manual is crucial for ensuring the safety and proper functioning of your gas heating system.
2. Safety Information
WARNING: Installation and servicing of gas appliances should only be performed by a qualified and licensed professional. Improper installation, adjustment, alteration, service, or maintenance can cause property damage, personal injury, or loss of life.
- Always shut off the gas supply and electrical power to the heater before attempting any installation, maintenance, or repair.
- Ensure adequate ventilation in the work area.
- Check for gas leaks after installation using an approved leak detection solution. Never use an open flame.
- Do not bypass or modify any safety devices.
- Keep flammable materials away from the gas heater.
3. Product Overview
The REPORSHOP Thermocouple Heater (Model IB14UN01) is a safety device for gas water heaters. It is a copper-colored wire with a sensing tip at one end and a connection nut at the other. Its primary function is to detect the presence of a pilot flame. If the pilot flame extinguishes, the thermocouple cools down, interrupting the gas supply to the main burner, thereby preventing unburnt gas from accumulating.
Key features:
- Length: 300 mm
- Sensing tip: 5mm smooth head, 35mm long
- Connection: 10mm male nut
- Flame contact area: 17mm
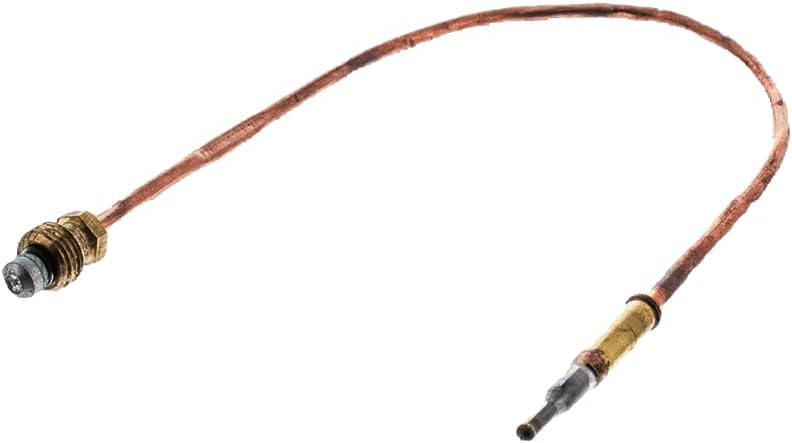
Figure 1: Overall view of the REPORSHOP Thermocouple Heater. This image shows the full length of the copper-colored wire with the sensing tip on the right and the connection nut on the left.

Figure 2: Close-up front view of the thermocouple's sensing tip. This image highlights the 5mm smooth head and the brass fitting where it connects to the copper wire.

Figure 3: Side view of the thermocouple's sensing tip, showing its cylindrical shape and the transition to the copper wire.

Figure 4: Close-up view of the thermocouple's connection nut. This image details the threaded 10mm male nut used for securing the thermocouple to the gas valve.
4. Compatibility
This REPORSHOP Thermocouple Heater (Part Number 8747202212) is compatible with the following gas heater models:
- Junkers: W125, WR400, W135, W250, W275, W350, WR250, WR275, WR350
- Other brands: Neckar, Vulcano (verify specific models with manufacturer documentation)
Always verify the part number and specifications against your existing thermocouple and heater model before purchase and installation.
5. Setup and Installation
IMPORTANT: This procedure should only be performed by a qualified gas appliance technician.
- Preparation:
- Turn off the gas supply to the water heater at the main shut-off valve.
- Disconnect electrical power to the water heater, if applicable.
- Allow the water heater to cool down completely.
- Access the pilot assembly area, typically behind a cover panel.
- Remove Old Thermocouple:
- Locate the thermocouple. It is a thin copper tube leading from the pilot burner to the gas control valve.
- Carefully disconnect the thermocouple from the gas control valve using a wrench.
- Unclip or unfasten the thermocouple from its mounting bracket near the pilot burner.
- Gently pull the old thermocouple out of the pilot assembly.
- Install New Thermocouple:
- Insert the new REPORSHOP thermocouple into the pilot assembly, ensuring the tip is positioned correctly within the pilot flame. The tip should be fully immersed in the flame when lit.
- Secure the thermocouple to its mounting bracket.
- Connect the threaded end of the thermocouple to the gas control valve. Hand-tighten first, then use a wrench to tighten securely, but do not overtighten.
- Test for Leaks:
- Turn the gas supply back on.
- Apply a gas leak detection solution (soapy water) to all connections. Look for bubbles, which indicate a leak. If a leak is detected, shut off the gas, tighten the connection, and retest.
- Relight Pilot and Test Operation:
- Follow your heater's specific instructions to relight the pilot light.
- Hold the pilot button down until the thermocouple heats up and holds the pilot flame.
- Release the pilot button. If the pilot light goes out, the thermocouple may be faulty, improperly installed, or the pilot flame is too weak.
- Once the pilot is stable, turn on the main burner to ensure proper operation.
6. Operating Principles
A thermocouple operates on the principle of the Seebeck effect, generating a small electrical voltage when its tip is heated by the pilot flame. This voltage energizes an electromagnet within the gas control valve, which holds open a safety valve, allowing gas to flow to the pilot and main burner. If the pilot flame goes out, the thermocouple cools, the voltage drops, the electromagnet de-energizes, and the safety valve closes, shutting off the gas supply. This prevents unburnt gas from escaping, ensuring safety.
7. Maintenance
Regular maintenance of your gas heater, including the thermocouple, is essential for safe and efficient operation. It is recommended to have your gas heater inspected annually by a qualified technician.
- Visual Inspection: Periodically check the thermocouple for signs of corrosion, bending, or damage.
- Pilot Flame Check: Ensure the pilot flame is strong, blue, and consistently engulfs the tip of the thermocouple. A weak or yellow flame may indicate a dirty pilot orifice or insufficient gas pressure.
- Cleaning: If the thermocouple tip appears sooty, it can be gently cleaned with fine-grit sandpaper or steel wool, but this should be done with caution and preferably by a professional.
8. Troubleshooting
If your gas heater's pilot light will not stay lit, the thermocouple is often the cause. Here are common troubleshooting steps:
| Problem | Possible Cause | Solution |
|---|---|---|
| Pilot light won't stay lit after releasing the button. |
|
|
| Pilot light lights but main burner does not ignite. |
|
|
If troubleshooting steps do not resolve the issue, contact a qualified gas appliance technician for assistance.
9. Specifications
| Brand | REPORSHOP |
| Model Number | IB14UN01 |
| Part Number (C.O.) | 8747202212 |
| Length | 300 mm |
| Sensing Tip Diameter | 5 mm |
| Sensing Tip Length | 35 mm |
| Connection Nut | 10 mm male |
| Item Weight | 20 g |
| Dimensions (Parcel) | 34 x 10.1 x 2.4 cm |
10. Warranty and Support
For warranty information or technical support regarding your REPORSHOP Thermocouple Heater, please refer to the original purchase documentation or contact REPORSHOP directly through their official website or customer service channels. Keep your proof of purchase for any warranty claims.