SW-Motech BHG-050-02-NP
Bark Busters Handguard Mounting Kit User Manual
Model: BHG-050-02-NP | Brand: SW-Motech
1. Introduction
This manual provides detailed instructions for the installation, operation, and maintenance of the SW-Motech Bark Busters Handguard Mounting Kit, model BHG-050-02-NP. This kit is designed to provide a robust aluminum backbone for hand protection on compatible motorcycles.
Please note that this product is a hardware kit only and does not include the plastic guards (such as JET, VPS, STORM, or CARBON guards), which are sold separately. The kit consists of the aluminum frames and all necessary mounting hardware for attachment to the motorcycle's handlebars.

Figure 1: Components of the Bark Busters Handguard Mounting Kit BHG-050-02-NP. This image displays the two aluminum backbone frames, mounting clamps, and various bolts and spacers included in the kit.
2. Vehicle Compatibility
The BHG-050-02-NP mounting kit is specifically designed for the following motorcycle models:
- BMW R1200GS: 2013 - 2018 models
- BMW R1200GS Adventure: 2014 - 2018 models
- BMW S1000XR: 2015 - 2020 models
Ensure your motorcycle model and year fall within these ranges for proper fitment. Refer to the fitment guide image below for visual confirmation.

Figure 2: Official fitment guide indicating compatible BMW motorcycle models and their respective model years for the BHG-050-02-NP handguard mounting kit.
3. Installation Guide
Installation of the Bark Busters Handguard Mounting Kit is designed to be straightforward. It involves securing the aluminum backbone frames to your motorcycle's handlebars using two mounting points for each side, ensuring a full wrap-around design for maximum strength and impact protection.
3.1. Before You Begin
- Ensure you have all components as shown in Figure 1.
- Gather necessary tools (e.g., Allen wrenches, torque wrench).
- Read through all instructions before starting.
- It is recommended to perform installation on a stable surface with the motorcycle securely parked.
3.2. Installation Steps
- Prepare Handlebars: Remove any existing bar-end weights or handguards. Clean the handlebar area where the new clamps will be positioned.
- Attach Inner Clamp: Loosely attach the inner mounting clamp to the handlebar, near the triple clamp, ensuring it does not interfere with controls or cables.
- Assemble Outer Mount: Attach the outer mounting hardware (bar-end insert) to the end of the handlebar.
- Connect Aluminum Backbone: Connect the aluminum backbone frame to both the inner clamp and the outer bar-end mount. Ensure the backbone is correctly oriented for your motorcycle's controls.
- Adjust Position: Adjust the position of the handguard backbone to ensure adequate clearance for levers, cables, and fairings throughout the full range of steering motion.
- Tighten Fasteners: Once satisfied with the positioning, progressively tighten all fasteners, starting from the inner clamp and then the bar-end mount. Refer to your motorcycle's service manual for specific torque specifications if available, or tighten securely without over-tightening.
- Repeat for Other Side: Follow the same steps for the opposite side of the motorcycle.
- Final Check: Before riding, ensure all components are securely fastened and that the handguards do not impede steering or control operation.

Figure 3: Front view of the handguard mounting kit installed on a motorcycle. This image demonstrates the overall appearance and positioning of the aluminum frames when mounted.
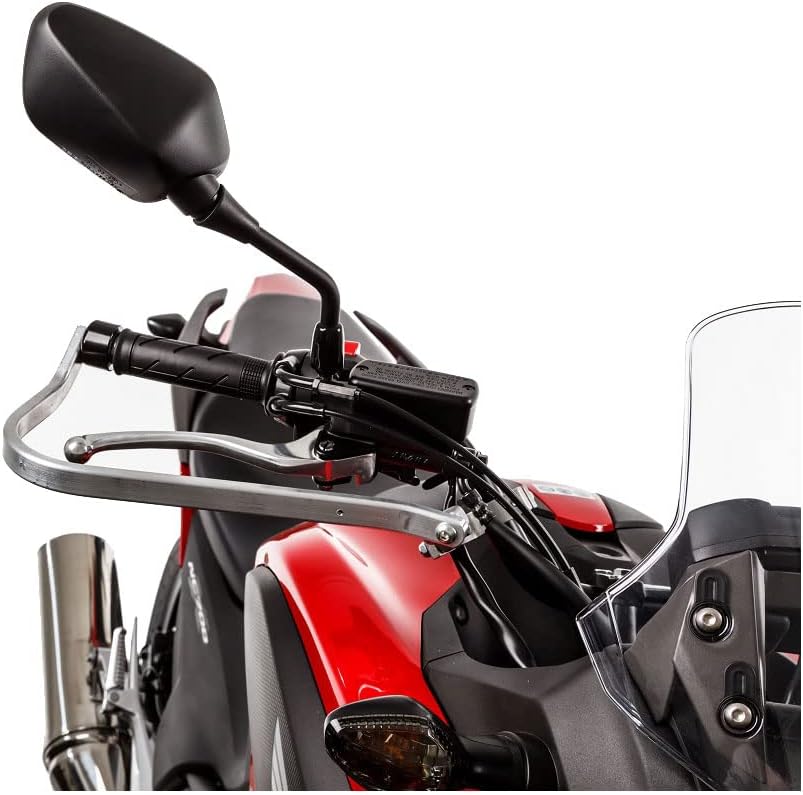
Figure 4: Side view of the handguard mounting kit installed on a motorcycle. This perspective highlights the robust aluminum backbone extending from the handlebar clamp to the bar end.
4. Function and Operation
The SW-Motech Bark Busters Handguard Mounting Kit provides a foundational structure for hand protection. Its primary function is to offer a heat-treated aluminum backbone that delivers significant strength and impact protection for your hands and motorcycle controls.
Once installed, this kit serves as the base for attaching compatible plastic guards (sold separately). These plastic guards, such as JET, VPS, STORM, or CARBON models, can then be easily mounted onto the aluminum backbone to provide additional protection against wind, debris, and minor impacts.
The full wrap-around design, secured by two mounting points, ensures that the handguards remain stable and effective even under demanding riding conditions.
5. Maintenance
To ensure the longevity and continued performance of your Bark Busters Handguard Mounting Kit, follow these simple maintenance guidelines:
- Regular Cleaning: Clean the aluminum components regularly with a mild soap and water solution. Avoid abrasive cleaners or harsh chemicals that could damage the finish.
- Inspect Fasteners: Periodically check all bolts and screws for tightness. Vibrations from riding can sometimes loosen fasteners. Re-tighten as necessary, but do not over-tighten.
- Check for Damage: Inspect the aluminum backbone for any signs of bending, cracks, or significant impact damage, especially after a fall or collision. Damaged components should be replaced immediately to maintain protective integrity.
- Corrosion Prevention: While aluminum is corrosion-resistant, prolonged exposure to harsh elements (e.g., road salt) can affect its appearance. Rinse thoroughly after riding in such conditions.
6. Troubleshooting
Most issues related to the Bark Busters Handguard Mounting Kit can be resolved by carefully reviewing the installation steps. Here are some common troubleshooting tips:
- Interference with Controls/Fairings: If the handguards interfere with brake/clutch levers, cables, or the motorcycle's fairings, loosen the mounting bolts and carefully adjust the position of the aluminum backbone. Ensure full steering lock and lever operation before re-tightening.
- Loose Handguards: If the handguards feel loose, re-check the tightness of all mounting bolts, especially the inner clamp and bar-end fasteners. Ensure the bar-end insert is properly expanded within the handlebar.
- Missing Parts: If you believe parts are missing from your kit, compare the contents with Figure 1 and the included components list. Contact your retailer or SW-Motech customer support if parts are indeed missing.
- Difficulty with Installation: If you encounter significant difficulty, ensure you have the correct kit for your motorcycle model (refer to Section 2). Professional installation by a qualified mechanic is always an option if you are unsure.
7. Specifications
| Attribute | Detail |
|---|---|
| Model Number | BHG-050-02-NP |
| Brand | SW-Motech |
| Material | Heat-treated Aluminum |
| Color | Silver |
| Installation Type | Bolt-On |
| Auto Part Position | Front (Handlebars) |
| Item Weight | 2.27 pounds (approx. 1.03 kg) |
| Package Dimensions | 17.04 x 11.34 x 2.36 inches (approx. 43.28 x 28.80 x 5.99 cm) |
| UPC | 722301242391 |
| ASIN | B01N0J1GD5 |
8. Warranty and Support
SW-Motech products are manufactured to high standards and are typically covered by a manufacturer's warranty against defects in materials and workmanship. For specific warranty terms and conditions, please refer to the documentation provided with your purchase or visit the official SW-Motech website.
For technical support, missing parts, or warranty claims, please contact your authorized SW-Motech dealer or SW-Motech customer service directly. When contacting support, please have your product model number (BHG-050-02-NP) and proof of purchase readily available.
SW-Motech Official Website: https://sw-motech.com