1. Introduction
This manual provides comprehensive instructions for the installation, operation, and maintenance of your Greenbrook T105A-C Electronic 7-Day Timer Switch. Please read this manual carefully before installation and use to ensure safe and efficient operation of the device. Keep this manual for future reference.
The Greenbrook T105A-C is a versatile electronic timer designed for general timing applications, such as controlling lighting and heating systems. It offers advanced programming capabilities to automate your electrical appliances.
2. Safety Information
WARNING: Electrical installation should only be carried out by a qualified electrician or competent person in accordance with national wiring regulations.
- Always switch off the mains power supply before commencing any installation or maintenance work.
- Ensure the timer is correctly rated for the load it will control. The maximum load is 16A resistive and 8A inductive.
- This device is Class II - Double Insulated, meaning it does not require an earth connection.
- Do not expose the timer to moisture, extreme temperatures, or corrosive environments.
- Do not attempt to open or repair the unit yourself. Refer all servicing to qualified personnel.
3. Product Overview
The Greenbrook T105A-C features a clear digital display and intuitive control buttons for easy programming. Below is an illustration of the timer's front panel and its key components.
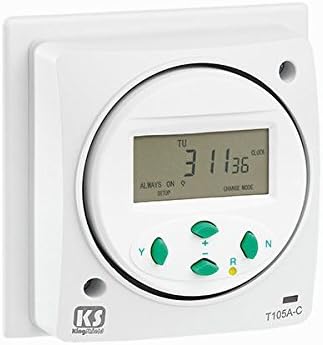
Figure 1: Front panel of the Greenbrook T105A-C Timer Switch. This image displays the front panel of the Greenbrook T105A-C timer switch. It features a central digital LCD screen showing the current time, day (TU for Tuesday), and status indicators like 'ALWAYS ON' and 'CHARGE MODE'. Below the screen are four control buttons: 'Y' (likely for Yes/Program), '+' (for increasing values or advancing), 'R' (for Reset or Random function), and 'N' (likely for No/Next). The model number 'T105A-C' is visible on the bottom right, and the 'KS' logo is on the bottom left.
Key Components:
- Digital LCD Display: Shows time, day, program status, and operating modes.
- 'Y' Button: Typically used for confirming selections or entering programming mode.
- '+' Button: Used to increase values, advance through settings, or manually override.
- 'R' Button: Used for Resetting the timer or activating the Random switching function.
- 'N' Button: Used to navigate through options or cancel a selection.
- Power-on Indicator: A visual cue that the unit is receiving power.
4. Setup and Installation
The T105A-C timer is designed for direct surface mounting or installation into a standard 1-gang back box.
4.1 Mounting
- Ensure the mains power supply is switched OFF at the consumer unit.
- The timer can be mounted directly onto any suitable flat surface.
- Alternatively, it can be fitted into a 1-gang back box with a minimum depth of 35mm, utilizing the 60.3mm horizontal fixing centers.
- Secure the timer to the mounting surface or back box using appropriate screws.
4.2 Wiring
Connect the wiring according to the diagram provided with the product packaging. As a Class II - Double Insulated device, an earth connection is not required. Ensure all connections are secure and correctly terminated.
4.3 Initial Power-Up and Battery Reserve
Upon initial power-up, the display may show 'CHARGE MODE' as the internal battery charges. The timer has a 150-hour battery reserve, which maintains settings during power outages once fully charged. Allow the unit to charge for several hours before programming for optimal battery backup.
5. Operating Instructions
This section details how to set the time, program ON/OFF cycles, and utilize special functions.
5.1 Setting Current Time and Day
- Press the 'Y' button to enter the time setting mode. The hour display will flash.
- Use the '+' button to adjust the hour.
- Press 'N' to move to the minute setting. Use '+' to adjust minutes.
- Press 'N' again to set the day of the week. Use '+' to select the correct day (e.g., MO, TU, WE, TH, FR, SA, SU).
- Press 'Y' to confirm and exit time setting mode.
5.2 Programming ON/OFF Cycles
The timer supports up to 24 ON and 24 OFF programs per 24 hours, with a minimum switching interval of 1 minute.
- Press the 'Y' button repeatedly until 'PROG' appears on the display.
- The display will show '1 ON'. Use '+' to set the desired ON time for program 1.
- Press 'N' to move to '1 OFF'. Use '+' to set the desired OFF time for program 1.
- Press 'N' to advance to the next program ('2 ON', '2 OFF', etc.) and repeat the process.
- To set programs for specific days or groups of days, consult the detailed programming instructions in the product packaging. (General programming often allows day selection after time setting for each program).
- After setting all desired programs, press 'Y' to save and exit programming mode.
5.3 Random Switching Option
The 'R' button can activate a random switching function, which varies the ON/OFF times slightly to give the impression of occupancy, enhancing security.
- Press the 'R' button once to activate the random function. An indicator (e.g., 'RANDOM' or 'R') may appear on the display.
- Press 'R' again to deactivate the random function.
5.4 Bypass Facility (Manual Override)
The timer includes a bypass facility, allowing you to manually override the programmed settings.
- Press the '+' button briefly to toggle the output ON or OFF, overriding the current program. The display may show 'ALWAYS ON' or 'ALWAYS OFF'.
- The timer will revert to programmed operation at the next scheduled ON/OFF event, or by pressing '+' again to cycle through modes.
6. Maintenance
The Greenbrook T105A-C timer switch requires minimal maintenance.
- Cleaning: Wipe the unit with a soft, dry cloth. Do not use abrasive cleaners or solvents.
- Battery: The internal battery is designed to hold settings for up to 150 hours during power outages. It is not user-replaceable. If the battery reserve significantly diminishes over time, the unit may need replacement.
7. Troubleshooting
If you encounter issues with your timer, refer to the following common problems and solutions:
| Problem | Possible Cause | Solution |
|---|---|---|
| Display is blank or dim. | No power supply; internal battery discharged. | Check mains power supply. Allow unit to charge for several hours. |
| Timer not switching ON/OFF at programmed times. | Incorrect programming; manual override active; incorrect current time/day. | Review and re-enter programs. Check if 'ALWAYS ON' or 'ALWAYS OFF' is active and deactivate. Verify current time and day settings. |
| Time/settings lost after power outage. | Internal battery reserve depleted or faulty. | Allow unit to charge for 24 hours. If problem persists, the unit may need replacement. |
| Buttons are unresponsive. | Temporary software glitch. | Press the 'R' (Reset) button to perform a soft reset. If available, a small pinhole reset button may exist (not explicitly mentioned for this model). |
If the problem persists after attempting these solutions, please contact Greenbrook customer support.
8. Specifications
| Feature | Specification |
|---|---|
| Model Number | T105A-C |
| Brand | Greenbrook |
| Color | White |
| Max Load (Resistive) | 16 A |
| Max Load (Inductive) | 8 A |
| Programs | 24 ON/OFF per 24 hours |
| Minimum Switching Interval | 1 minute |
| Battery Reserve | 150 hours |
| Mounting | Surface or 1-gang back box (35mm min depth, 60.3mm horizontal fixing) |
| Insulation Class | Class II - Double Insulated |
| Dimensions (W x H x D) | 87 mm x 87 mm x 40 mm (front) / 20 mm (rear) |
| Weight | 180 g |
9. Warranty and Support
Warranty information for the Greenbrook T105A-C Electronic 7-Day Timer Switch is typically provided at the point of purchase or within the product packaging. Please retain your proof of purchase for warranty claims.
For technical support, further assistance, or to inquire about warranty details, please contact Greenbrook customer service. Contact details can usually be found on the manufacturer's website or on the product packaging.


