1. Introduction
This manual provides detailed instructions for the installation, operation, and programming of the Baomain THC15A Digital LCD Programmable Timer Switch Relay. This device is designed for precise control of electrical circuits, allowing for automated on/off switching based on a programmed schedule. Please read this manual thoroughly before use to ensure safe and efficient operation.
2. Product Features
- Digital LCD Display: Clear display for time, day, and programming status.
- Programmable Schedules: Up to 16 ON/OFF programs per day or week.
- Wide Voltage Range: Operates on AC 220V - 240V.
- High Contact Capacity: Rated for 16A.
- Internal Rechargeable Battery: 1.2V/40mA battery for power failure memory.
- Power Failure Memory: Retains settings for up to 60 days without external power.
- Manual Override: Allows temporary manual control.
- Compact Design: Suitable for DIN rail mounting.
3. Specifications
| Model Number | THC15A |
| Rated Voltage | AC 220V - 240V |
| Contact Capacity | 16A |
| Full Time Range | 1 Minute - 168 Hours |
| Programmable Settings | 16 ON/OFF times per week or day |
| Internal Battery | 1.2V/40mA (rechargeable) |
| Power Failure Memory | 60 days |
| Operating Temperature | -10°C to +40°C |
| Product Dimensions (D x W x H) | 1.42" x 3.39" x 2.56" (36mm x 86mm x 65mm) |
| Net Weight | 120g (4.2 ounces) |
| Material | Plastic |
| Color | White |
 Image: Baomain THC15A Digital Timer Switch showing its physical dimensions (1.42"D x 3.39"W x 2.56"H).
4. Safety Information
- Electrical Hazard: Installation and wiring should only be performed by a qualified electrician or competent person. Ensure power is disconnected before any installation or maintenance.
- Voltage Compatibility: Verify that the supply voltage matches the timer's rated voltage (AC 220V-240V).
- Load Capacity: Do not exceed the maximum contact capacity of 16A. Overloading can cause damage or fire.
- Environment: Do not install in areas with excessive moisture, dust, or extreme temperatures outside the specified operating range (-10°C to +40°C).
- Proper Grounding: Ensure the device is properly grounded according to local electrical codes.
5. Product Overview and Components
The Baomain THC15A is a compact digital timer switch designed for DIN rail mounting. It features an LCD screen for displaying time and programming, along with several buttons for setting and control.
 Image: Angled view of the Baomain THC15A timer switch, highlighting the LCD display and blue control buttons.
 Image: Front view of the Baomain THC15A Digital Timer Switch, showing the LCD screen, buttons, and terminal connections.
Control Buttons:
- (P) Button: Used to enter programming mode and confirm settings.
- D+ Button: Adjusts the day of the week during time setting or selects day combinations for programs.
- H+ Button: Adjusts the hour.
- M+ Button: Adjusts the minute.
- Clock Button (Clock icon): Exits programming mode and saves current time settings.
- Reset Button: Resets all settings to factory defaults.
- Manual Button: Toggles between AUTO, ON, and OFF modes.
6. Installation and Wiring
The THC15A timer switch is designed for DIN rail mounting. Ensure all power is disconnected before proceeding with wiring.
 Image: Wiring diagram for the Baomain THC15A Digital Timer Switch, showing connections for Neutral (N), Live (L), and load terminals (3, 4, 5) with an optional circuit breaker.
Wiring Connections:
- Connect the Live (L) wire to terminal 1.
- Connect the Neutral (N) wire to terminal 2.
- For the output, connect the common terminal (usually 4) to the load's power input.
- Connect the normally open (NO) terminal (usually 3) or normally closed (NC) terminal (usually 5) to the other side of the load, depending on desired operation.
- Ensure all connections are secure and insulated.
Warning: Incorrect wiring can lead to electric shock or damage to the device and connected equipment. Consult a professional if unsure.
7. Initial Setup
7.1. Resetting the Timer
Upon first use or after a long period of inactivity, it is recommended to reset the timer. Use a pointed object (like a pen tip) to press the Reset button. The LCD display will show "00:00" and all previous settings will be cleared.
 Image: Close-up view of the Baomain THC15A timer's control panel, showing the LCD screen and the blue buttons, including the recessed Reset button.
7.2. Setting Current Time and Day
To set the current time and day:
- Press and hold the Clock button (with the clock icon).
- While holding the Clock button, press D+ to set the current day of the week (MO, TU, WE, TH, FR, SA, SU).
- While holding the Clock button, press H+ to set the current hour (0-23 for 24-hour format).
- While holding the Clock button, press M+ to set the current minute (0-59).
- Release the Clock button to save the settings. The display will show the current time and day.
8. Programming the Timer
The THC15A allows for up to 16 ON/OFF programs. Follow these steps to set your desired schedule:
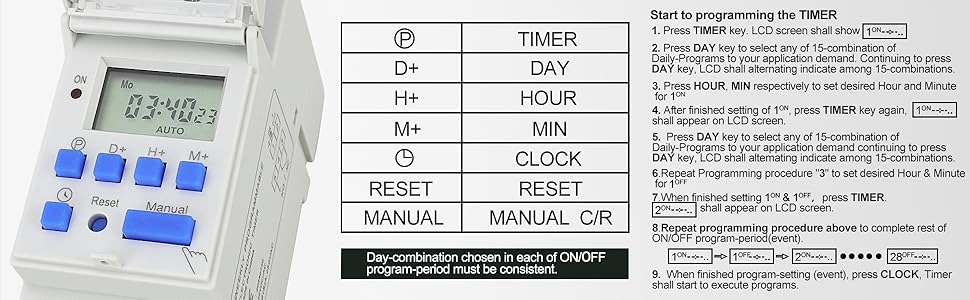 Image: A table outlining the programming steps for the Baomain THC15A timer, detailing button presses for setting ON/OFF times and day combinations.
 Image: Detailed programming instructions for the Baomain THC15A timer, showing the sequence of button presses for setting ON/OFF events and day selections.
- Press the (P) button once. The LCD will display "1 ON" (first ON program).
- Press D+ to select the desired day combination for this program (e.g., MO, TU, WE, TH, FR, SA, SU for everyday, or specific days). Continue pressing D+ to cycle through 15 different day combinations.
- Press H+ to set the hour for the "1 ON" time.
- Press M+ to set the minute for the "1 ON" time.
- Press the (P) button again. The LCD will display "1 OFF" (first OFF program).
- If you want the same day combination as "1 ON", you do not need to press D+. If different, press D+ to select.
- Press H+ to set the hour for the "1 OFF" time.
- Press M+ to set the minute for the "1 OFF" time.
- Repeat steps 1-8 for additional ON/OFF programs (up to 16 pairs). The display will cycle through "2 ON", "2 OFF", etc., up to "16 ON", "16 OFF".
- After setting all desired programs, press the Clock button to exit programming mode and save your settings. The timer will then execute the programs.
Programming Video Tutorial:
Video: This video demonstrates the programming steps for the Baomain THC15A Digital LCD Power Programmable Timer Switch Relay, showing how to set ON/OFF times and day combinations.
9. Operating Modes (Manual Control)
The Manual button allows you to override the programmed schedule temporarily or permanently.
- Press the Manual button to cycle through the following modes:
- AUTO: The timer operates according to the programmed schedule.
- ON: The output is continuously ON, overriding any programmed OFF times.
- OFF: The output is continuously OFF, overriding any programmed ON times.
Always return the timer to AUTO mode for scheduled operation.
10. Troubleshooting
Common Issues and Solutions:
- Display is blank:
- Check power supply to terminals 1 and 2.
- The internal battery might be fully discharged. Connect to power for several hours to charge.
- Timer not switching ON/OFF as programmed:
- Ensure the timer is in AUTO mode (check the display).
- Verify that the current time and day are set correctly.
- Review your programmed ON/OFF times for accuracy.
- Check wiring connections to the load.
- Error Codes on LCD:
- E1: Indicates that a START time was not set for a program.
- E2: Indicates that an END time was not set for a program.
- Solution: Re-enter programming mode and ensure both ON and OFF times are set for each program you intend to use. Press the Clock button to save and exit.
- Buttons unresponsive:
- Try pressing the Reset button with a pointed object to clear any temporary glitches.
11. Maintenance
- Keep the device clean and free from dust. Use a soft, dry cloth for cleaning.
- Do not use abrasive cleaners or solvents.
- Ensure proper ventilation around the device to prevent overheating.
- The internal battery is designed for long life and is generally not user-replaceable. If the power failure memory fails, the unit may need servicing or replacement.
12. Warranty and Support
Baomain products are manufactured to high-quality standards. For warranty information, technical support, or service inquiries, please refer to the contact information provided with your purchase or visit the official Baomain website. Keep your purchase receipt as proof of purchase for warranty claims.


