1. Important Safety Information
Read and understand all instructions and warnings before operating this winch. Failure to follow these instructions may result in serious injury or property damage. Keep this manual for future reference.
- Wear appropriate safety gear: Always wear heavy-duty gloves and eye protection when operating the winch.
- Never exceed rated capacity: Do not attempt to pull loads heavier than the winch's rated capacity (12000 lbs).
- Inspect before use: Before each use, inspect the winch, cable, hook, and all connections for damage, wear, or corrosion. Do not use if any components are compromised.
- Maintain clear area: Ensure all bystanders are clear of the winch, cable, and vehicle during operation. A broken cable can cause severe injury.
- Keep hands and clothing clear: Never place hands or fingers near the cable, fairlead, or drum during operation. Loose clothing can become entangled.
- Avoid shock loads: Do not use the winch to jerk or snatch loads. Apply power smoothly to avoid sudden stress on the cable and winch components.
- Spool cable under tension: Always re-spool the cable under light tension to ensure even winding and prevent damage.
- Secure vehicle: Always set the parking brake and block the wheels of the vehicle being winched and the anchor vehicle.
- Electrical safety: Ensure all electrical connections are secure and properly insulated. Avoid contact with live terminals.
2. Product Overview
The X-BULL 12V Steel Cable Electric Winch is designed for vehicle recovery and heavy-duty pulling applications. It features a powerful 12V motor, durable steel cable, and remote control options for safe operation.

Image: The complete X-BULL 12V Steel Cable Electric Winch, showcasing its robust black housing, steel cable, and control box.
Key Components:
- Winch Motor: Provides the power for pulling.
- Winch Drum: Spools the steel cable.
- Steel Cable: High-strength cable for pulling.
- Roller Fairlead: Guides the cable onto the drum evenly and reduces wear.
- Clutch Lever: Engages or disengages the drum for free-spooling.
- Control Box (Solenoid): Houses the electrical components and relays.
- Wired Remote Control: Provides direct control over winch operation.
- Wireless Remote Controls: Allows for remote operation from a safe distance.
- Hook: Attaches to the load or anchor point.
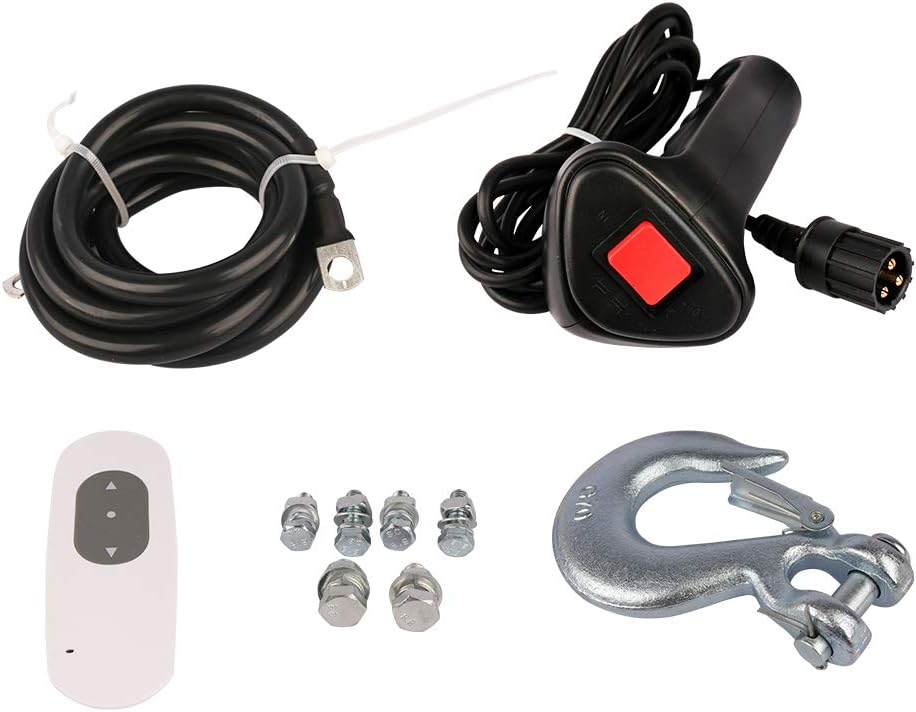
Image: Various accessories included with the winch, such as the wired remote control, wireless remote control, heavy-duty hook, and mounting bolts.
3. Setup and Installation
Proper installation is critical for safe and effective winch operation. If you are unsure about any step, consult a qualified professional.
3.1 Mounting the Winch
- Choose a mounting location on your vehicle that is structurally sound and can support the full pulling force of the winch.
- Ensure the mounting surface is flat and provides adequate clearance for the winch, cable, and fairlead.
- Use high-grade bolts and hardware to securely fasten the winch to the mounting plate or bumper.
- Mount the roller fairlead to the vehicle's bumper or mounting plate, ensuring it is aligned with the winch drum.

Image: A close-up view of the roller fairlead, designed to guide the steel cable smoothly and reduce friction during winching operations.
3.2 Electrical Connections
The winch operates on a 12V DC electrical system. Ensure your vehicle's battery and charging system are in good condition.
- Connect the thick red power cable from the winch motor to the positive (+) terminal of your vehicle's battery.
- Connect the thick black ground cable from the winch motor to a clean, unpainted metal part of the vehicle chassis or the negative (-) terminal of the battery.
- Connect the control box (solenoid) to the winch motor and battery according to the wiring diagram provided with your winch. Ensure all connections are tight and protected from moisture and corrosion.
- Test the winch briefly to ensure proper operation before full use.
4. Operating Instructions
Follow these steps for safe and effective winch operation.
4.1 Engaging and Disengaging the Clutch

Image: A close-up of the winch's clutch lever, clearly indicating the 'IN ENGAGE' and 'OUT DISENGAGED' positions for controlling the drum.
- To engage the clutch (for winching), turn the clutch lever to the 'IN ENGAGE' position. This locks the drum to the motor.
- To disengage the clutch (for free-spooling cable), turn the clutch lever to the 'OUT DISENGAGED' position. This allows the cable to be pulled out manually.
4.2 Winching Procedure
- Prepare the vehicle: Secure the vehicle with the parking brake and wheel chocks.
- Select anchor point: Choose a strong, stable anchor point (e.g., another vehicle, tree trunk with a tree saver strap, rock).
- Extend cable: Disengage the clutch and pull out enough cable to reach the anchor point. Always leave at least 5 wraps of cable on the drum.
- Attach hook: Securely attach the hook to the anchor point. Ensure the safety latch on the hook is closed.
- Engage clutch: Re-engage the clutch by turning the lever to the 'IN ENGAGE' position.
- Clear the area: Ensure all personnel are clear of the cable and winch.
- Begin winching: Use the wired or wireless remote control to slowly reel in the cable. Apply power smoothly.
- Monitor operation: Watch the cable spooling onto the drum. If the cable begins to pile up on one side, stop winching and adjust the cable by hand (wearing gloves) to ensure even winding.
- Stop winching: Once the vehicle is recovered, stop the winch.
- Release tension: Carefully release tension on the cable before disconnecting the hook.
- Re-spool cable: Disconnect the hook, disengage the clutch, and re-spool the cable onto the drum under light tension. Ensure the cable is neatly wound.

Image: A detailed view of the steel cable, showing the thimble eye and the robust clevis hook attached, ready for secure connection to an anchor point.
5. Maintenance
Regular maintenance ensures the longevity and safe operation of your winch.
- Cable Inspection: Regularly inspect the steel cable for kinks, fraying, broken strands, or corrosion. Replace damaged cables immediately.
- Hook Inspection: Check the hook for deformation, cracks, or a malfunctioning safety latch. Replace if damaged.
- Fairlead Maintenance: Keep the roller fairlead clean and free of debris. Lubricate the rollers periodically with a light grease.
- Electrical Connections: Check all electrical connections for tightness and corrosion. Clean terminals as needed.
- General Cleaning: Keep the winch clean from mud, dirt, and road salt. Use a mild detergent and water, then dry thoroughly.
- Storage: When not in use, store the winch in a dry, protected area. If mounted on a vehicle, consider using a winch cover to protect it from the elements.
6. Troubleshooting
Refer to this section for common issues and their potential solutions.
| Problem | Possible Cause | Solution |
|---|---|---|
| Winch does not operate | No power to winch; Loose electrical connections; Faulty remote control; Engaged clutch. | Check battery connections and voltage; Tighten all wiring connections; Test remote battery or try wired remote; Ensure clutch is engaged. |
| Winch operates in only one direction | Faulty solenoid; Remote control issue. | Inspect solenoid wiring; Test with a different remote if available; Contact customer support if solenoid is suspected faulty. |
| Winch motor runs but cable does not move | Clutch is disengaged. | Engage the clutch by turning the lever to the 'IN ENGAGE' position. |
| Cable spools unevenly | Insufficient tension during re-spooling; Obstruction in fairlead. | Re-spool cable under light tension; Clear any debris from the fairlead. |
| Winch overheats | Overloading; Continuous operation without rest. | Reduce load; Allow winch to cool down between pulls. Do not exceed duty cycle. |
7. Specifications
- Model Number: 80012000A
- Rated Line Pull: 12000 lbs (5443 kg)
- Motor: 12V DC
- Cable Type: Steel Cable
- Product Dimensions: 23.6 x 9.45 x 13.78 inches
- Item Weight: 79.8 pounds
- Manufacturer: X-BULL
8. Warranty and Support
For warranty information, technical support, or replacement parts, please contact X-BULL customer service. Refer to your purchase documentation for specific warranty terms and contact details. X-BULL is committed to providing support when you need it.