1. Introduction
The ThermoPro TP50 is a compact and highly accurate digital indoor thermometer and hygrometer designed to help you monitor the temperature and humidity levels in your living spaces. This device provides essential information for maintaining a comfortable and healthy indoor environment, displaying current conditions, maximum and minimum records, and a comfort level indicator.
Its versatile design allows for easy placement in various locations, making it suitable for homes, offices, baby rooms, greenhouses, and more. Understanding the information provided by the TP50 can assist in managing conditions for personal comfort, plant care, and pet well-being.
2. Product Features
- Compact Design: Approximately 8.0 cm (height) x 7.0 cm (width) x 2.2 cm (depth). Made from durable ABS resin.
- Large, Clear Display: Features a large LCD screen with clear digits for easy readability of current temperature and humidity.
- Max/Min Record: Automatically records and displays the highest and lowest temperature and humidity values measured since the last reset. This feature is useful for tracking environmental changes over time.
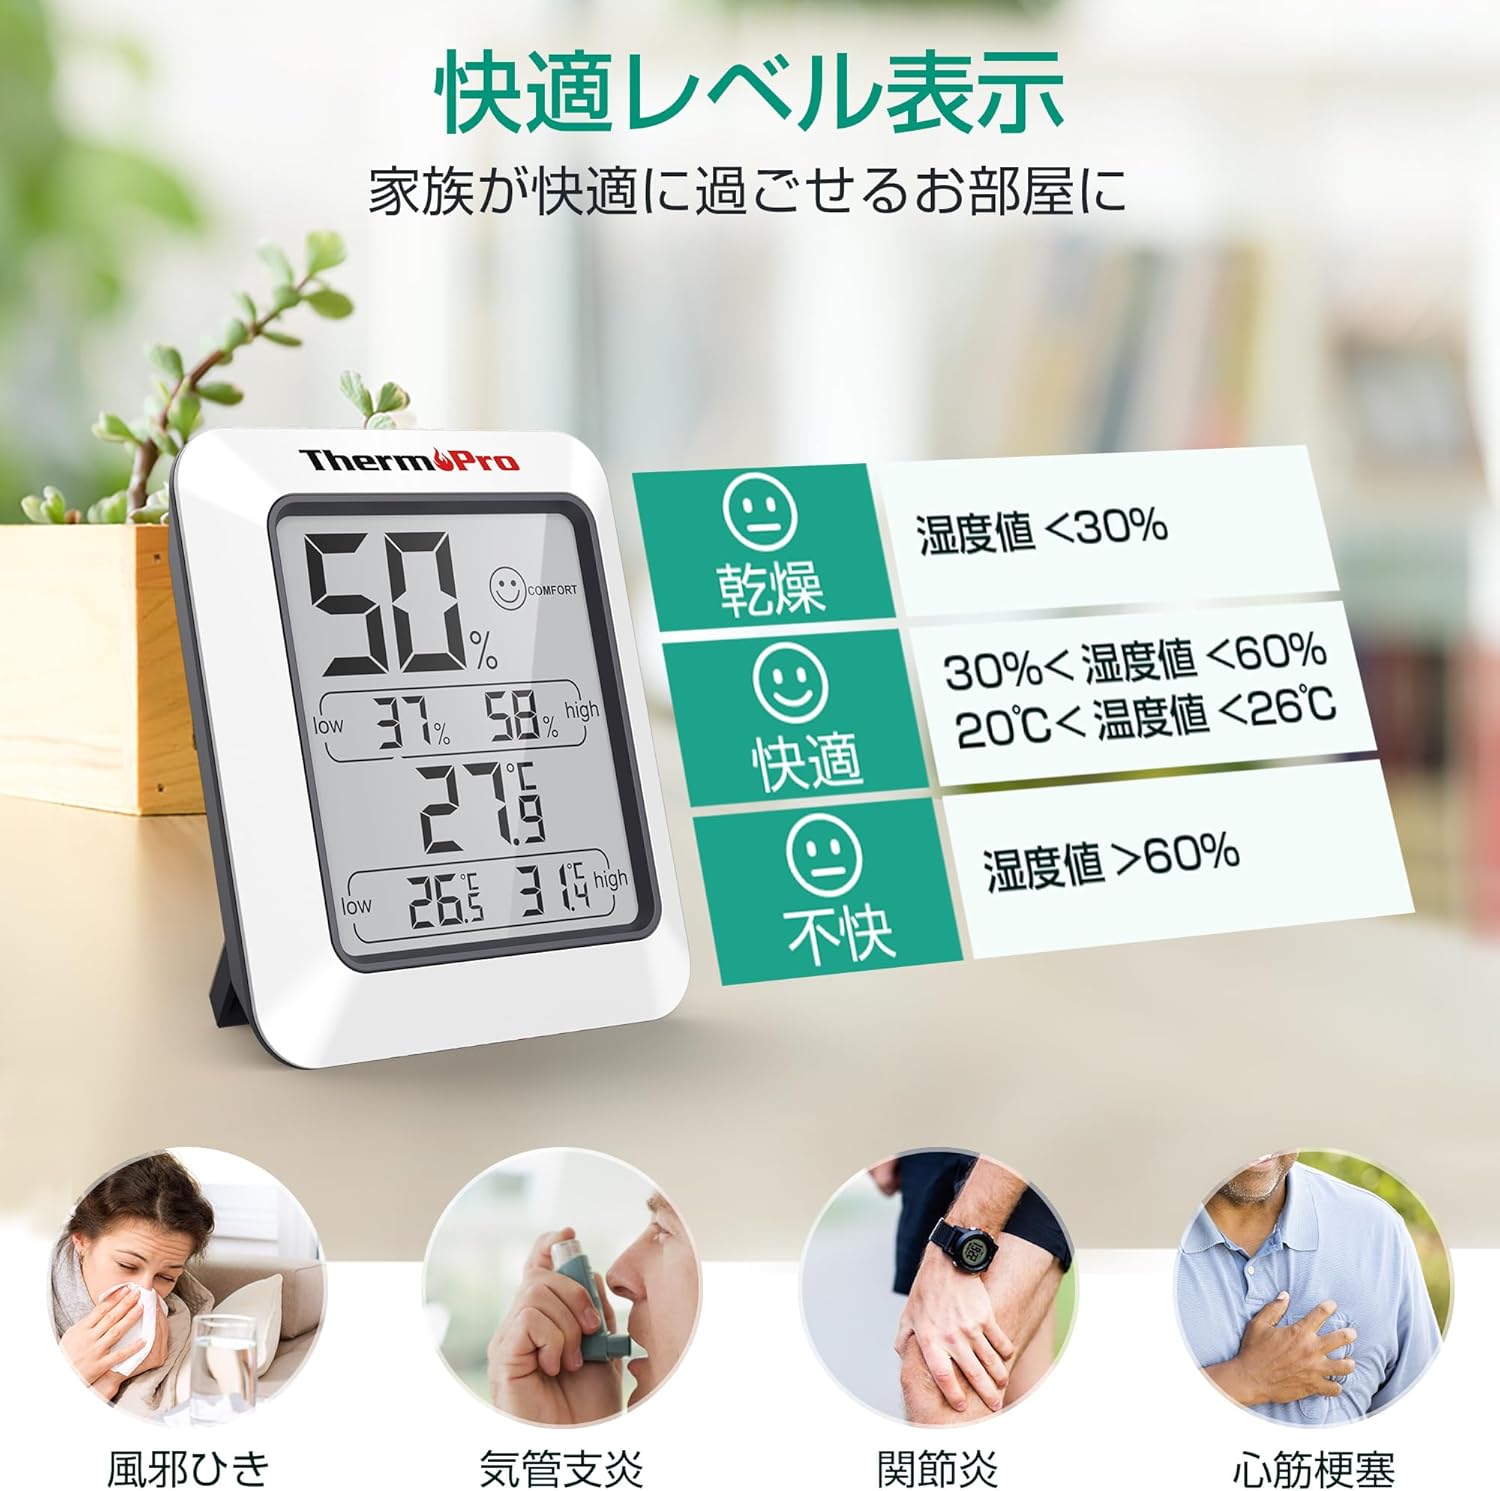
- Comfort Level Indicator: Utilizes a simple face icon to indicate one of three comfort levels: Dry, Comfort, or Uncomfortable, based on the current temperature and humidity.
- Versatile Placement: Equipped with a strong magnet for attachment to metallic surfaces like refrigerators, and a foldable stand for tabletop use.
- High Accuracy: Provides precise measurements for effective environmental monitoring.

3. Setup
3.1 Battery Installation
- Locate the battery compartment on the back of the unit.
- Open the battery compartment cover.
- Insert one (1) AAA 1.5V battery, ensuring the correct polarity (+/-) as indicated inside the compartment.
- Close the battery compartment cover securely.
3.2 Initial Stabilization
Upon initial power-on or after battery replacement, the sensor requires time to stabilize and accurately reflect the surrounding environment. Due to the small air intake hole on the back of the unit, it may take approximately 30 minutes for the device to display stable and accurate readings. Please allow this period for the device to calibrate before relying on the measurements.
4. Operating Instructions
4.1 Reading the Display
The large LCD screen displays the following information:
- Current Humidity: Shown as a percentage (%) at the top of the display.
- Current Temperature: Shown in degrees Celsius (°C) or Fahrenheit (°F) in the middle of the display.
- Max/Min Humidity: The highest and lowest humidity recorded since the last reset are displayed below the current humidity.
- Max/Min Temperature: The highest and lowest temperature recorded since the last reset are displayed below the current temperature.
- Comfort Level Icon: A face icon (Dry, Comfort, Uncomfortable) is displayed next to the current humidity reading.

4.2 Switching Temperature Units (°C/°F)
To switch between Celsius (°C) and Fahrenheit (°F), locate the '°F/°C' button on the back of the unit and press it. The display will instantly change the temperature unit.
4.3 Resetting Max/Min Records
The maximum and minimum temperature and humidity records are automatically updated every 10 seconds. To clear the recorded maximum and minimum values and start a new recording cycle, press and hold the 'CLEAR' button located on the back of the unit for approximately 3 seconds. The display will show the current readings as the new starting point for max/min tracking.

5. Maintenance
5.1 Cleaning
To clean the unit, wipe it with a soft, damp cloth. Do not use abrasive cleaners or immerse the unit in water. Ensure the device is dry before re-using.
5.2 Battery Replacement
When the display becomes dim or shows inaccurate readings, it may be time to replace the battery. Follow the battery installation steps in Section 3.1 to replace the AAA battery.
5.3 Storage
If storing the unit for an extended period, remove the battery to prevent leakage and damage to the device.
5.4 Important Note on Water Resistance
This device is NOT waterproof. Please avoid using it in wet environments such as bathrooms, washrooms, or near sinks, as exposure to water can damage the unit.
6. Troubleshooting
6.1 Inaccurate Readings
- Initial Setup: As mentioned in Section 3.2, allow 30 minutes for the device to stabilize after initial setup or battery replacement.
- Placement: Ensure the device is placed in a location with good air circulation, away from direct sunlight, heat sources, or drafts, which can affect readings.
- Obstruction: The small air intake hole on the back should not be obstructed.
6.2 Display is Dim or Blank
- Battery Check: The battery may be low or depleted. Replace the AAA battery with a new one.
- Battery Installation: Ensure the battery is installed correctly with the proper polarity.
7. Specifications
| Specification | Detail |
|---|---|
| Model | TP50 |
| Dimensions | Approx. 8.0 cm (H) x 7.0 cm (W) x 2.2 cm (D) |
| Weight | Approx. 60 g |
| Material | ABS Resin |
| Power Source | 1 x AAA 1.5V Battery (included) |
| Battery Life | Approx. 1 year |
| Temperature Range | -50°C to 70°C (-58°F to 158°F) |
| Humidity Range | 10% to 99% RH |
| Temperature Accuracy | ±1°C (±1.8°F) |
| Humidity Accuracy | ±2% RH (30%-80% RH), ±3% RH (10%-30% & 80%-99% RH) |
| Refresh Rate | Every 10 seconds |
| Display Type | LCD |
| Water Resistance | No (Not waterproof) |

8. Warranty and Support
ThermoPro products are designed for reliability and performance. This product comes with a 1-year warranty from the date of purchase, covering defects in materials and workmanship under normal use.
For technical assistance, troubleshooting, or warranty claims, please contact ThermoPro customer support. Our friendly customer support team is available to assist you with any questions or concerns regarding your device.
ThermoPro is committed to providing high-quality products and support to its community of over 20 million users worldwide.
For more information and support, please visit the official ThermoPro brand store: ThermoPro Brand Store