1. Introduction
Thank you for choosing the Outsunny Tunnel Greenhouse. This manual provides essential information for the safe and efficient assembly, operation, and maintenance of your greenhouse. Designed to provide an optimal environment for your plants, this large 10.5 m² tunnel greenhouse offers protection against adverse weather conditions, birds, and UV rays, ensuring a healthy growing season for flowers, vegetables, and fruits. Please read these instructions thoroughly before beginning assembly and retain them for future reference.

Image: The Outsunny Tunnel Greenhouse, a large green structure, is shown nestled in a vibrant garden, demonstrating its integration into an outdoor space for cultivation.
2. Safety Instructions
- Site Selection: Choose a level, well-drained area for installation. Avoid locations prone to strong winds or water accumulation.
- Anchoring: Ensure the greenhouse is securely anchored to the ground using all provided stakes and ropes. Proper anchoring is crucial to prevent damage from wind.
- Weather Conditions: In case of heavy snow, strong winds, or severe storms, it is recommended to remove the cover to prevent damage to the structure.
- Assembly: Assembly should be performed by at least two adults. Wear appropriate safety gear, such as gloves, during assembly.
- Ventilation: Ensure adequate ventilation, especially during hot weather, to prevent overheating inside the greenhouse.
- Children and Pets: Keep children and pets away from the assembly area. Do not allow them to play inside the greenhouse unsupervised.
- Sharp Edges: Be aware of potential sharp edges on metal components during handling and assembly.
3. Product Overview
Key Features:
- Spacious Design: Offers a generous 10.5 m² ground surface, ideal for various plants.
- Durable Construction: Features a robust galvanized iron tubular frame (Ø 18 mm) and a high-density 140g/m² polyethylene (PE) cover, treated for UV resistance.
- Optimal Plant Protection: Shields plants from harsh weather, pests, and harmful UV radiation.
- Enhanced Ventilation: Equipped with 6 roll-up side windows with blinds for adjustable airflow and insect protection.
- Convenient Access: Includes a large main entrance with a roll-up flap and a secure zipper system.
- Easy Assembly: Designed for quick and straightforward setup with an illustrated manual.
Components:
The Outsunny Tunnel Greenhouse consists of a sturdy metal frame and a durable PE cover. Key components include:
- Galvanized Steel Tubes (various lengths and shapes for frame)
- Connectors (for joining frame tubes)
- High-Density Polyethylene (PE) Cover
- Ground Stakes and Ropes (for anchoring)
- Roll-up Window Mechanisms
- Zippered Door Assembly
- Hook-and-loop Fasteners (for securing cover to frame)

Image: A diagram highlights the key protective features of the greenhouse, including its tear-resistant PE cover, protection against birds, UV resistance, and ability to retain heat for optimal plant growth.
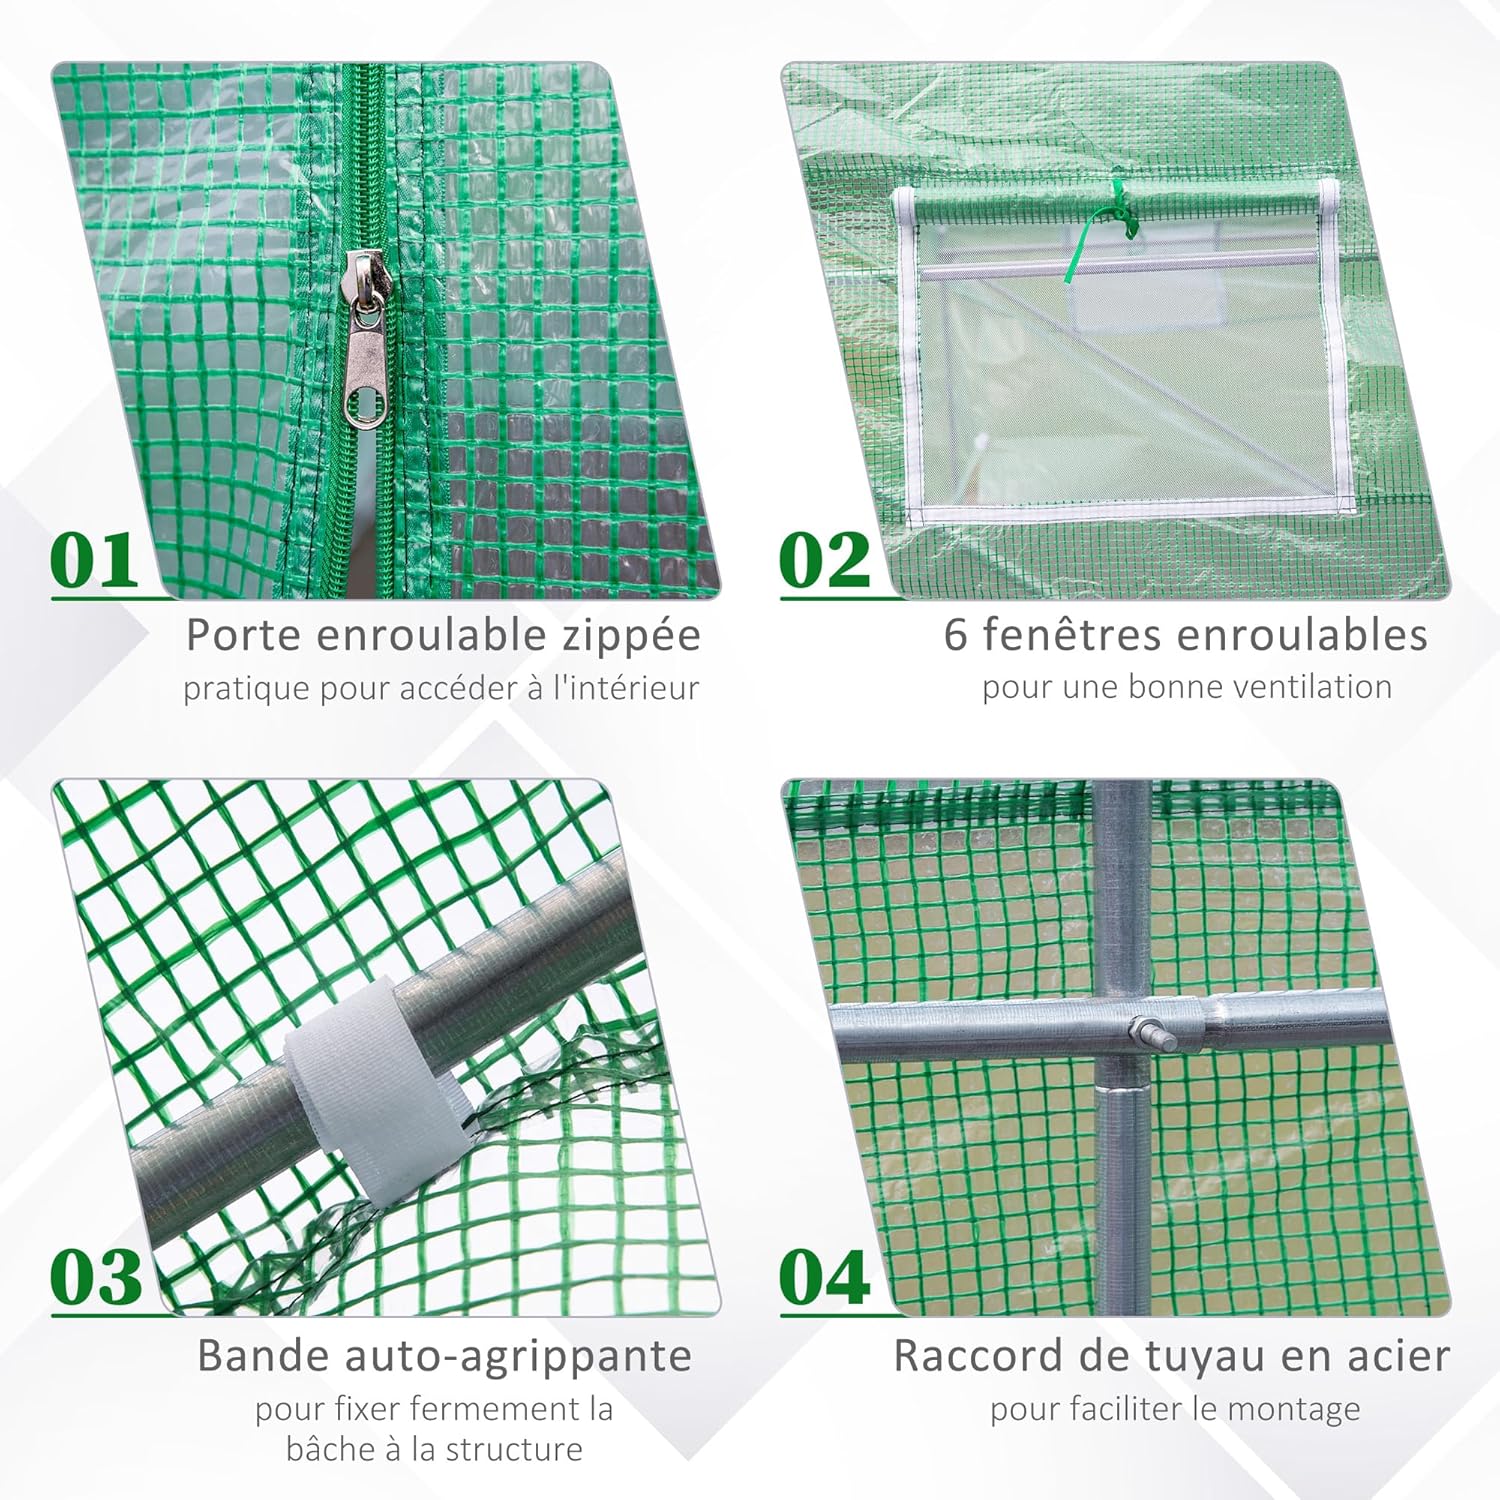
Image: Detailed views of the greenhouse's functional elements: a zippered roll-up door for easy access, a roll-up window for ventilation, a hook-and-loop fastener securing the cover, and a robust steel pipe connection point.
4. Setup and Assembly
The assembly of your Outsunny Tunnel Greenhouse is designed to be straightforward. Please follow the detailed, illustrated assembly manual provided in the packaging for step-by-step instructions. Below are general guidelines:
- Unpack and Identify: Carefully unpack all components and verify them against the parts list in your assembly manual.
- Assemble the Frame: Connect the galvanized steel tubes using the provided connectors. Ensure all connections are secure. Refer to the manual for the correct sequence and orientation of tubes.
- Attach the Cover: Drape the high-density PE cover over the assembled frame. Ensure it is centered and aligned correctly. Secure the cover to the frame using the integrated hook-and-loop fasteners.
- Secure the Base: The cover includes a 15 cm extension around the base. Bury this extension into the soil to create a seal and enhance stability.
- Anchor the Greenhouse: Use the provided ground stakes and ropes to firmly anchor the greenhouse to the ground. This is critical for stability, especially in windy conditions.
- Install Door and Windows: Ensure the zippered door operates smoothly and the roll-up windows can be securely opened and closed.
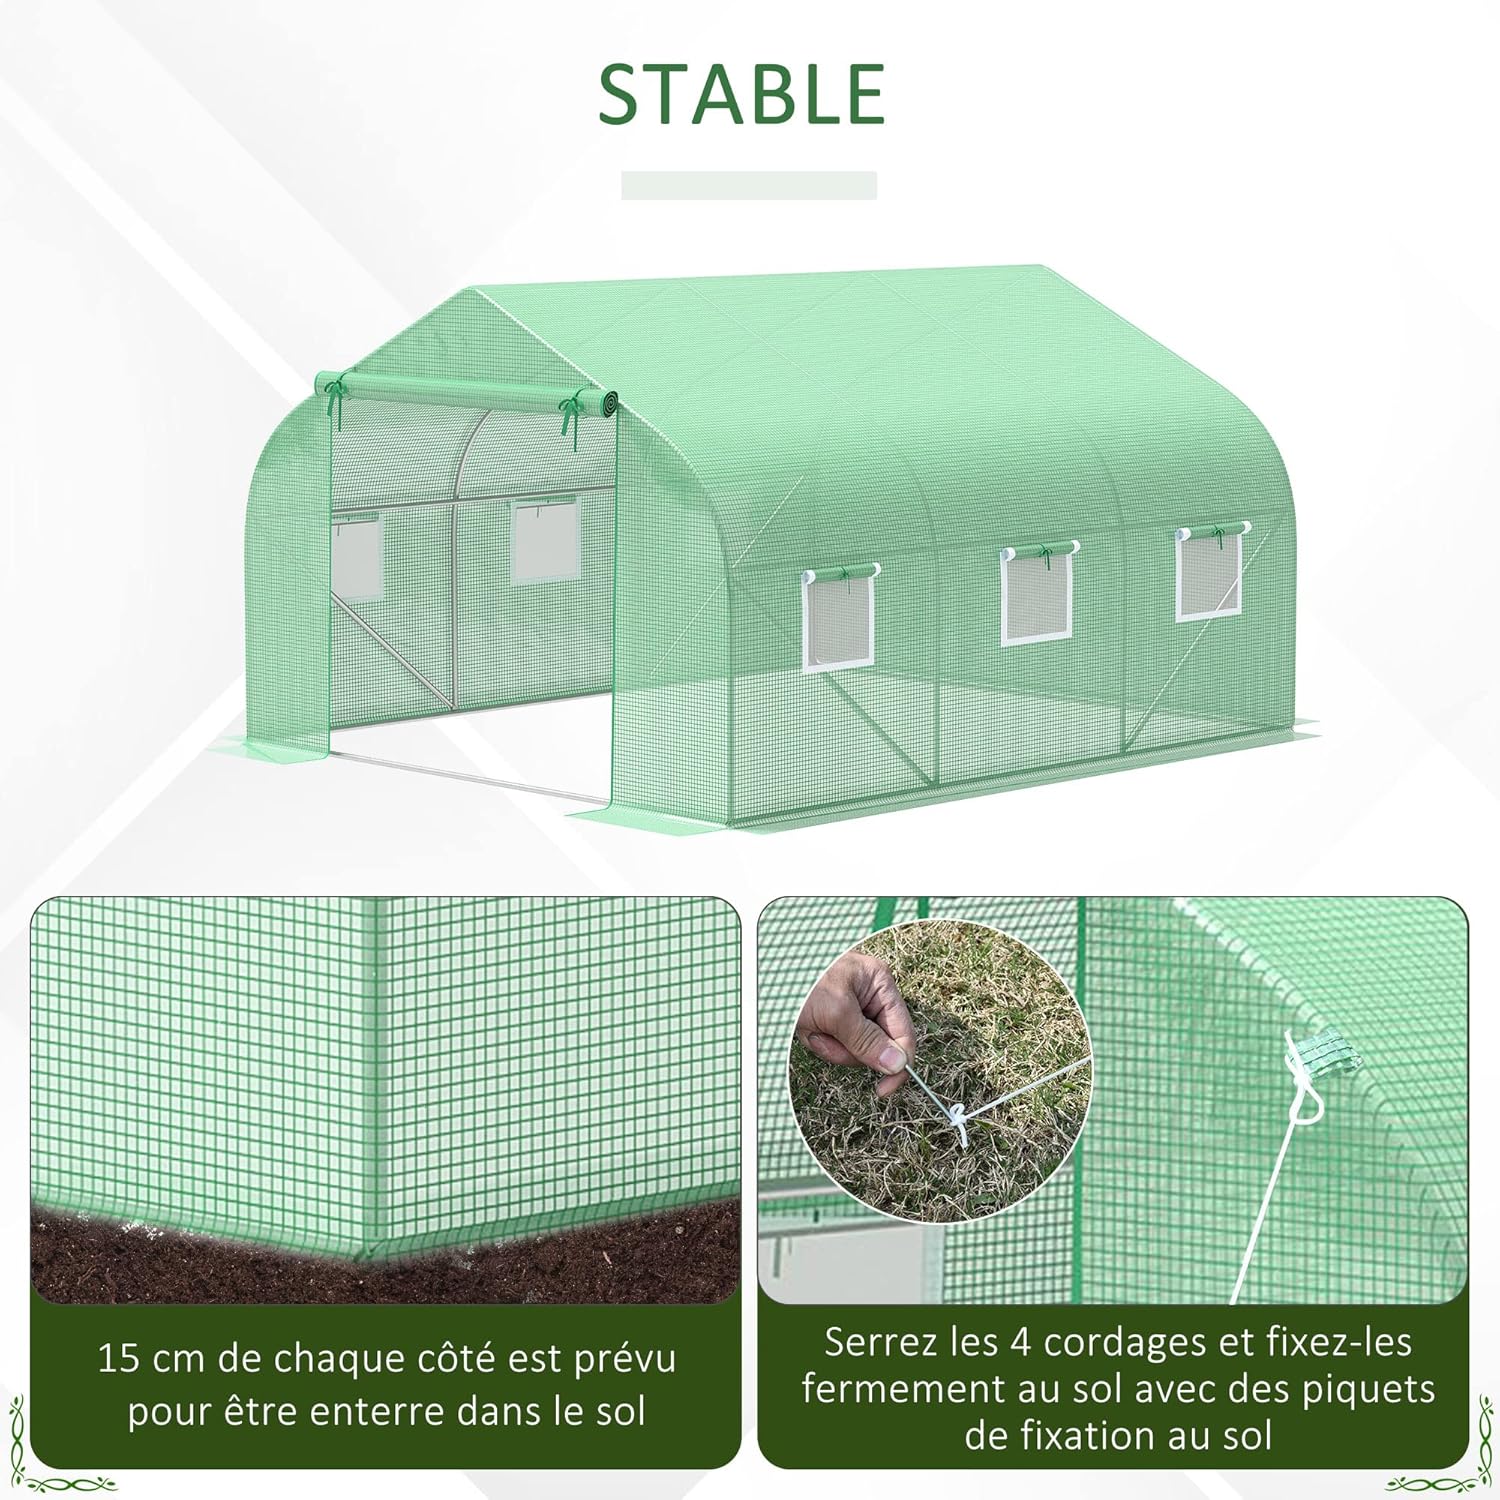
Image: This image illustrates the stability features of the greenhouse, showing the 15 cm extension at the base designed to be buried in the soil and the method for securing the structure with ground stakes and ropes.
5. Operating Instructions
Ventilation:
The greenhouse is equipped with 6 roll-up side windows. To regulate temperature and humidity, and to ensure proper air circulation, open these windows as needed. This also helps in preventing the buildup of excessive heat and moisture, which can be detrimental to plants.
Access:
The main entrance features a roll-up flap with a zipper. Unzip and roll up the flap to enter or exit the greenhouse, or to move larger items like gardening tools and wheelbarrows. Ensure the zipper is fully closed when not in use to maintain the internal environment.
6. Maintenance
- Regular Cleaning: Periodically clean the PE cover with mild soap and water to remove dirt and debris, ensuring maximum light penetration. Avoid abrasive cleaners.
- Frame Inspection: Regularly inspect the metal frame for any signs of rust, damage, or loose connections. Tighten any loose bolts or connections.
- Cover Condition: Check the PE cover for tears or punctures. Small damages can be repaired with appropriate repair tape to prevent them from worsening.
- Anchoring Check: Verify that the ground stakes and ropes remain secure, especially after strong winds or heavy rain. Re-anchor if necessary.
- Winter Preparation: In areas with heavy snowfall, it is advisable to remove the PE cover during winter months to prevent structural damage from snow accumulation.
7. Troubleshooting
Greenhouse Instability:
If the greenhouse appears unstable, particularly in windy conditions:
- Ensure all ground stakes are fully inserted and ropes are taut.
- Verify that the 15 cm base extension of the cover is properly buried in the soil.
- Check all frame connections for tightness.
- Consider adding additional anchoring points or weights in extremely windy areas.
Poor Ventilation/High Humidity:
If the interior of the greenhouse is too hot or humid:
- Ensure all 6 side windows are fully open during the day.
- Consider opening the main door for a period to allow for maximum airflow.
- Ensure plants are not overcrowded, which can restrict airflow.
8. Specifications
| Attribute | Detail |
|---|---|
| Model Number | 845-0150531 |
| Overall Dimensions (L x W x H) | 350 x 300 x 200 cm (137.8 x 118.1 x 78.7 inches) |
| Ground Surface Area | 10.5 m² |
| Weight | 15.5 kg (34.17 lbs) |
| Frame Material | Galvanized Steel (Alloy Steel) |
| Cover Material | 140g/m² High-Density Polyethylene (PE), UV-treated |
| Number of Windows | 6 (roll-up with blinds) |
| Number of Doors | 1 (zippered roll-up) |
| Usage | Outdoor |

Image: A technical diagram illustrating the precise dimensions of the greenhouse: 350 cm in length, 300 cm in width, and 200 cm in height, providing a clear visual reference for its size.
9. Warranty and Support
Outsunny provides a 2-year availability for spare parts for this product. For any questions regarding assembly, operation, or if you require replacement parts, please contact Outsunny customer support.
Please visit the official Outsunny website or refer to your purchase documentation for specific contact details and warranty claim procedures.