1. Introduction and Overview
The Teltonika FMA 110 is a small and professional GPS tracker equipped with internal high-gain GNSS (Global Navigation Satellite System) and GSM (Global System for Mobile Communications) antennas. This device is designed to collect device coordinates and other useful data, which are then transferred via the GSM network to a central server.
The FMA 110 is ideally suited for applications requiring remote object monitoring and management, including fleet management, car rental services, taxi companies, public transport, and logistics operations. It can perform various remote control tasks, such as engine status monitoring and checking the status of vehicle doors.
2. Product Features
- Small and professional tracker with internal high-gain GNSS and GSM antennas.
- Easy detection for starting and stopping operations.
- Supports 1-Wire protocol, enabling driver identification and connection of temperature sensors.
- Data transmission via GPRS using TCP/IP and UDP/IP protocols.
- Smart data collection based on time, distance, angle, speed deviation, ignition status, and I/O events.
3. Setup and Installation
Proper installation of the FMA 110 is crucial for optimal performance. This involves connecting the device to the vehicle's power supply and integrating it with various sensors and control systems as needed.

Figure 3.1: The Teltonika FMA 110 GPS Tracker device, showing its compact size and connection ports.
3.1. Wiring and Connections
The FMA 110 requires connection to a 10-30V DC power source. It features multiple digital inputs/outputs, an analog input, and 1-Wire support for various peripherals. Ensure all connections are secure and correctly wired according to the diagrams below.

Figure 3.2: System diagram illustrating the various inputs, outputs, and connectivity options for the FMA 110, including USB for configuration, CAN bus, and sensor integration.
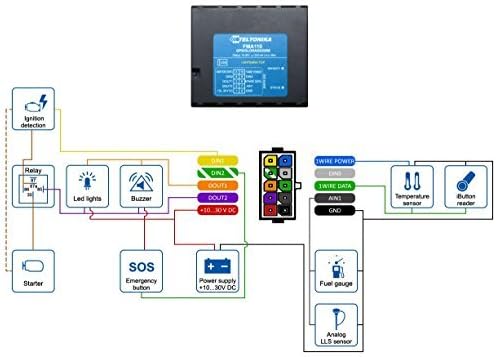
Figure 3.3: Detailed wiring diagram for the FMA 110, showing pin assignments for power, digital inputs/outputs, 1-Wire, and analog inputs, along with example connections to external components like relays, LED lights, and sensors.
3.2. SIM Card Insertion
Before powering on the device, insert a properly provisioned SIM card into the designated slot. The SIM card is essential for GSM network communication and data transmission.
3.3. Initial Configuration
The FMA 110 can be configured via a PC using a USB connection. Refer to the Teltonika configurator software manual for detailed instructions on setting up parameters such as APN settings, server IP/port, data collection rules, and I/O event triggers.
4. Operating Instructions
Once installed and configured, the FMA 110 operates automatically. It collects data based on predefined parameters and transmits it to the configured server.
4.1. Data Collection
The device intelligently collects data based on various triggers:
- Time-based: Data is sent at set intervals.
- Distance-based: Data is sent after a certain distance is covered.
- Angle-based: Data is sent when the vehicle's heading changes by a specified angle.
- Speed Deviation: Triggers data transmission if speed exceeds or falls below set thresholds.
- Ignition and I/O Events: Data is sent upon ignition status changes or specific input/output events (e.g., door open/close, SOS button press).
4.2. Data Transmission
Collected data is transmitted over the GSM network using GPRS (General Packet Radio Service). The device supports both TCP/IP and UDP/IP protocols for reliable and efficient data transfer to the monitoring platform.
4.3. 1-Wire Protocol Usage
The 1-Wire protocol allows for the connection of Dallas iButton readers for driver identification and digital temperature sensors. This enables advanced functionalities like driver authentication and temperature monitoring within the vehicle.
5. Maintenance
The Teltonika FMA 110 is designed for low maintenance. However, regular checks can help ensure its longevity and reliable operation:
- Physical Inspection: Periodically check the device and its connections for any signs of damage, corrosion, or loose wiring.
- Cleaning: Keep the device free from dust and debris. Use a soft, dry cloth for cleaning. Do not use liquid cleaners.
- Firmware Updates: Check the Teltonika website for available firmware updates. Keeping the firmware up-to-date can improve performance and add new features.
6. Troubleshooting
If you encounter issues with your FMA 110, consider the following troubleshooting steps:
- No Data Transmission:
- Verify the device is receiving power. Check power connections and vehicle battery voltage.
- Ensure the SIM card is correctly inserted and has an active data plan.
- Check GSM signal strength in the device's location.
- Confirm APN settings and server IP/port configurations are correct in the device's settings.
- GPS Not Locating:
- Ensure the device has a clear view of the sky (no metallic obstructions directly above).
- Allow sufficient time for the device to acquire GPS satellites, especially after initial power-up or relocation.
- Device Not Responding:
- Perform a power cycle by disconnecting and reconnecting the power supply.
- If issues persist, connect to a PC via USB and check device status using the Teltonika configurator.
- Service Compatibility: Users should be aware that some older models of GPS trackers, including potentially the FMA 110, may have service limitations or require specific SIM card activation procedures from Teltonika or a compatible service provider. Always contact Teltonika support for the most up-to-date service requirements and compatibility information before purchasing or activating service.
7. Specifications
| Feature | Detail |
|---|---|
| Brand | Teltonika |
| Manufacturer | Teltonika |
| Model | FMA 110 |
| Part Number | FMA110 |
| Batteries Included | No |
| Item Model Number | FMA 110 |
| Package Dimensions | 15.4 x 12.4 x 4.6 cm; 180 g |
| ASIN | B01MU5YZ50 |
| Date First Available | 14 April 2017 |
| Is discontinued by manufacturer | No |
8. Warranty and Support
For information regarding the warranty of your Teltonika FMA 110, please refer to the warranty terms provided at the time of purchase or visit the official Teltonika website. Warranty conditions may vary based on region and distributor.
For technical support, detailed documentation, firmware updates, and software tools, please visit the official Teltonika support portal or contact their customer service directly. It is recommended to have your device's serial number and purchase information ready when seeking support.