1. Introduction
This manual provides essential information for the safe and efficient operation, maintenance, and troubleshooting of your Koolatron 5.0 Cubic Feet Chest Freezer, Model KTCF155. Please read these instructions thoroughly before using your appliance and retain them for future reference.

Figure 1: Front view of the Koolatron 5.0 Cubic Feet Chest Freezer (KTCF155).
2. Safety Information
WARNING: To reduce the risk of fire, electric shock, or injury when using your appliance, follow these basic precautions:
- Read all instructions before using the freezer.
- Connect to a properly grounded outlet only.
- Do not repair or replace any part of the freezer or attempt any servicing unless specifically recommended in this manual.
- Keep ventilation openings clear of obstruction.
- Do not use mechanical devices or other means to accelerate the defrosting process, other than those recommended by the manufacturer.
- Do not damage the refrigerant circuit.
- Do not use electrical appliances inside the food storage compartments of the appliance, unless they are of the type recommended by the manufacturer.
- This appliance is not intended for use by persons (including children) with reduced physical, sensory or mental capabilities, or lack of experience and knowledge, unless they have been given supervision or instruction concerning use of the appliance by a person responsible for their safety.
- Children should be supervised to ensure that they do not play with the appliance.
- Proposition 65 Warning: This product may contain materials cautioned by California Proposition 65.
3. Product Overview and Features
The Koolatron KTCF155 is a 5.0 cubic feet (142 liter) chest freezer designed for efficient frozen food storage. Key features include:
- Ample Storage Capacity: 5.0 cubic feet (142 liters) for various frozen goods.
- Manual Defrost with Easy-Access Drain: Front-mount drain with a leak-proof plug for simplified defrosting and cleaning.
- Removable Storage Basket: Corrosion-resistant, vinyl-coated wire basket for organizing smaller items.
- Convenient Stay-Open Lid: Lid opens effortlessly and stays open, supported by rear-mounted hinges that also ensure a tight seal when closed.
- Reliable Compressor Cooling: Maintains temperatures between 0°C and -24°C (32°F and -11.2°F).
- External Temperature Control Dial: Easy adjustment of internal temperature.
- Quiet Operation: Designed to minimize noise disturbances.
- Compact and Space-Saving Design: Flat-back design allows for placement in tight spaces.
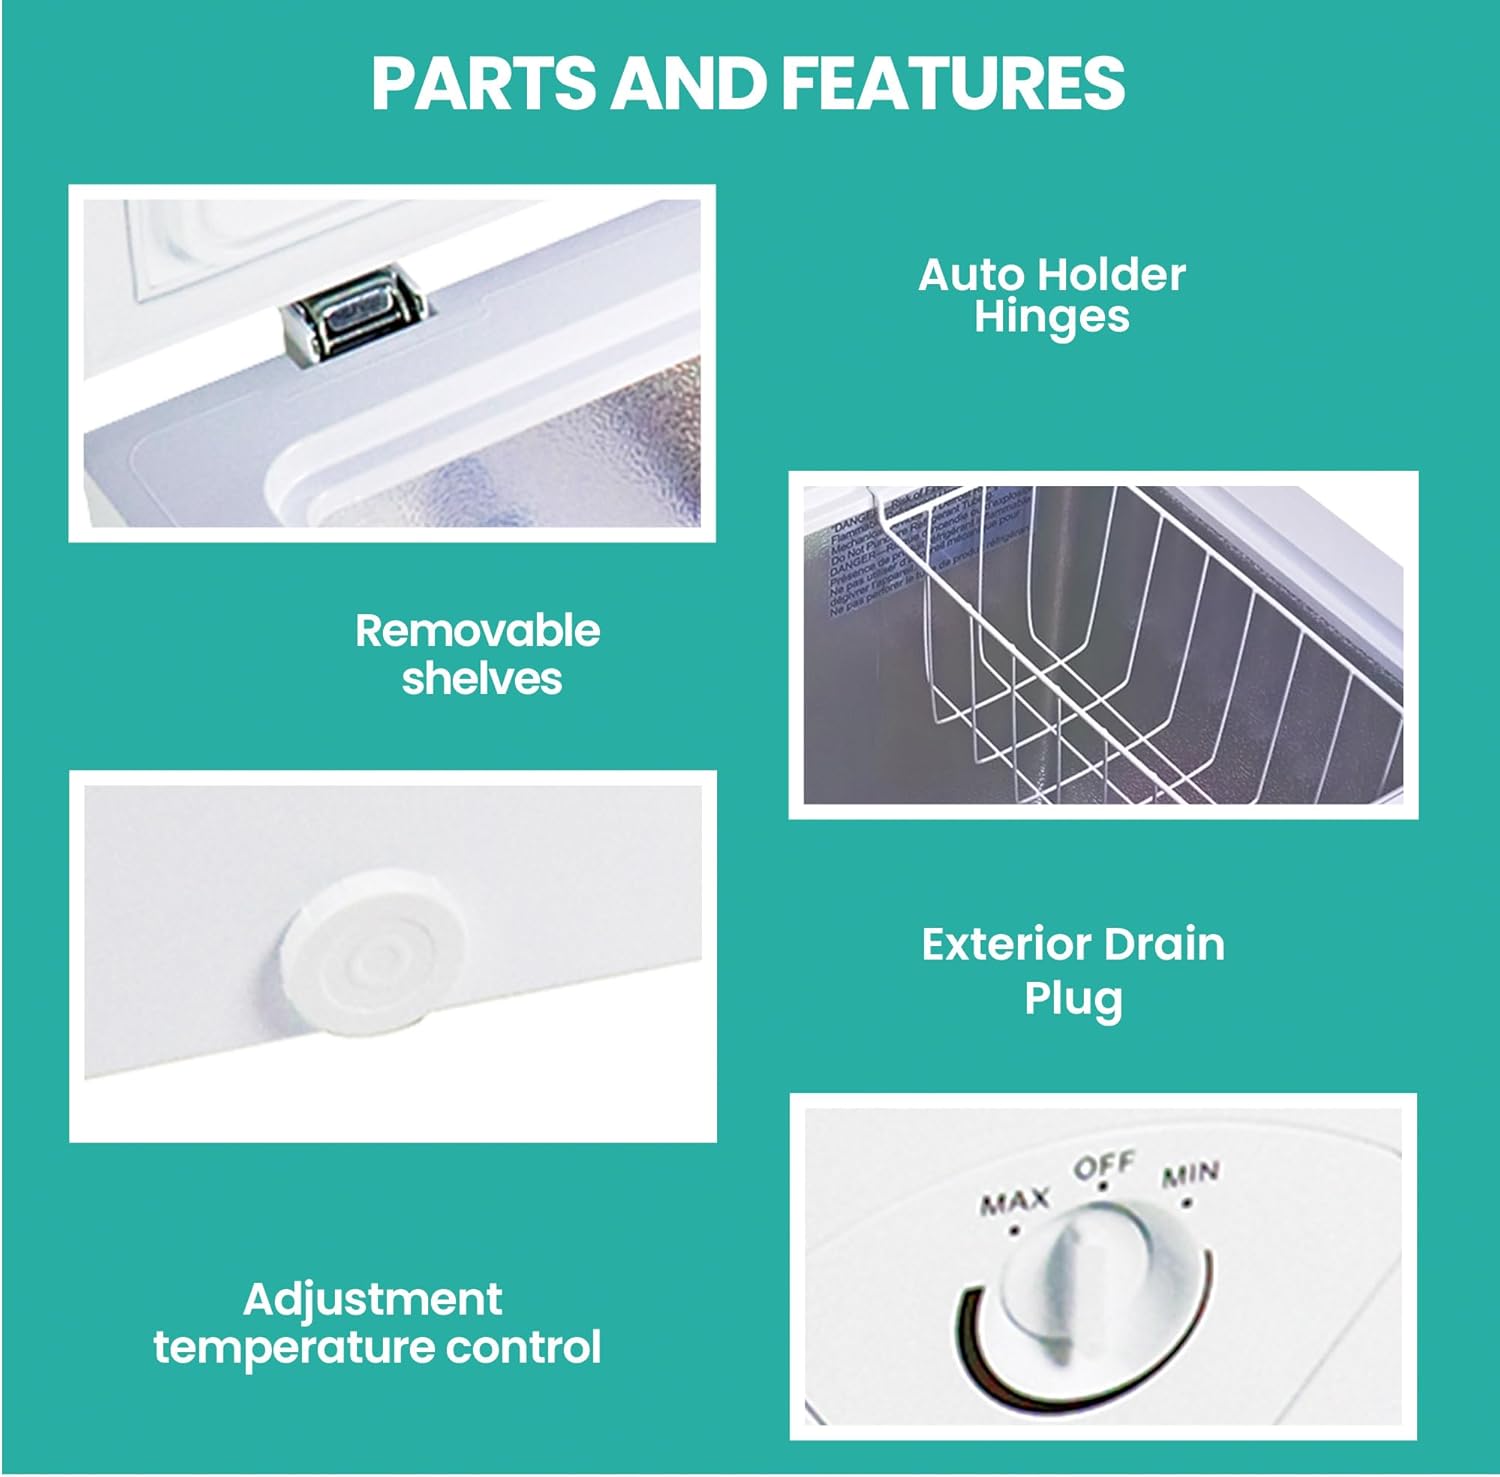
Figure 2: Key parts and features of the freezer.

Figure 3: Overview of compact and convenient features.

Figure 4: Hands-free convenience with stay-open lid.

Figure 5: Ample 5.0 cubic feet (142L) storage capacity.

Figure 6: Reliable and energy-efficient cooling system.
4. Setup and Installation
- Unpacking: Remove all packaging materials, including foam and adhesive tape. Inspect the freezer for any damage.
- Placement:
- Place the freezer on a flat, solid surface strong enough to support it when fully loaded.
- Allow at least 4 inches (10 cm) of space between the back and sides of the freezer and any adjacent walls to ensure proper air circulation.
- Avoid direct sunlight or heat sources (e.g., stove, heater).
- This freezer is garage-ready, suitable for various environments.

Figure 7: Examples of suitable placement locations.
- Leveling: Ensure the freezer is level to prevent vibrations and ensure proper door sealing. Adjust the leveling feet if necessary.
- Initial Cleaning: Before use, clean the interior with a mild detergent and warm water. Wipe dry thoroughly.
- Power Connection: Plug the freezer into a dedicated, grounded electrical outlet. Allow the freezer to stand upright for at least 2-4 hours before plugging it in to allow refrigerants to settle.
5. Operating Instructions
- Power On: Once plugged in, the freezer will begin to cool. The power indicator light (if present) will illuminate.
- Temperature Control:
- Locate the external temperature control dial, typically on the lower front of the unit.
- Turn the dial to adjust the temperature setting. Settings range from MIN (least cold) to MAX (coldest). An OFF setting may also be available to turn the unit off.
- For initial use, set the dial to MAX for approximately 24 hours to allow the freezer to reach optimal freezing temperature quickly.
- The recommended operating temperature range is between 0°C and -24°C (32°F and -11.2°F).

Figure 8: Temperature control dial.
- Loading the Freezer:
- Once the freezer has reached its operating temperature, you can begin loading food items.
- Utilize the removable wire basket for smaller, frequently accessed items to maintain organization.
- Avoid overloading the freezer, as this can impede air circulation and cooling efficiency.

Figure 9: Freezer interior with basket and food items.

Figure 10: Removable storage basket.
6. Maintenance
6.1 Defrosting
This is a manual defrost freezer. Defrosting should be performed when the frost layer reaches approximately 0.2 inches (5 mm) thick.
- Preparation: Unplug the freezer from the power outlet. Remove all food items and store them in another freezer or cooler to keep them frozen.
- Drainage: Locate the front-mount drain plug at the bottom of the freezer. Place a shallow pan or towel beneath the drain to collect water. Remove the drain plug to allow water to flow out.
- Melting Frost: Leave the lid open to allow the frost to melt naturally. You can place bowls of warm water inside the freezer to speed up the process, but avoid using sharp objects or heating elements to remove frost, as this can damage the freezer.
- Cleaning: Once all frost has melted, clean the interior with a mild detergent and warm water. Rinse and dry thoroughly.
- Restart: Replace the drain plug, plug the freezer back in, and allow it to cool for a few hours before returning food items.

Figure 11: Exterior drain plug for defrosting.
6.2 Cleaning the Exterior
Wipe the exterior surfaces with a soft cloth dampened with mild detergent and water. Dry thoroughly to prevent streaks.
6.3 Power Outage
In case of a power outage, keep the freezer lid closed to maintain the internal temperature for as long as possible. The freezer can typically keep food frozen for several hours if unopened.
7. Troubleshooting
| Problem | Possible Cause | Solution |
|---|---|---|
| Freezer does not operate. |
|
|
| Freezer is not cold enough. |
|
|
| Excessive frost buildup. |
|
|
| Freezer makes too much noise. |
|
|
8. Specifications

Figure 12: Product dimensions.
| Feature | Detail |
|---|---|
| Brand | Koolatron |
| Model Name | KTCF155 |
| Capacity | 5.0 Cubic Feet (142 Liters) |
| Product Dimensions (D x W x H) | 21.75" x 33.75" x 33.75" |
| Item Weight | 62.2 pounds |
| Color | Pearl White |
| Defrost Type | Manual |
| Voltage | 115 Volts |
| Wattage | 150 watts |
| Annual Energy Consumption | 218 Kilowatt Hours |
| Included Components | 1 x hanging basket |
| Installation Type | Freestanding |
| Material Type | Steel |
| Certification | DOE |
9. Warranty and Support
Your Koolatron KTCF155 Chest Freezer comes with a one-year warranty from the date of purchase. This warranty covers defects in materials and workmanship under normal use.
For warranty claims or technical support, please retain your purchase receipt and contact Koolatron customer service. Do not attempt to repair the appliance yourself, as this may void the warranty.
For further assistance, please refer to the contact information provided with your purchase documentation or visit the official Koolatron website.


