Introduction
This manual provides instructions for the installation, operation, and maintenance of your LiftMaster Garage Door Opener Safety Sensors, Model 041A5034. These sensors are designed to enhance the safety of your garage door system by detecting obstructions in the door's path.
Please read these instructions carefully before beginning installation or operation. Retain this manual for future reference.
Important Safety Information
WARNING: Garage door openers can cause serious injury or death if not installed and operated correctly. Always follow all safety warnings and instructions.
- Disconnect power to the garage door opener before performing any installation or maintenance.
- Ensure the garage door opener is properly installed and balanced before installing safety sensors.
- Do not allow children to play with or near the garage door opener or its controls.
- Test the safety reversal system monthly.
Package Contents
Your package should contain the following items:
- One (1) Pair of LiftMaster Safety Sensors (Transmitter and Receiver)
Note: Brackets and additional wiring are not included with this product.
Installation Instructions
Tools Required
- Wire cutters
- Pliers (for crimping connections)
- Level (recommended for alignment)
Step-by-Step Installation
- Disconnect Power: Unplug the garage door opener from the power outlet or turn off the circuit breaker.
- Identify Sensors: The safety sensor system consists of two units: a sending eye (transmitter) and a receiving eye (receiver). The sending eye typically has an amber LED, and the receiving eye has a green LED.
- Mounting: Mount the sensors on each side of the garage door opening, approximately 6 inches (15 cm) above the floor. Ensure they are securely fastened and facing each other.
- Wiring:
- Locate the existing sensor wires from your garage door opener.
- Separate the two wires from each sensor. Do not strip the wires.
- Insert the wires into the appropriate terminals on the garage door opener. Consult your garage door opener's manual for specific wiring instructions.
- Connect the wires from the sending eye to the corresponding terminals (usually white and white/black striped).
- Connect the wires from the receiving eye to the corresponding terminals.
- Use pliers to crimp the connections securely.
- Restore Power: Plug the garage door opener back into the power outlet or turn on the circuit breaker.
- Alignment:
- The amber LED on the sending eye should glow steadily.
- The green LED on the receiving eye should glow steadily when properly aligned.
- If the green LED is flashing or off, adjust the sensors until both LEDs glow steadily. A level can assist in ensuring proper horizontal alignment.
- Tip: If one side of your garage receives more direct sunlight, place the sensor with the green LED (receiving eye) on the shaded side to minimize interference.

Image of the LiftMaster Garage Door Opener Safety Sensors (Model 041A5034) with attached wiring. The two black sensor units are connected by white and white/black striped wires, bundled together with a yellow tie. This image shows the overall product as it comes in the package.
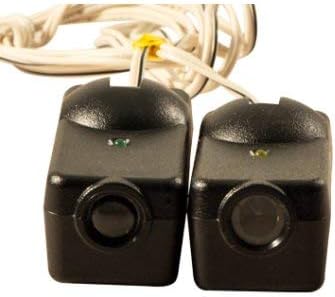
Close-up view of the LiftMaster Safety Sensors, highlighting the lenses and the small LED indicators (one green, one amber) on top of each sensor. This view helps in identifying the sending and receiving units and their operational status.
Operation
Once properly installed and aligned, the safety sensors continuously monitor the area across the garage door opening.
- If an obstruction breaks the infrared beam while the door is closing, the garage door will automatically reverse to the fully open position.
- If the beam is obstructed while the door is open, the door will not close until the obstruction is removed and the beam is clear.
- The garage door opener's light will typically flash if the safety sensors detect an obstruction or are misaligned.
Maintenance
- Regular Cleaning: Periodically clean the sensor lenses with a soft, dry cloth to remove dust, dirt, or spiderwebs that may obstruct the beam.
- Alignment Check: Regularly check that both the amber and green LEDs on the sensors are glowing steadily. If either is off or flashing, realign the sensors.
- Wiring Inspection: Inspect the wiring for any signs of damage or loose connections. Repair or replace as necessary.
- Monthly Safety Test:
- With the garage door fully open, place an object (e.g., a cardboard box) in the path of the safety sensor beam.
- Press the garage door opener's close button.
- The door should not close and should reverse if it starts to move. If the door closes, the safety reversal system is not working correctly, and the opener should be serviced immediately.
Troubleshooting
| Problem | Possible Cause | Solution |
|---|---|---|
| Garage door does not close, opener lights flash. | Safety sensors are misaligned or obstructed. | Check for obstructions in the beam path. Clean sensor lenses. Realign sensors until both LEDs glow steadily. |
| Green LED is off or flashing. | Receiving eye is misaligned, obstructed, or has a wiring issue. | Ensure the receiving eye (green LED) is properly aligned with the sending eye (amber LED). Check wiring connections. |
| Amber LED is off. | Sending eye has a wiring issue or is faulty. | Check wiring connections to the sending eye. If wiring is secure and power is on, the sensor may be faulty and require replacement. |
| Door reverses unexpectedly. | Intermittent obstruction or misalignment. | Ensure sensors are securely mounted and not vibrating. Check for objects that might temporarily break the beam (e.g., sunlight interference, shadows). Consider placing the green LED sensor on the shaded side of the garage. |
Specifications
- Model: 041A5034
- Part Number: CECOMINOD052535
- Compatibility: Garage door openers manufactured after 1997 (Chamberlain/LiftMaster)
- Installation Type: Screw-In
- Product Dimensions: Approximately 2 x 2 x 1 inches (5.08 x 5.08 x 2.54 cm) per sensor
- Item Weight: Approximately 5.1 ounces (0.14 kg) for the pair
- Material: Aluminum (housing)
- Color: Black
- Batteries: Not required
Warranty and Support
For warranty information or technical support, please refer to the official LiftMaster website or contact their customer service.


