Introduction
Thank you for purchasing the Westinghouse 3-Light Oil Rubbed Bronze Wall Sconce. This manual provides detailed instructions for the safe installation, operation, and maintenance of your new lighting fixture. Please read this manual thoroughly before beginning installation and retain it for future reference.
Safety Information
WARNING: Risk of electric shock. Disconnect power at the fuse box or circuit breaker before installation or servicing.
- All electrical connections must be in accordance with local codes, ordinances, or the National Electric Code (NEC).
- Consult a qualified electrician if you are unsure about the installation process.
- Use only the specified bulb type and wattage. Exceeding the maximum wattage may cause overheating.
- Do not install this fixture in wet locations unless specifically rated for such use.
- Handle glass components with care to prevent breakage.
- Ensure all wires are properly secured and insulated.
Package Contents
Carefully unpack your fixture and check that all parts are included. If any parts are missing or damaged, contact Westinghouse customer service before proceeding with installation.
- Wall Sconce Fixture (1)
- Mounting Hardware Kit (1) - typically includes mounting strap, outlet box screws, wire nuts, ground screw.
- Instruction Manual (1)
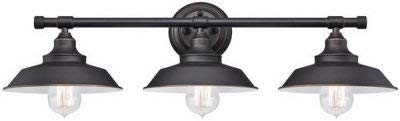
Image: The Westinghouse 3-Light Oil Rubbed Bronze Wall Sconce, featuring three downward-facing light shades attached to a horizontal bar, with a central mounting plate. The fixture has a dark, oil-rubbed bronze finish.
Installation / Setup
Tools Required (not included): Phillips screwdriver, flathead screwdriver, wire strippers, electrical tape, safety glasses.
- Turn Off Power: Locate the circuit breaker or fuse box that supplies power to the light fixture location. Turn off the power completely before beginning any work.
- Prepare Mounting Surface: If replacing an existing fixture, carefully remove it. Ensure the electrical outlet box is securely mounted to the wall structure.
- Attach Mounting Strap: Secure the mounting strap (usually included in hardware kit) to the electrical outlet box using the provided outlet box screws. Ensure the strap is oriented correctly for the fixture.
- Make Electrical Connections:
- Connect the bare copper or green ground wire from the fixture to the ground wire from the outlet box (usually bare copper or green) using a wire nut. If no ground wire is present in the outlet box, attach the fixture's ground wire to the ground screw on the mounting strap.
- Connect the white (neutral) wire from the fixture to the white (neutral) wire from the outlet box using a wire nut.
- Connect the black (hot) wire from the fixture to the black (hot) wire from the outlet box using a wire nut.
- Ensure all wire nuts are securely tightened and no bare wire is exposed. Wrap connections with electrical tape if desired for added security.
- Mount Fixture: Carefully tuck all wires into the outlet box. Align the fixture's mounting holes with the screws on the mounting strap. Secure the fixture to the mounting strap using the decorative nuts or screws provided.
- Install Bulbs: Insert the appropriate light bulbs (not included) into the sockets. Refer to the "Specifications" section for recommended bulb type and maximum wattage.
- Restore Power: Once installation is complete and all connections are secure, turn the power back on at the circuit breaker or fuse box.
Operation
The Westinghouse 3-Light Oil Rubbed Bronze Wall Sconce is designed to be operated via a standard wall switch. Once installed and powered, simply toggle the wall switch connected to the fixture to turn the lights on or off.
Note: While some Westinghouse products may feature remote control capabilities, this specific wall sconce model (63434) is typically controlled by a standard wall switch.
Maintenance
- Cleaning: To clean the fixture, ensure power is off. Wipe with a soft, dry cloth. Do not use abrasive cleaners, solvents, or polishes as they may damage the finish.
- Bulb Replacement: Always turn off power at the circuit breaker before replacing bulbs. Allow bulbs to cool before touching. Replace with bulbs of the same type and wattage, not exceeding the maximum specified wattage.
- Periodic Check: Periodically check all electrical connections and mounting hardware to ensure they remain secure.
Troubleshooting
| Problem | Possible Cause | Solution |
|---|---|---|
| Light does not turn on. |
|
|
| Lights flicker. |
|
|
Specifications
| Feature | Detail |
|---|---|
| Brand | Westinghouse |
| Model Number | 63434 |
| UPC | 024034634345 |
| Material | Iron, Metal |
| Finish | Oil Rubbed Bronze |
| Light Sources | 3 |
| Power Source | Corded Electric |
| Control Method | Wall Switch (Note: Product specifications may list "Remote" as a general feature for the brand, but this model is typically wall switch controlled.) |
| Item Weight | 10.56 pounds (4.79 kg) |
| Product Dimensions (L x W x H) | 31.1 x 31.1 x 11.02 inches (79 x 79 x 28 cm) |
| Mounting Type | Wall Mount |
Warranty and Support
For warranty information or technical support, please contact Westinghouse customer service. Keep your purchase receipt for warranty claims.
You can typically find contact information on the Westinghouse official website or on the product packaging.
Online Resources: For additional information and FAQs, visit the official Westinghouse website: www.westinghouselighting.com


