
1. Product Overview
This manual provides instructions for the installation, operation, and maintenance of the FLYPIG Carburetor. This carburetor is designed as a replacement part for various Stihl outdoor power equipment models, ensuring proper fuel-air mixture for optimal engine performance.
1.1 Compatibility
This carburetor is compatible with a range of Stihl models and replaces several OEM part numbers. Please verify compatibility with your specific equipment before installation.
- Replaces MPN: 41801200610, 4180 120 0610, C1Q-S173, 41801200611, 4180 120 0611, C1Q-S174, 41801200613, 4180 120 0613, C1Q-S176, C1Q-S131, 4180-120-0607, 4180-120-0608, 4180-120-0610, 4180-120-0611, 4180-120-0613
- Fits Stihl Models: FR130T, FS110, FS130, FS130R, HT130, HT131, KM130, FS90R, KM90, KM90R, KM100, KM100R, KM110R, KM110, KM130R, FS87, FS87R, FS90, FS90K, FS100, FS100RX, FS100R, FS110X, FS110RX, SP90, SP90T
- For Stihl Pole Pruner: HT100, HT101, HT130, HT131
- For Stihl Edger: FC110, FC100, FC95, FC90
- For Stihl Hedge Trimmer: HL90, HL95, HL95K, HL100, HL100K, HL101, HL110

Image 1.1: The FLYPIG Carburetor. This image displays the main carburetor unit, showing its general shape and components, including the primer bulb and throttle linkage.
2. Safety Information
Always prioritize safety when working with fuel systems and power equipment. Failure to follow safety precautions can result in serious injury or property damage.
- Fuel Handling: Work in a well-ventilated area. Avoid open flames, sparks, or smoking near fuel. Use an approved fuel container.
- Eye Protection: Always wear safety glasses or goggles to protect your eyes from fuel, debris, or carburetor cleaner.
- Gloves: Wear appropriate gloves to protect your hands from fuel and chemicals.
- Engine Cool Down: Allow the engine to cool completely before performing any maintenance or installation. Hot engine parts can cause burns.
- Disconnect Spark Plug: Before working on the engine, disconnect the spark plug wire to prevent accidental starting.
- Professional Assistance: If you are unsure about any step, consult a qualified service technician.

Image 2.1: Safety Warning Symbol. This image depicts a red triangular warning sign with an exclamation mark, indicating the importance of safety precautions.
3. Setup and Installation
The following steps provide a general guide for replacing a carburetor. Specific procedures may vary depending on your Stihl equipment model. Refer to your equipment's service manual for detailed instructions.
- Preparation: Ensure the engine is off and cool. Disconnect the spark plug wire. Drain any fuel from the tank if necessary.
- Access the Carburetor: Remove any air filter covers, air filters, or other components that obstruct access to the carburetor.
- Disconnect Fuel Lines: Carefully disconnect the fuel lines from the old carburetor. Be prepared for minor fuel spills and have rags ready. Note the routing of the fuel lines for correct reinstallation.
- Disconnect Linkages: Disconnect the throttle and choke linkages from the old carburetor. Take note of how they are connected.
- Remove Old Carburetor: Unscrew the mounting bolts or nuts that secure the carburetor to the engine intake. Carefully remove the old carburetor and any gaskets.
- Install New Carburetor: Place new gaskets (if supplied and required) onto the intake manifold. Position the new FLYPIG carburetor, ensuring it aligns correctly. Secure it with the mounting bolts/nuts, tightening them evenly.
- Reconnect Linkages: Reattach the throttle and choke linkages to the new carburetor. Ensure they operate smoothly without binding.
- Reconnect Fuel Lines: Reconnect the fuel lines to the appropriate ports on the new carburetor. Ensure connections are secure to prevent leaks.
- Reassemble: Reinstall the air filter, air filter cover, and any other components removed during disassembly.
- Reconnect Spark Plug: Reconnect the spark plug wire.
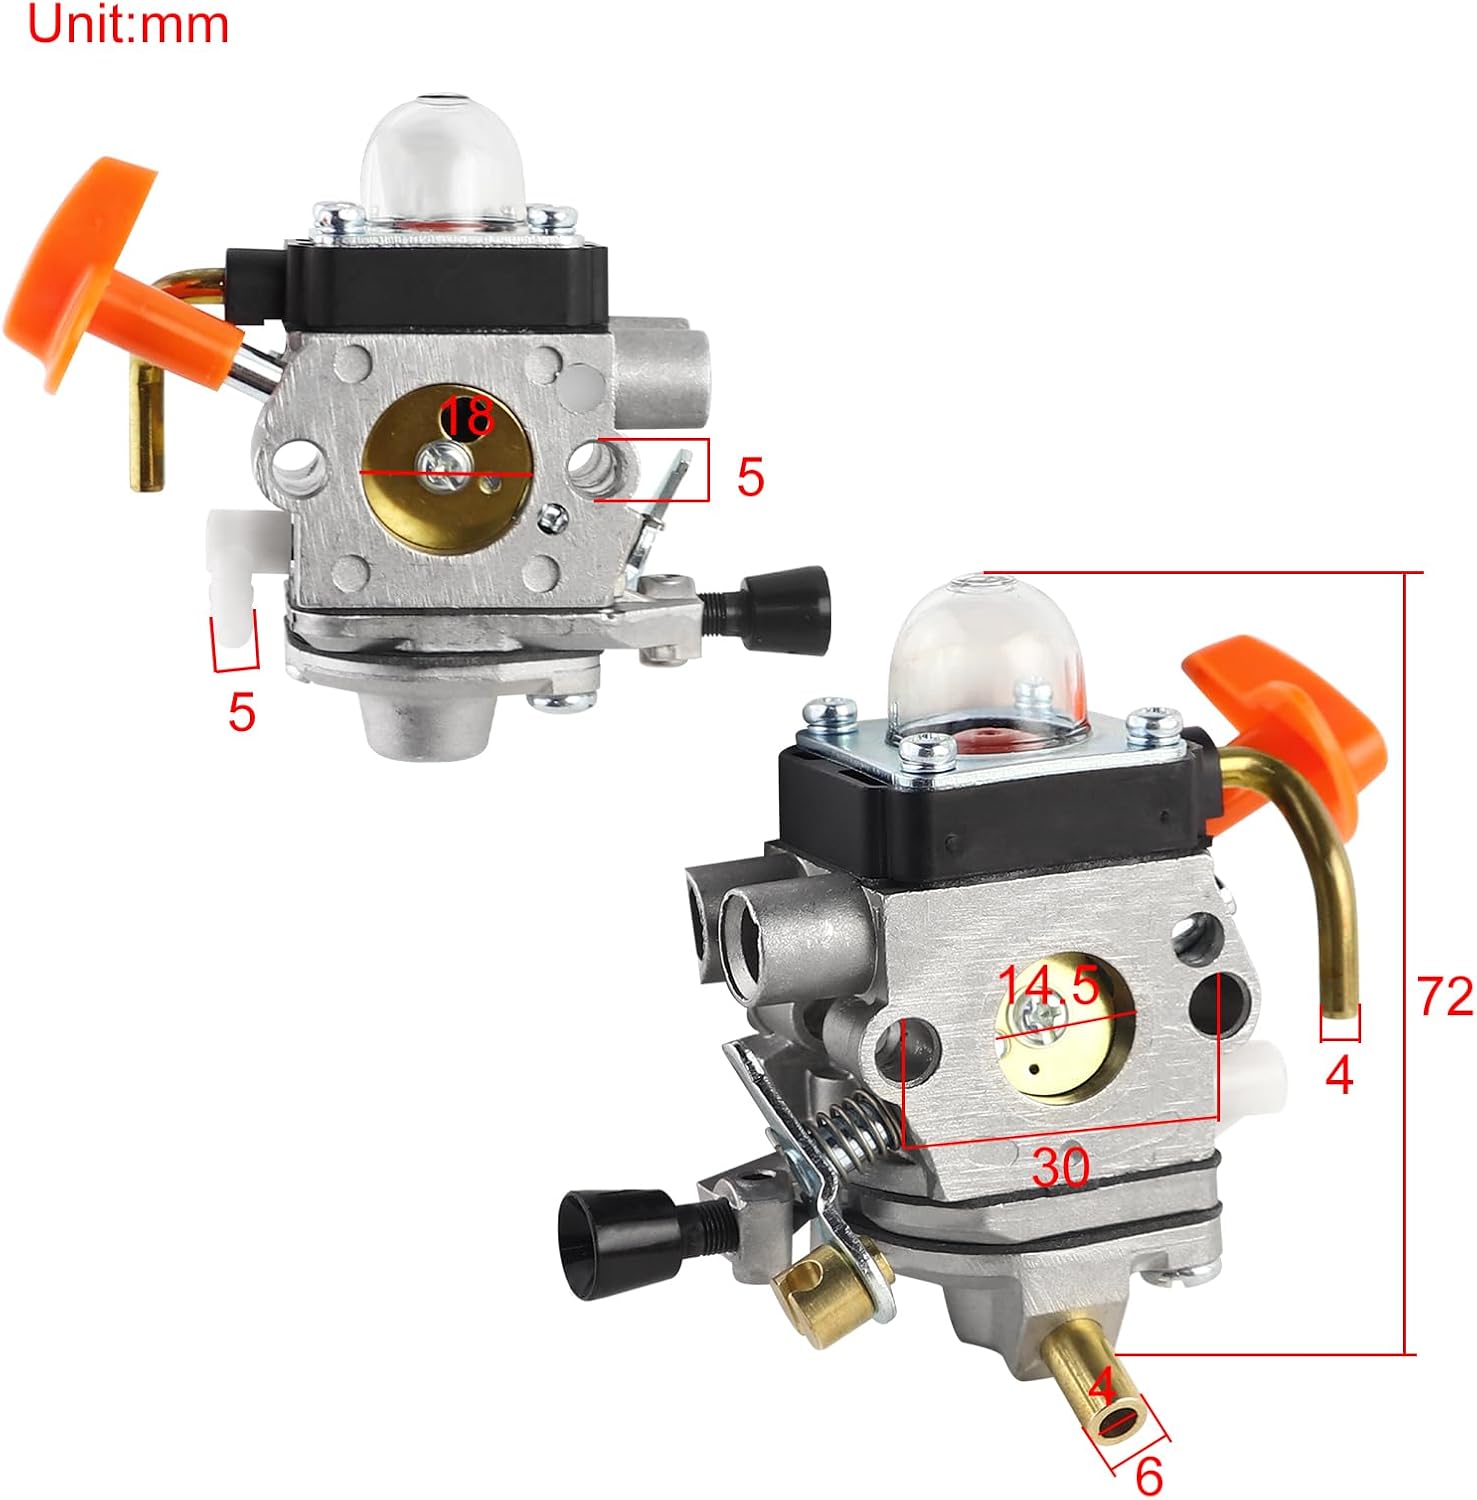
Image 3.1: FLYPIG Carburetor with key dimensions. This image provides various views of the carburetor with measurements in millimeters, useful for verifying fitment.
4. Operation and Adjustment
After installation, the carburetor may require minor adjustments for optimal performance. This carburetor features adjustable high and low jet settings, similar to original equipment.
- Fueling: Fill the fuel tank with the correct fuel mixture as specified by your Stihl equipment manufacturer.
- Priming: Press the primer bulb several times until fuel is visible in the bulb and flows freely.
- Starting: Follow your equipment's specific starting procedure (e.g., choke position, pull cord).
- Idle Adjustment: Once the engine is warm, adjust the idle screw (usually marked 'LA' or 'T') to achieve a smooth, consistent idle speed.
- High/Low Jet Adjustment: If the engine runs poorly at high or low RPMs, the high (H) and low (L) mixture screws may need fine-tuning. These adjustments typically require specialized tools and knowledge. Adjust in small increments (e.g., 1/8 turn) and test performance. Turning screws clockwise leans the mixture, counter-clockwise enriches it.
Note: Incorrect carburetor adjustments can damage the engine. If you are unfamiliar with these adjustments, it is recommended to seek professional assistance.
5. Maintenance
Regular maintenance of your carburetor and fuel system will ensure reliable operation and extend the life of your equipment.
- Fuel Quality: Always use fresh, clean fuel mixed according to your equipment manufacturer's specifications. Stale or contaminated fuel is a common cause of carburetor issues.
- Fuel Filter: Regularly inspect and replace the fuel filter in the fuel tank. A clogged fuel filter can restrict fuel flow to the carburetor.
- Air Filter: Keep the air filter clean. A dirty air filter can restrict airflow, causing the engine to run rich and affect carburetor performance.
- Carburetor Cleaning: If performance issues arise, the carburetor may need cleaning. This involves disassembling the carburetor and cleaning its internal passages with carburetor cleaner. This task is best performed by experienced individuals or a service technician.
- Storage: Before long-term storage, drain the fuel system or use a fuel stabilizer to prevent fuel degradation and gumming in the carburetor.
6. Troubleshooting
This section addresses common issues related to carburetor function. If problems persist, consult a qualified service technician.
| Problem | Possible Cause | Solution |
|---|---|---|
| Engine will not start | No fuel, clogged fuel filter, clogged carburetor, incorrect choke setting, spark plug issue | Check fuel level and quality, replace fuel filter, clean carburetor, adjust choke, check/replace spark plug |
| Engine runs rough/stalls | Dirty air filter, incorrect fuel mixture, carburetor out of adjustment, vacuum leak | Clean/replace air filter, use fresh fuel, adjust carburetor (idle/mixture), check for loose connections |
| Lack of power | Clogged fuel filter, dirty air filter, carburetor running lean/rich, restricted exhaust | Replace fuel filter, clean/replace air filter, adjust carburetor mixture, check exhaust for blockages |
| Fuel leaks | Loose fuel lines, damaged gaskets, faulty primer bulb | Tighten fuel line clamps, replace gaskets, replace primer bulb |
7. Specifications
Key specifications for the FLYPIG Carburetor.
- Brand: FLYPIG
- Model: Carburetor (Replacement for Stihl FS87, FS90, FS100 series and others)
- Flange Type: Bolt On
- Product Dimensions: Approximately 1.77"D x 1.38"W x 2.83"H (45mm D x 35mm W x 72mm H)
- Item Weight: Approximately 5.2 ounces
- OEM Part Numbers Replaced: ZAMA C1Q-S131, C1Q-S173, C1Q-S174, C1Q-S176, 41801200613, 41801200611, 41801200610
- UPC: 699949409533

Image 7.1: Top view of the FLYPIG Carburetor. This perspective highlights the primer bulb and the general layout of the top components.
8. Warranty and Support
For warranty information or technical support regarding your FLYPIG Carburetor, please refer to the seller or manufacturer's official contact channels. Keep your purchase receipt for any warranty claims.
For general information or to explore other products, you may visit the FLYPIG Store on Amazon.