Introduction
This manual provides detailed instructions for the setup, operation, and maintenance of your Blaupunkt CLR 180 BK Digital FM Clock Radio. Please read this manual thoroughly before using the device to ensure proper functionality and to maximize your user experience. Keep this manual for future reference.
Safety Instructions
- Do not expose the unit to rain, moisture, or extreme temperatures.
- Ensure proper ventilation; do not block any ventilation openings.
- Use only the power adapter supplied with the unit or a compatible replacement.
- Do not attempt to disassemble or modify the unit. Refer all servicing to qualified personnel.
- Keep the unit away from strong magnetic fields.
- Clean the unit only with a soft, dry cloth. Do not use liquid cleaners or aerosols.
Package Contents
Please check that all items are present:
- Blaupunkt CLR 180 BK Digital FM Clock Radio Unit
- Power Adapter
- User Manual (this document)
Product Overview
The Blaupunkt CLR 180 BK features a clear LED display and intuitive controls for easy operation.
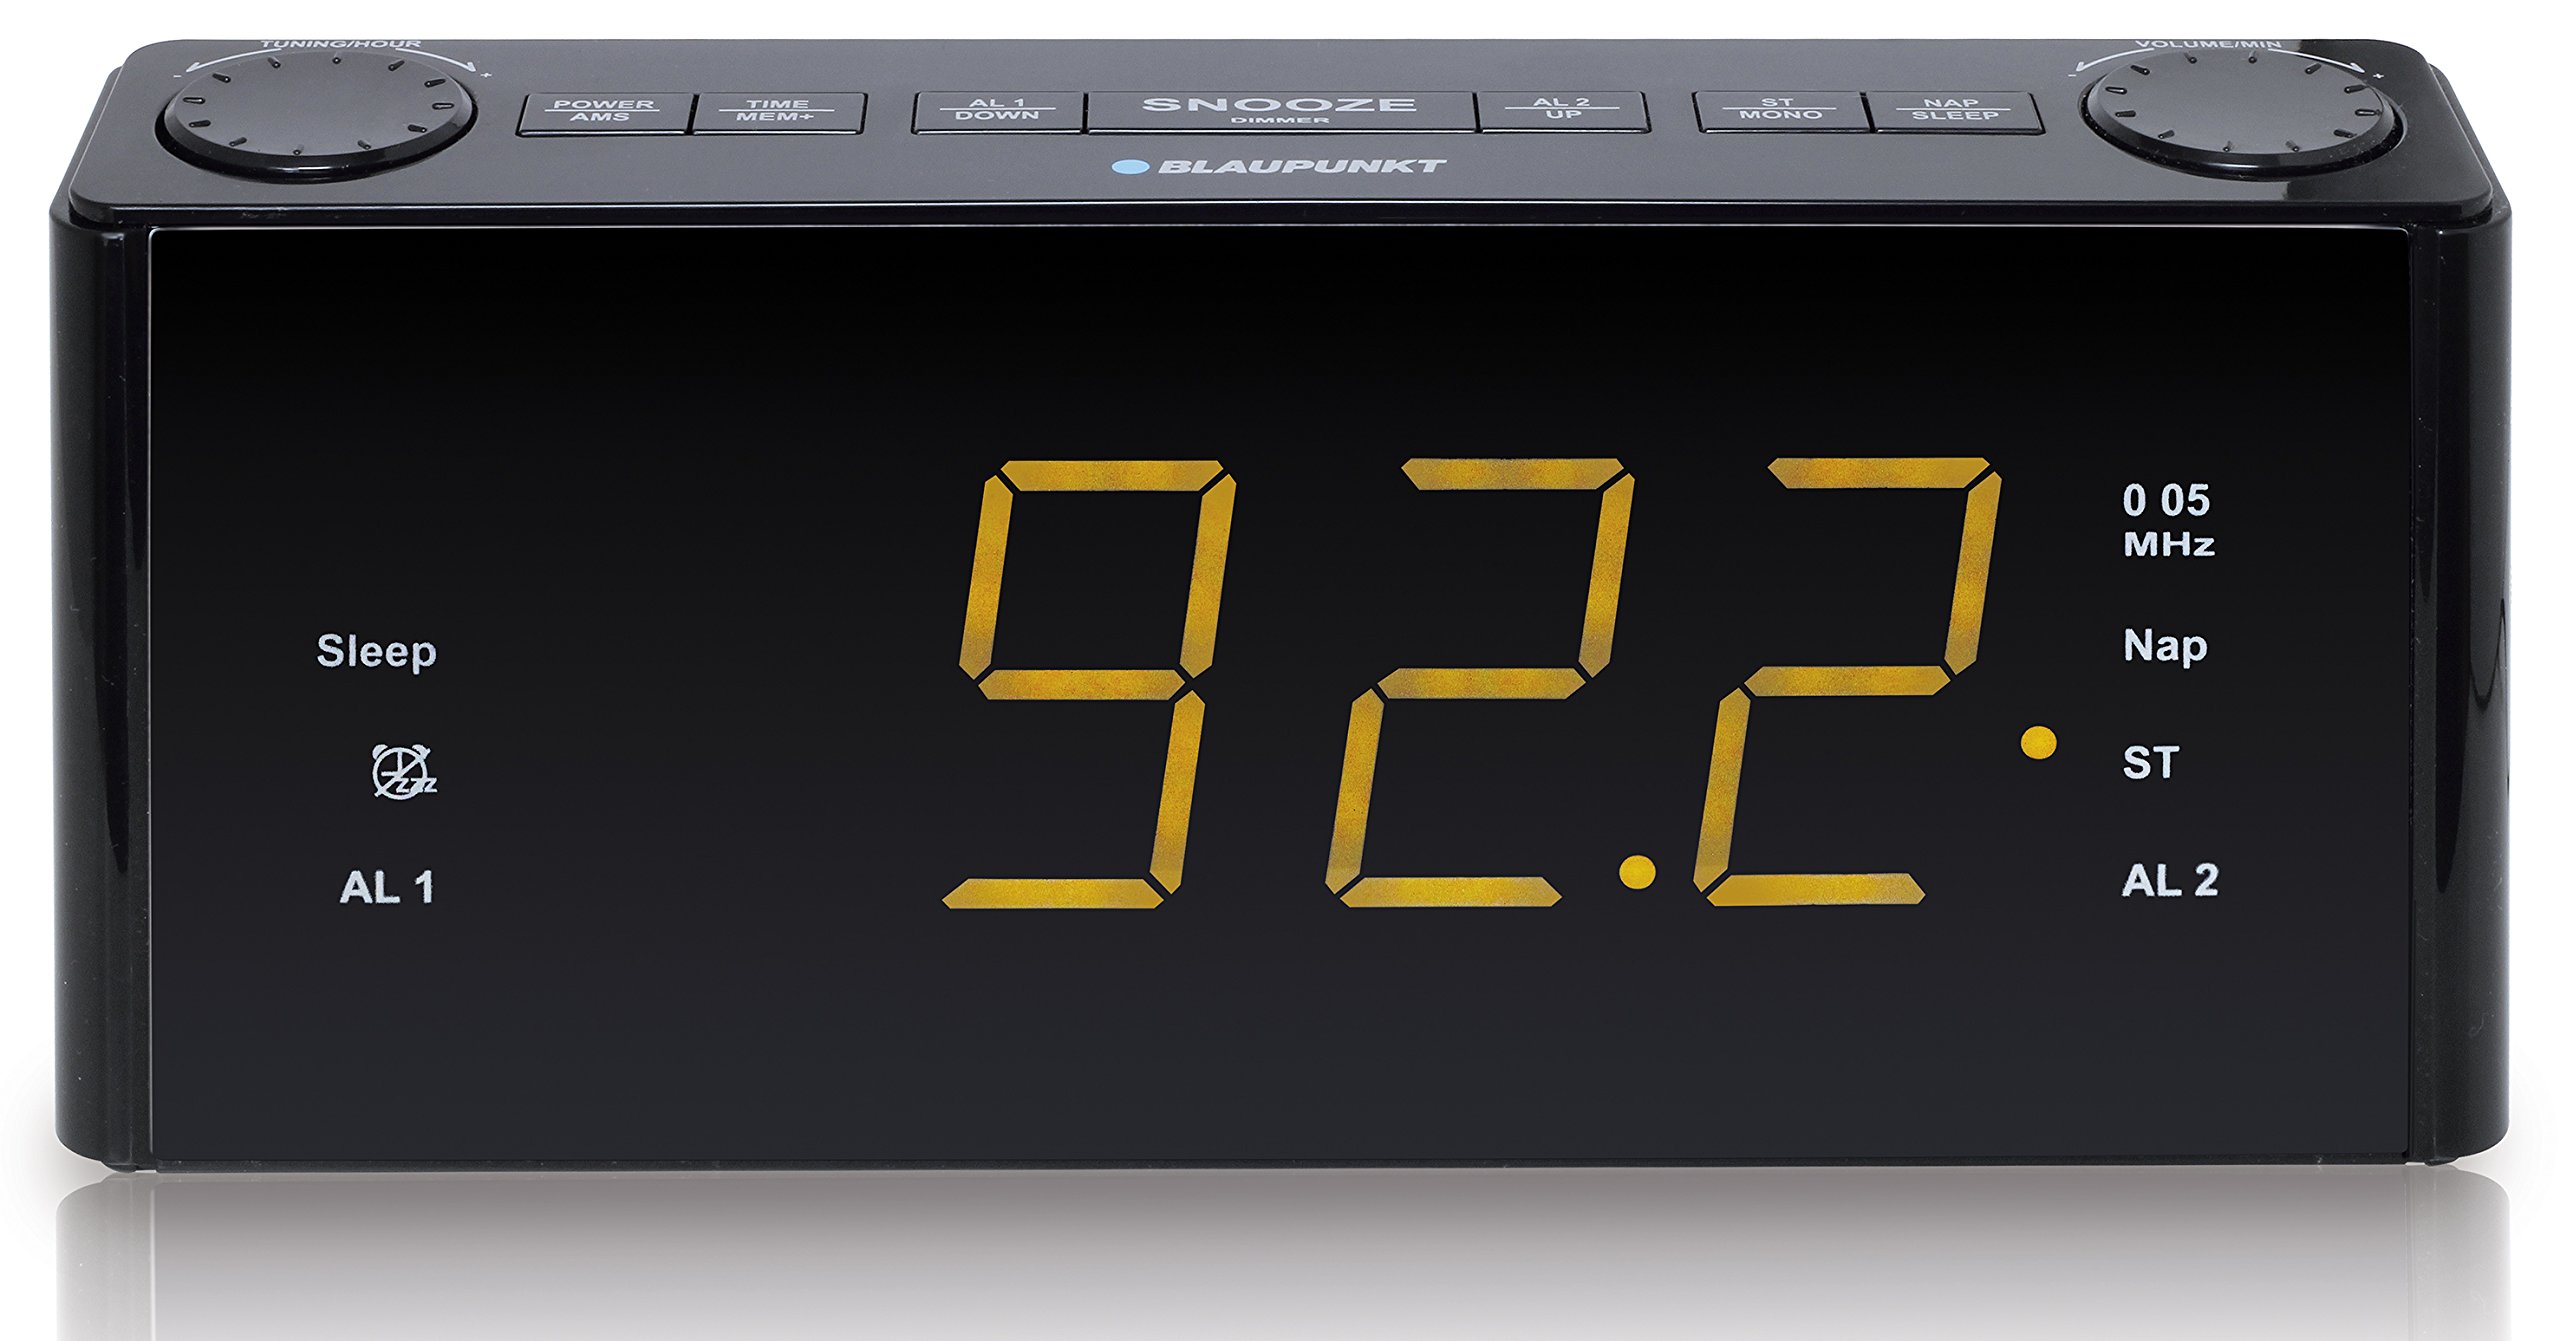
Figure 1: Front view of the Blaupunkt CLR 180 BK Clock Radio. The display shows the time, alarm indicators (AL1, AL2), sleep mode, NAP timer, and radio frequency/stereo indicators.
Display Elements:
- Time Display: Large amber LED digits for current time.
- Sleep Indicator: Illuminates when the sleep timer is active.
- AL 1 / AL 2 Indicators: Light up when Alarm 1 or Alarm 2 is set.
- MHz Indicator: Shows when the display is indicating radio frequency.
- Nap Indicator: Illuminates when the NAP timer is active.
- ST (Stereo) Indicator: Lights up when FM stereo reception is active.
Controls:
(Specific button functions are typically located on the top or rear of the unit. Please refer to the physical unit for exact button placement.)
- Power/Standby Button: Turns the unit on/off.
- Time Set Button: For manual time adjustment.
- Alarm 1 / Alarm 2 Buttons: To set and activate individual alarms.
- Tuning Buttons (Up/Down): For radio frequency adjustment and menu navigation.
- Volume Buttons (+/-): To adjust audio volume.
- Snooze/Dimmer Button: Temporarily silences the alarm and adjusts display brightness.
- Sleep Button: Activates the sleep timer function.
- NAP Button: Activates the NAP timer function.
- Preset Buttons: To store and recall radio stations.
- AUX-IN Jack: For connecting external audio devices.
Setup
1. Power Connection:
- Connect the power adapter to the DC IN jack on the back of the clock radio.
- Plug the power adapter into a standard wall outlet.
- The display will light up, and the unit will enter standby mode.
2. Initial Time Setting:
The CLR 180 BK supports automatic time setting via RDS (Radio Data System) when tuned to an FM station broadcasting RDS time signals. Alternatively, you can set the time manually.
Automatic Time Setting (via RDS):
- Ensure the FM antenna is fully extended for optimal reception.
- Turn on the radio and tune to a strong FM station that broadcasts RDS signals.
- The clock radio will automatically synchronize its time with the RDS signal. This may take a few minutes.
Manual Time Setting:
- In standby mode, press and hold the Time Set button. The hour digits will flash.
- Use the Tuning Up/Down buttons to adjust the hour.
- Press the Time Set button again. The minute digits will flash.
- Use the Tuning Up/Down buttons to adjust the minutes.
- Press the Time Set button once more to confirm and exit time setting mode.
Operating Instructions
1. Radio Operation (FM):
- Press the Power button to turn on the radio.
- Press the FM button (if available, or cycle modes until FM is selected).
- Use the Tuning Up/Down buttons to manually tune to a desired frequency. Press and hold for auto-scan to the next strong station.
- Adjust the volume using the Volume +/- buttons.
Storing and Recalling Presets:
- Tune to the desired station.
- Press and hold a Preset Number button (e.g., P1, P2) until the display confirms storage. The unit supports up to 20 presets.
- To recall a stored station, simply press the corresponding Preset Number button.
2. Setting Alarms (AL1 & AL2):
The clock radio features two independent alarms.
- In standby mode, press and hold the AL1 or AL2 button. The alarm hour digits will flash.
- Use the Tuning Up/Down buttons to set the desired alarm hour.
- Press the AL1 or AL2 button again. The alarm minute digits will flash.
- Use the Tuning Up/Down buttons to set the desired alarm minutes.
- Press the AL1 or AL2 button once more to select the alarm source (Buzzer or FM Radio). Use Tuning Up/Down to choose.
- Press the AL1 or AL2 button again to confirm and exit alarm setting mode. The corresponding AL indicator will light up on the display.
- To deactivate an alarm, press the corresponding AL1 or AL2 button once. The indicator will turn off.
3. Snooze Function:
When an alarm sounds, press the Snooze/Dimmer button to temporarily silence it. The alarm will sound again after approximately 9 minutes.
4. NAP Timer:
The NAP timer allows for a short sleep period. The alarm will sound after the set duration.
- In standby mode, press the NAP button repeatedly to cycle through available NAP durations (e.g., 10, 20, 30, 60, 90, 120 minutes).
- The NAP indicator will light up, and the display will show the remaining NAP time.
- To cancel the NAP timer, press the NAP button until the indicator turns off.
5. Sleep Timer:
The sleep timer allows you to fall asleep to the radio, which will automatically turn off after a set period (up to 120 minutes).
- While the radio is playing, press the Sleep button repeatedly to cycle through sleep durations (e.g., 10, 20, 30, 60, 90, 120 minutes).
- The Sleep indicator will light up, and the display will show the remaining sleep time.
- To cancel the sleep timer, press the Sleep button until the indicator turns off.
6. AUX-IN Functionality:
Connect an external audio device (e.g., smartphone, MP3 player) to the clock radio using a 3.5mm audio cable (not included).
- Connect one end of the 3.5mm audio cable to the AUX-IN jack on the clock radio.
- Connect the other end to the headphone jack or AUX-OUT of your external audio device.
- Press the Mode button (if available, or cycle modes) until "AUX" or "LINE IN" appears on the display.
- Start playback on your external device.
- Adjust the volume using the clock radio's Volume +/- buttons and/or your external device's volume control.
Maintenance
Cleaning:
- Always unplug the unit from the power outlet before cleaning.
- Use a soft, dry, lint-free cloth to wipe the exterior surfaces.
- Do not use abrasive cleaners, waxes, or solvents as they may damage the finish.
- For stubborn marks, lightly dampen the cloth with water, then wipe dry immediately.
Storage:
If you plan to store the unit for an extended period, unplug it from the power source and store it in a cool, dry place, away from direct sunlight and extreme temperatures.
Troubleshooting
| Problem | Possible Cause | Solution |
|---|---|---|
| No power / Display off | Power adapter not connected or faulty. Power outlet not working. | Ensure the power adapter is securely plugged into both the unit and a working wall outlet. Try a different outlet. |
| Poor FM radio reception | Antenna not fully extended. Interference from other electronic devices. Weak signal in the area. | Fully extend the FM wire antenna. Reposition the unit away from other electronics. Try tuning to a stronger station. |
| Alarm does not sound | Alarm not activated. Alarm volume too low (for radio alarm). | Ensure the AL1/AL2 indicator is lit on the display. Check the alarm volume setting if using radio as the alarm source. |
| Display is too bright/dim | Display brightness setting needs adjustment. | Press the Snooze/Dimmer button (or dedicated dimmer button) to cycle through brightness levels. |
| Time is incorrect | RDS signal not received or manual time not set correctly. | Ensure good FM reception for RDS. Manually set the time as per "Initial Time Setting" section. |
Specifications
- Model: CLR 180 BK
- Display Type: Digital LED (Amber)
- Screen Size: 1.8 inches
- Radio: FM Stereo with PLL & RDS
- Presets: 20 FM stations
- Alarms: 2 independent alarms (Buzzer or Radio)
- Special Features: Snooze, NAP Timer, Sleep Timer (up to 120 minutes)
- Connectivity: AUX-IN (3.5mm)
- Speakers: 2 x 0.8 W RMS stereo speakers
- Dimensions (L x W x H): 25 x 5 x 10 cm (approximately 9.8 x 2 x 3.9 inches)
- Weight: 800 grams (approximately 1.76 lbs)
- Power Source: AC Power Adapter (Batteries not included for backup)
Warranty and Support
Blaupunkt products are designed and manufactured to the highest quality standards. For warranty information and technical support, please refer to the warranty card included with your product or visit the official Blaupunkt website for your region. Please have your model number (CLR 180 BK) and purchase details ready when contacting support.
For further assistance, you may also contact your local retailer.