Introduction
This manual provides comprehensive instructions for the setup, operation, and maintenance of your GPX Digital AM/FM Clock Radio, model C224B. Please read this manual thoroughly before using the device to ensure proper functionality and to maximize your user experience. Keep this manual for future reference.
Product Overview
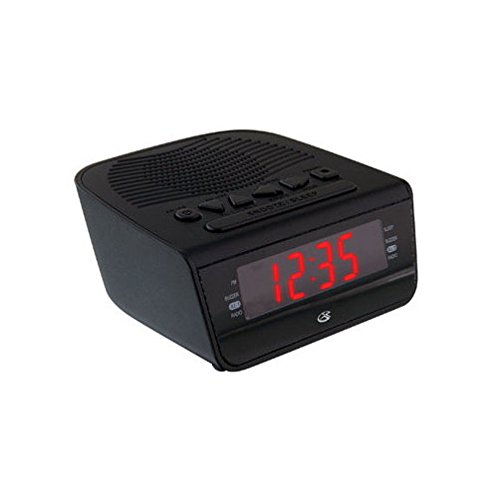
Figure 1: Front view of the GPX Digital AM/FM Clock Radio. This image shows the compact black unit with its digital display and control buttons.
The GPX Digital AM/FM Clock Radio (C224B) is designed for reliable timekeeping and audio entertainment. Key features include a clear multi-display clock, AM/FM radio tuner, dual alarm functionality, and a battery backup option to ensure continuous operation during power interruptions. Its compact and modern design makes it suitable for various indoor settings.
Setup
1. Unpacking
Carefully remove the clock radio from its packaging. Ensure all components are present: the clock radio unit and the power adapter.
2. Power Connection
- Plug the power adapter into the DC input jack located on the back of the clock radio.
- Plug the other end of the power adapter into a standard wall outlet (AC 120V, 60Hz).
- The display will illuminate, indicating the unit is receiving power.
3. Battery Backup Installation (Optional)
For backup power during outages, install batteries (not included).
- Locate the battery compartment on the bottom of the unit.
- Open the battery compartment cover.
- Insert the required batteries (e.g., 2 x AAA, check unit for specific type) according to the polarity markings (+ and -).
- Close the battery compartment cover securely.
Note: Batteries are for backup only and will not power the display or radio functions continuously. They preserve time and alarm settings during a power interruption.
Operating Instructions
1. Setting the Time
- Press and hold the TIME SET button until the display flashes.
- Use the HOUR and MINUTE buttons to adjust the time.
- Press TIME SET again to confirm and exit time setting mode.
2. Setting Alarms (Alarm 1 and Alarm 2)
This unit features dual alarms, allowing you to set two independent wake-up times.
- Press and hold the ALARM 1 SET (or ALARM 2 SET) button until the alarm time flashes.
- Use the HOUR and MINUTE buttons to adjust the desired alarm time.
- Press ALARM 1 SET (or ALARM 2 SET) again to confirm the time.
- Immediately after confirming the time, use the ALARM MODE button to select the alarm source: BUZZER or RADIO.
- The alarm icon (e.g., AL1 or AL2) will appear on the display, indicating the alarm is active.
To turn off an alarm, press the corresponding ALARM 1 ON/OFF (or ALARM 2 ON/OFF) button. The alarm icon will disappear.
3. AM/FM Radio Operation
- Press the RADIO ON/OFF button to turn on the radio.
- Press the BAND button to switch between AM and FM bands.
- Use the TUNE + or TUNE - buttons to manually tune to a desired station.
- To automatically scan for the next available station, press and hold TUNE + or TUNE - for a few seconds.
- Adjust the volume using the VOLUME + or VOLUME - buttons.
- To turn off the radio, press the RADIO ON/OFF button again.
4. Snooze Function
When an alarm sounds, press the SNOOZE button to temporarily silence the alarm for approximately 9 minutes. The alarm will sound again after the snooze period.
5. Sleep Function
The sleep function allows the radio to play for a set duration before automatically turning off.
- While the radio is playing, press the SLEEP button repeatedly to cycle through available sleep times (e.g., 90, 60, 30, 15 minutes, OFF).
- The radio will automatically turn off after the selected time.
Maintenance
1. Cleaning
To clean the unit, wipe the exterior with a soft, slightly damp cloth. Do not use abrasive cleaners or solvents, as these may damage the finish. Ensure the unit is unplugged before cleaning.
2. Battery Replacement
If the battery backup function is not working, or if the unit loses time during a power outage, the backup batteries may need replacement. Follow the "Battery Backup Installation" steps in the Setup section to replace them.
Troubleshooting
| Problem | Possible Cause | Solution |
|---|---|---|
| Unit does not power on. | Power adapter not connected or faulty outlet. | Ensure power adapter is securely plugged into the unit and a working wall outlet. Try a different outlet. |
| Alarm does not sound. | Alarm not set, alarm volume too low, or alarm turned off. | Verify alarm time and source (buzzer/radio) are set correctly. Ensure alarm is activated (icon visible). Increase radio volume if alarm source is radio. |
| Poor radio reception. | Weak signal or interference. | Adjust the position of the unit or the antenna (if external). Move away from other electronic devices that may cause interference. |
| Time/settings lost after power outage. | Backup batteries are dead or not installed. | Install fresh backup batteries or replace existing ones. |
Specifications
- Model: C224B
- Power Source: AC 120V, 60Hz (main); Battery Powered (backup)
- Display Type: LED Digital Display
- Radio Bands: AM/FM
- Dimensions (Approx.): 5.12" W x 5.12" H
- Weight (Approx.): 3 Pounds
- Color: Black
- Material: Plastic
Warranty and Support
For warranty information or technical support, please refer to the warranty card included with your product or visit the official GPX website. Do not attempt to repair this unit yourself, as this may void your warranty.
GPX Official Website: www.gpx.com