1. Introduction
This manual provides detailed instructions for the setup, operation, and maintenance of your Sennheiser XSW 1-ME3-A Wireless Headmic Set. This system is designed for reliable wireless audio transmission within the 548-572 MHz frequency range, featuring an SK XSW bodypack transmitter, an ME 3-II cardioid head microphone, and an EM XSW 1 diversity receiver.
Please read this manual thoroughly before operating the device to ensure proper functionality and to prevent damage.
2. Components Included
The Sennheiser XSW 1-ME3-A Wireless Headmic Set includes the following components:
- 1 x EM-XSW 1 Diversity Receiver
- 1 x ME 3-II Cardioid Headset Microphone
- 1 x SK-XSW Bodypack Transmitter
- 1 x NT 12-5 CW Power Supply
- 2 x AA Batteries

Image: Overview of the Sennheiser XSW 1-ME3-A Wireless Headmic Set, showing the receiver, bodypack transmitter, and headset microphone.
3. Setup Guide
3.1. EM-XSW 1 Receiver Setup
- Positioning: Place the EM-XSW 1 receiver in a stable location, away from large metal objects or other wireless devices that may cause interference. Ensure the integrated antennas have a clear line of sight to the transmitter.
- Power Connection: Connect the NT 12-5 CW power supply to the "Power" input on the rear of the receiver. Plug the power supply into an AC outlet.
- Audio Output: Connect the receiver's audio output to your mixer or amplifier.
- For balanced output, use an XLR cable to connect the "Bal" output.
- For unbalanced output, use a 1/4" (6.3mm) jack cable to connect the "Unbal" output.
- Output Level Adjustment: Use the "Line/Mic" switch on the rear panel to select the appropriate output level for your connected device. "Line" is for line-level inputs, "Mic" is for microphone-level inputs.
- Squelch Adjustment (SQ): The "SQ" knob adjusts the squelch threshold. This helps to suppress noise when the transmitter signal is weak or absent. Adjust as needed to prevent unwanted noise.
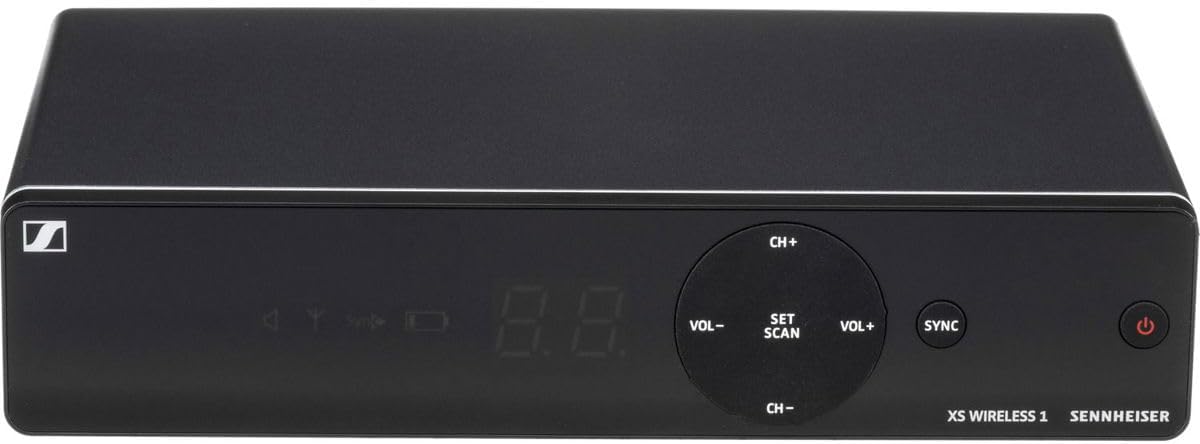
Image: Rear panel of the EM-XSW 1 receiver, showing balanced XLR, unbalanced 1/4" outputs, Line/Mic switch, Squelch control, and power input.
3.2. SK-XSW Bodypack Transmitter Setup
- Battery Installation: Open the battery compartment of the SK-XSW bodypack transmitter. Insert the two supplied AA batteries, observing correct polarity.
- Headset Microphone Connection: Connect the ME 3-II headset microphone to the input jack on the bodypack transmitter.

Image: The SK-XSW bodypack transmitter with its antenna and display, ready for battery and microphone connection.
3.3. ME 3-II Headset Microphone Placement
Position the ME 3-II headset microphone securely on your head. Adjust the microphone boom so that the microphone capsule is approximately 2-3 cm (1 inch) from the corner of your mouth, pointing towards it. Ensure the headset is comfortable and stable during use.

Image: The ME 3-II headset microphone, showing its adjustable boom and ear hooks for secure placement.
4. Operating Instructions
4.1. Powering On/Off
- Receiver: Press the power button on the front panel of the EM-XSW 1 receiver. The display will illuminate.
- Transmitter: Slide the power switch on the SK-XSW bodypack transmitter to the "ON" position. The display will show the current channel and battery status.
4.2. Automatic Frequency Management and Synchronization
The XSW 1 system features automatic frequency management for easy setup.
- Scan for Frequencies: On the EM-XSW 1 receiver, press the SET/SCAN button. The receiver will scan for available interference-free frequencies.
- Synchronize Transmitter: Once a frequency is found, the receiver display will prompt for synchronization. Hold the SK-XSW bodypack transmitter with its infrared window facing the receiver's infrared window (usually near the display). Press the SYNC button on the receiver. The frequency information will be transferred to the transmitter.
- Verification: After successful synchronization, the receiver's RF signal indicator and the transmitter's display will confirm the connection.

Image: Front panel of the EM-XSW 1 receiver, highlighting the SET/SCAN and SYNC buttons, along with channel and volume controls.
4.3. Manual Channel Selection (Optional)
If automatic scanning does not yield satisfactory results, you can manually select channels:
- On the EM-XSW 1 receiver, use the CH+ and CH- buttons to cycle through available channels.
- Once a desired channel is selected, perform the synchronization step (Section 4.2, Step 2) to transfer the channel to the transmitter.
4.4. Volume Control
Adjust the audio output level of the receiver using the VOL+ and VOL- buttons on the front panel of the EM-XSW 1 receiver. Monitor your mixer or amplifier's input levels to prevent clipping.
4.5. Mute Function
The SK-XSW bodypack transmitter features a mute switch. Slide the switch to mute or unmute the microphone. The transmitter's display will indicate the mute status.
5. Maintenance
5.1. Battery Replacement
The SK-XSW bodypack transmitter uses two AA batteries. When the battery indicator on the transmitter or receiver shows low power, replace both batteries with fresh alkaline batteries. Always dispose of used batteries responsibly.
5.2. Cleaning
- Clean the receiver and transmitter surfaces with a soft, dry cloth.
- For the headset microphone, gently wipe the boom and capsule with a slightly damp cloth. Avoid getting moisture into the microphone capsule.
- Do not use cleaning agents containing solvents or abrasive materials.
6. Troubleshooting
| Problem | Possible Cause | Solution |
|---|---|---|
| No sound or weak signal |
|
|
| Static or interference |
|
|
| Audio distortion |
|
|
7. Specifications
| Feature | Detail |
|---|---|
| Model Name | XSW 1-ME3-A |
| Frequency Range | 548-572 MHz (A Range) |
| Microphone Form Factor | Headset (ME 3-II cardioid) |
| Number of Channels | Up to 10 simultaneous channels |
| Signal-to-Noise Ratio | 103 dB |
| Power Source (Transmitter) | 2 AA batteries (included) |
| Power Source (Receiver) | DC 12V, 300mA (NT 12-5 CW power supply included) |
| Connectivity Technology | XLR (Balanced), 1/4" Jack (Unbalanced) |
| Item Weight | 2.8 pounds (total package) |
| Product Dimensions | 13.7 x 13.6 x 3.4 inches |
| Material | Plastic |
8. Warranty and Support
Sennheiser products are manufactured to high quality standards. For specific warranty information, please refer to the warranty card included with your product or visit the official Sennheiser website. For technical support, product registration, or service inquiries, please contact Sennheiser customer service or visit their support portal.
You can find more information and support resources on the Sennheiser Brand Store.