
1. Introduction
This manual provides detailed instructions for the setup, operation, and maintenance of your KINGDEL Mini PC HT690-N3150. This compact desktop computer is designed for various applications, including personal media, business, education, and office tasks, offering 4K triple-screen support and dual LAN connectivity.
2. Package Contents
Verify that all items listed below are present in your package:
- 1 x KINGDEL Mini PC
- 1 x Power Adapter
- 1 x Power Cable
- 1 x HD Cable
- Screws for installation
3. Product Overview
Familiarize yourself with the ports and components of your KINGDEL Mini PC.
3.1 Front Panel
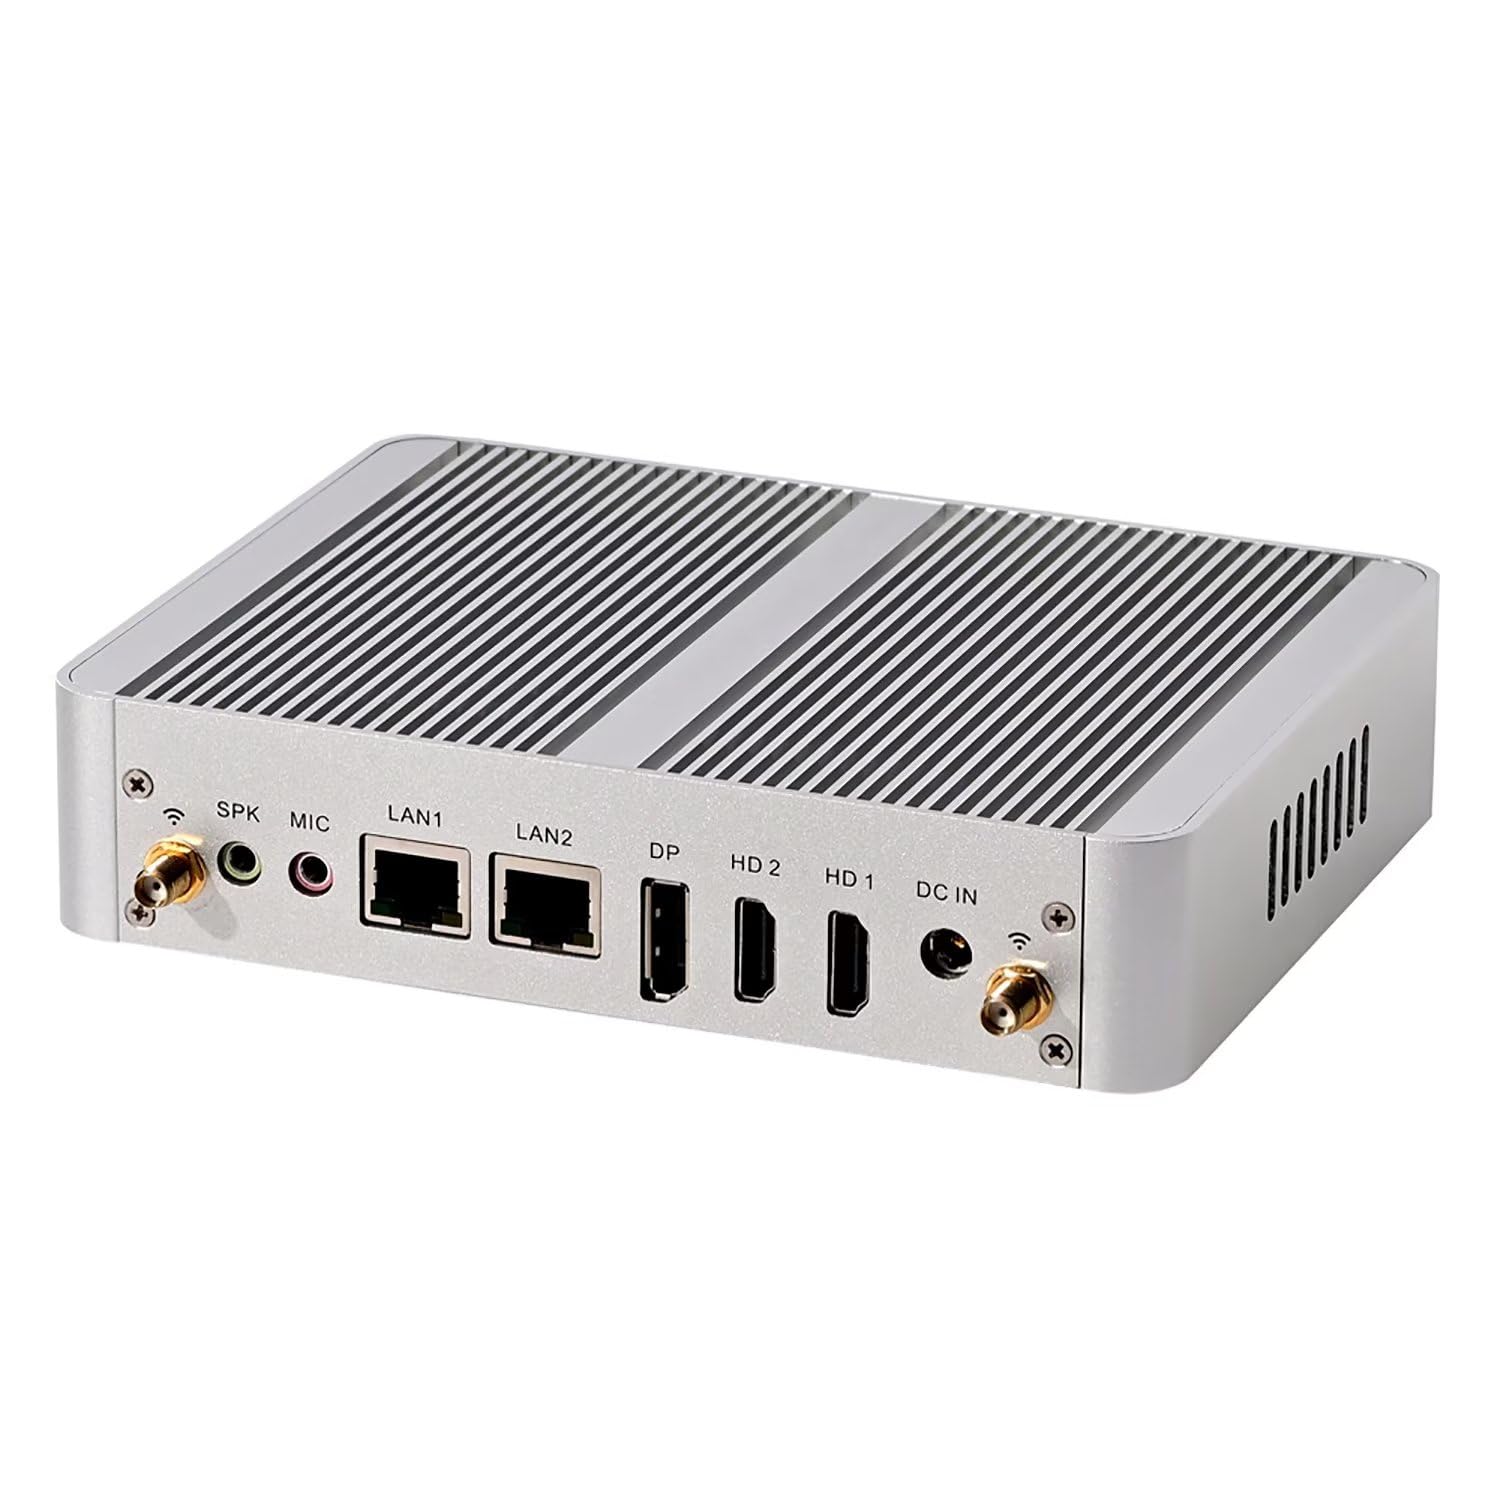
Image: Front view of the KINGDEL Mini PC, highlighting the power button and various USB ports for peripheral connections.
- Power Switch (SW): Used to turn the Mini PC on or off.
- USB 2.0 Ports (6x): For connecting standard USB devices.
- USB 3.0 Ports (2x): For high-speed data transfer with compatible USB 3.0 devices.
3.2 Rear Panel

Image: Rear view of the KINGDEL Mini PC, displaying the audio jacks, dual LAN ports, DisplayPort, HDMI ports, and DC power input.
- Audio Connectors (2x): For connecting speakers, headphones, or microphones.
- LAN Ports (2x): Gigabit Ethernet ports for wired network connections.
- DP Port (1x): DisplayPort for connecting a monitor, supporting 4K resolution.
- HD Ports (2x): HDMI ports for connecting monitors or TVs, supporting 4K resolution.
- 12V DC Input: Power input for the included power adapter.
3.3 Internal Components

Image: Internal view of the KINGDEL Mini PC, revealing the motherboard with the N100 processor, DDR4 RAM slot, and various storage interfaces.
- DDR4 RAM Slot (1x): Supports up to 16GB DDR4 3200MHz RAM.
- MSATA 3.0 Slot (1x): For mSATA SSD storage.
- SATA 3.0 Slot (1x): For 2.5-inch SATA SSD/HDD storage.
- M.2 NVMe SSD Slot (1x): For high-speed M.2 NVMe SSD storage.
- MINI PCIE Interfaces (2x): One full-height for mSATA SSD, one half-height for wireless network card.
4. Setup Instructions
4.1 Connecting Peripherals
- Connect your monitor(s) to the HD (HDMI) or DP (DisplayPort) ports on the rear panel. The Mini PC supports up to three 4K displays simultaneously.
- Connect your keyboard and mouse to any available USB ports on the front or rear panel.
- For wired network access, connect an Ethernet cable from your router/modem to one of the LAN ports. For wireless connectivity, ensure the internal wireless module is installed and external antennas (if applicable) are connected.
- Connect any other desired USB devices (e.g., external hard drives, printers) to the remaining USB ports.
4.2 Power Connection and Initial Boot
- Connect the power adapter to the 12V DC input port on the rear panel of the Mini PC.
- Plug the power cable into a wall outlet.
- Press the Power Switch (SW) on the front panel to turn on the Mini PC.
- The system will boot up. Follow any on-screen instructions for initial operating system setup.
4.3 Important DisplayPort (DP) Cable Information
The DP port on this Mini PC requires an "Active" type DisplayPort cable for proper display functionality. If you are using a "Passive" type DP cable, the display may not function correctly or at all. Ensure your DP cable is an active type for optimal performance.
5. Operating Instructions
5.1 Power On/Off
- To Power On: Press the Power Switch (SW) on the front panel.
- To Power Off: Initiate a shutdown from your operating system. Alternatively, press and hold the Power Switch for a few seconds for a forced shutdown (use only when necessary to prevent data loss).
5.2 Network Connectivity
- Wired Network: Connect an Ethernet cable to either of the two LAN ports. The system will automatically detect the connection.
- Wireless Network: If a wireless module is installed, the system will detect available Wi-Fi networks. Select your network and enter the password to connect.
5.3 Multi-Display Setup
The Mini PC supports up to three 4K displays simultaneously via its two HD (HDMI) ports and one DP (DisplayPort) port. After connecting your monitors, configure display settings within your operating system to extend or duplicate your desktop.
5.4 Advanced Features (BIOS)
The AMI EFI BIOS supports several advanced features:
- Power-on Startup: Configure the system to automatically power on when power is restored after an outage.
- PXE Boot: Enable network boot for operating system deployment.
- Wake-on-LAN (WoL): Allow the computer to be woken up remotely over a network connection.
Access the BIOS settings by pressing the designated key (usually Del or F2) during startup.
6. Maintenance and Upgrades
6.1 Fanless Design
The KINGDEL Mini PC features a fanless cooling design, utilizing its aluminum alloy case as a heatsink. This design ensures silent operation, reduces dust accumulation, and minimizes maintenance requirements related to cooling fans.
6.2 Storage and RAM Upgrades
The Mini PC offers flexibility for storage and RAM upgrades:
- RAM: The single DDR4 3200MHz RAM slot supports up to 16GB. You can replace the existing 8GB module with a higher capacity one if desired.
- Storage: The device includes a 128GB M.2 SSD. Additional storage options include an mSATA 3.0 slot and a SATA 3.0 slot for a 2.5-inch drive. Refer to the internal view image for slot locations.
Note: Upgrading internal components should be performed by users with appropriate technical knowledge to avoid damage.
6.3 Environmental Conditions
To ensure optimal performance and longevity, operate the Mini PC within the following environmental parameters:
- Operating Temperature: -10°C to 60°C (32°F to 140°F)
- Storage Temperature: -20°C to 80°C (-68°F to 176°F)
- Relative Humidity: 10% to 90% (non-condensing)
7. Troubleshooting
This section addresses common issues you might encounter with your KINGDEL Mini PC.
7.1 No Display Output
- Ensure all display cables (HD/DP) are securely connected to both the Mini PC and the monitor.
- Verify that the monitor is powered on and set to the correct input source.
- If using the DisplayPort (DP) connection, confirm that you are using an "Active" type DP cable. Passive cables may not work.
- Test with a different display cable or monitor if possible.
7.2 System Does Not Power On
- Check that the power adapter is firmly connected to both the Mini PC and a working electrical outlet.
- Ensure the power outlet is functional by testing it with another device.
- Press the power button firmly.
7.3 No Network Connection
- Wired: Verify the Ethernet cable is properly connected to both the Mini PC and your router/modem. Check the status lights on the LAN port.
- Wireless: Ensure the Wi-Fi module is enabled in your operating system settings. Check if other devices can connect to your Wi-Fi network.
8. Specifications
| Feature | Detail |
|---|---|
| Model Number | HT690-N3150 |
| Processor | Intel N100 (12th Gen Alder Lake-N), 4 Cores, 4 Threads, up to 3.4GHz, 6MB L3 Cache, 6W TDP |
| Processor Base Frequency | 3.2 GHz (advertised), 3.4 GHz Max Turbo Frequency |
| Graphics | UHD Graphics 730 (Alder Lake), 300 MHz Base, 750 MHz Burst Frequency |
| RAM | 8GB DDR4 (Single-channel, Max 3200MHz), 1x SODIMM slot, Up to 16GB supported |
| Storage | 128GB M.2 SSD, 1x mSATA 3.0 slot, 1x SATA 3.0 slot |
| Display Output | 2x HD (HDMI), 1x DP (DisplayPort), Supports 4K @ 60Hz Triple-Screen Display |
| Network | 2x Realtek 10/100/1000 Base-T LAN, Internal Wireless Module (802.11bgn) |
| Audio | ALC892 chip, 6-channel Sound effect |
| USB Ports | 6x USB 2.0 (Front), 2x USB 3.0 (Front) |
| Other Ports | 2x Audio Connector (Rear), 1x 12V DC Input |
| BIOS | AMI EFI BIOS, Supports Power-on Startup, PXE, Network Wake-up |
| Case Material | Aluminum Alloy |
| Product Dimensions | 170mm x 125mm x 50mm (6.7 x 5.1 x 1.4 inches) |
| Item Weight | Approximately 650g (2.2 pounds) |
| Operating System | OS (Pre-installed or user-installable) |
| Operating Temperature | -10°C to 60°C (32°F to 140°F) |
| Storage Temperature | -20°C to 80°C (-68°F to 176°F) |
| Relative Humidity | 10% to 90% (non-condensing) |
9. Warranty and Support
Information regarding product warranty and customer support was not provided in the available data. Please refer to the product packaging or the vendor's website for details on warranty coverage and how to obtain technical support.